Canon FAXPHONE L120 FAXPHONE L120 Software Guide - Page 24
Introduction, Printing, Troubleshooting, Appendix, Edit Watermark
 |
View all Canon FAXPHONE L120 manuals
Add to My Manuals
Save this manual to your list of manuals |
Page 24 highlights
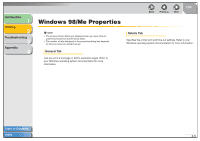
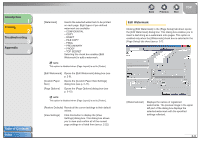
Introduction 1 Printing 2 Troubleshooting 3 Appendix 4 Table of Contents Index [Watermark] Inserts the selected watermark to be printed on each page. Eight types of pre-defined watermark are available: - CONFIDENTIAL - COPY - DRAFT - FILE COPY - FINAL - PRELIMINARY - PROOF - TOP SECRET Selecting this check box enables [Edit Watermark] to add a watermark. NOTE This option is disabled when [Page Layout] is set to [Poster]. [Edit Watermark] Opens the [Edit Watermark] dialog box (see p. 2-9). [Custom Paper Opens the [Custom Paper Size Settings] Size] dialog box (see p. 2-11). [Page Options] Opens the [Page Options] dialog box (see p. 2-12). NOTE This option is disabled when [Page Layout] is set to [Poster]. [Restore Defaults] Resets all the current settings to their default values. [View Settings] Click this button to display the [View Settings] dialog box. This dialog box allows you to view and confirm all of the current page settings in a listed from (see p. 2-22). Back Previous Next TOP Edit Watermark Clicking [Edit Watermark] in the [Page Setup] tab sheet opens the [Edit Watermark] dialog box. This dialog box enables you to insert a text string as a watermark onto pages. This option is enabled only when the [Watermark] check box is selected in the [Page Setup] tab sheet (see p. 2-7). [Watermark List] Displays the names of registered watermarks. The preview image in the upper left part of the dialog box displays the selected watermark with the specified settings reflected. 2-9
-
 1
1 -
2
-
3
-
4
-
5
-
6
-
7
-
8
-
9
-
10
-
11
-
12
-
13
-
14
-
15
-
16
-
17
-
18
-
 19
19 -
 20
20 -
 21
21 -
 22
22 -
 23
23 -
 24
24 -
 25
25 -
 26
26 -
 27
27 -
 28
28 -
 29
29 -
30
-
31
-
32
-
33
-
34
-
35
-
36
-
37
-
38
-
39
-
40
-
41
-
42
-
43
-
44
-
45
-
46
-
47
-
48
-
49
-
50
-
51
-
52
-
53
-
54
-
55
-
56
-
57
-
58
-
59
-
60
-
61
-
62
-
63
-
64
-
65
-
66
-
67
-
68
-
69
-
70
-
71
-
72
-
73
-
74
-
75
-
76
-
77
-
78
-
79
-
80
-
81
-
82
-
83
-
84
-
85
 |
 |