Canon MF6590 imageCLASS MF6500 Series Basic Operation Guide - Page 182
Scanning area, Platen glass, ADF Cleaning the ADF Manually - platen glass dirty
 |
UPC - 013803082043
View all Canon MF6590 manuals
Add to My Manuals
Save this manual to your list of manuals |
Page 182 highlights
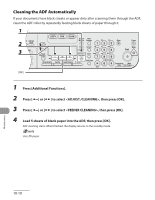
Scanning area 3 Close the ADF. Keep the scanning area clean to avoid dirty copies or faxes to be sent. ● Platen glass 1 Open the ADF. 2 Clean the platen glass and the underside of the ADF with a cloth dampened with water. Then wipe the area with a soft, dry cloth. Be careful not to get your fingers caught. ● ADF (Cleaning the ADF Manually) If your documents have black streaks or appear dirty after copying them using the ADF, this may be caused by pencil lead rubbing off the documents and onto the roller. Clean the ADF scanning area, film, and roller. 1 Turn off the main power switch and disconnect the power cord. 2 Open the ADF cover. Do not dampen the cloth too much, as this may tear the document or damage the machine. Maintenance 10-7
-
 1
1 -
2
-
3
-
4
-
5
-
6
-
7
-
8
-
9
-
10
-
11
-
12
-
13
-
14
-
15
-
16
-
17
-
18
-
19
-
20
-
21
-
22
-
23
-
24
-
25
-
26
-
27
-
28
-
29
-
30
-
31
-
32
-
33
-
34
-
35
-
36
-
37
-
38
-
39
-
40
-
41
-
42
-
43
-
44
-
45
-
46
-
47
-
48
-
49
-
50
-
51
-
52
-
53
-
54
-
55
-
56
-
57
-
58
-
59
-
60
-
61
-
62
-
63
-
64
-
65
-
66
-
67
-
68
-
69
-
70
-
71
-
72
-
73
-
74
-
75
-
76
-
77
-
78
-
79
-
80
-
81
-
82
-
83
-
84
-
85
-
86
-
87
-
88
-
89
-
90
-
91
-
92
-
93
-
94
-
95
-
96
-
97
-
98
-
99
-
100
-
101
-
102
-
103
-
104
-
105
-
106
-
107
-
108
-
109
-
110
-
111
-
112
-
113
-
114
-
115
-
116
-
117
-
118
-
119
-
120
-
121
-
122
-
123
-
124
-
125
-
126
-
127
-
128
-
129
-
130
-
131
-
132
-
133
-
134
-
135
-
136
-
137
-
138
-
139
-
140
-
141
-
142
-
143
-
144
-
145
-
146
-
147
-
148
-
149
-
150
-
151
-
152
-
153
-
154
-
155
-
156
-
157
-
158
-
159
-
160
-
161
-
162
-
163
-
164
-
165
-
166
-
167
-
168
-
169
-
170
-
171
-
172
-
173
-
174
-
175
-
176
-
 177
177 -
 178
178 -
 179
179 -
 180
180 -
 181
181 -
 182
182 -
 183
183 -
 184
184 -
 185
185 -
 186
186 -
 187
187 -
188
-
189
-
190
-
191
-
192
-
193
-
194
-
195
-
196
-
197
-
198
-
199
-
200
-
201
-
202
-
203
-
204
-
205
-
206
-
207
-
208
-
209
-
210
-
211
-
212
-
213
-
214
-
215
-
216
-
217
-
218
-
219
-
220
-
221
-
222
-
223
-
224
-
225
-
226
-
227
-
228
-
229
-
230
-
231
-
232
-
233
-
234
-
235
-
236
-
237
-
238
-
239
-
240
-
241
-
242
-
243
-
244
-
245
-
246
-
247
-
248
-
249
-
250
-
251
-
252
-
253
-
254
-
255
-
256
-
257
-
258
-
259
-
260
-
261
-
262
-
263
-
264
-
265
-
266
-
267
-
268
-
269
-
270
 |
 |

10-7
Maintenance
Scanning area
Keep the scanning area clean to avoid dirty
copies or faxes to be sent.
Platen glass
1
Open the ADF.
2
Clean the platen glass and the
underside of the ADF with a cloth
dampened with water. Then wipe
the area with a soft, dry cloth.
Do not dampen the cloth too much, as this
may tear the document or damage the
machine.
●
3
Close the ADF.
Be careful not to get your fingers caught.
ADF (Cleaning the ADF Manually)
If your documents have black streaks or
appear dirty after copying them using the
ADF, this may be caused by pencil lead
rubbing off the documents and onto the
roller. Clean the ADF scanning area, film,
and roller.
1
Turn off the main power switch
and disconnect the power cord.
2
Open the ADF cover.
●