Canon PowerShot A570IS Software Starter Guide For the Canon Digital Camera Sol - Page 16
Uninstalling the Software, Camera User Guide - utilities disk
 |
UPC - 013803078442
View all Canon PowerShot A570IS manuals
Add to My Manuals
Save this manual to your list of manuals |
Page 16 highlights
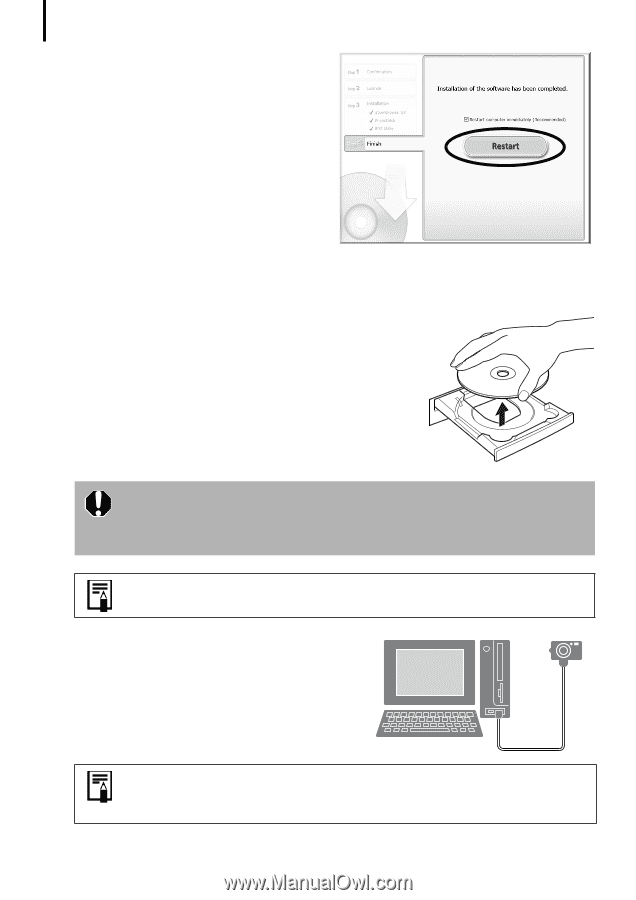
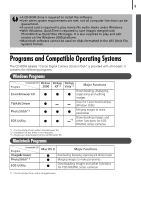
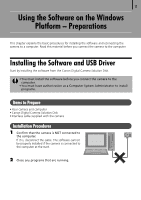
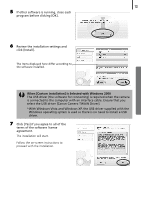
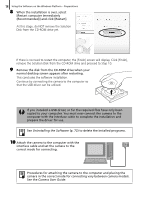
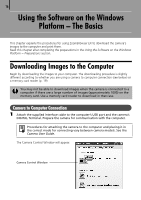
14 Using the Software on the Windows Platform - Preparations 8 When the installation is over, select [Restart computer immediately (Recommended)] and click [Restart]. AtÅthisÅstage,ÅdoÅNOTÅremoveÅtheÅSolutionÅ DiskÅfromÅtheÅCD-ROMÅdriveÅyet. IfÅthereÅisÅnoÅneedÅtoÅrestartÅtheÅcomputer,ÅtheÅ[Finish]ÅscreenÅwillÅdisplay.ÅClickÅ[Finish],Å removeÅtheÅSolutionÅDiskÅfromÅtheÅCD-ROMÅdriveÅandÅproceedÅtoÅStepÅ10. 9 Remove the disk from the CD-ROM drive when your normal desktop screen appears after restarting. ThisÅconcludesÅtheÅsoftwareÅinstallation.Å ContinueÅbyÅconnectingÅtheÅcameraÅtoÅtheÅcomputerÅsoÅ thatÅtheÅUSBÅdriverÅcanÅbeÅutilized.Å If you installed a USB driver, so far the required files have only been copied to your computer. You must now connect the camera to the computer with the interface cable to complete the installation and prepare the driver for use. See Uninstalling the Software (p. 72) to delete the installed programs. 10 Attach the camera to the computer with the interface cable and set the camera to the correct mode for connecting. Procedures for attaching the camera to the computer and placing the camera in the correct mode for connecting vary between camera models. See the Camera User Guide.
-
 1
1 -
2
-
3
-
4
-
5
-
6
-
7
-
8
-
9
-
10
-
 11
11 -
 12
12 -
 13
13 -
 14
14 -
 15
15 -
 16
16 -
 17
17 -
 18
18 -
 19
19 -
 20
20 -
 21
21 -
22
-
23
-
24
-
25
-
26
-
27
-
28
-
29
-
30
-
31
-
32
-
33
-
34
-
35
-
36
-
37
-
38
-
39
-
40
-
41
-
42
-
43
-
44
-
45
-
46
-
47
-
48
-
49
-
50
-
51
-
52
-
53
-
54
-
55
-
56
-
57
-
58
-
59
-
60
-
61
-
62
-
63
-
64
-
65
-
66
-
67
-
68
-
69
-
70
-
71
-
72
-
73
-
74
-
75
-
76
-
77
-
78
-
79
-
80
-
81
-
82
-
83
-
84
-
85
-
86
-
87
-
88
-
89
-
90
 |
 |