Canon PowerShot A570IS Software Starter Guide For the Canon Digital Camera Sol - Page 65
Preparing for Remote Shooting - how to remove covers
 |
UPC - 013803078442
View all Canon PowerShot A570IS manuals
Add to My Manuals
Save this manual to your list of manuals |
Page 65 highlights
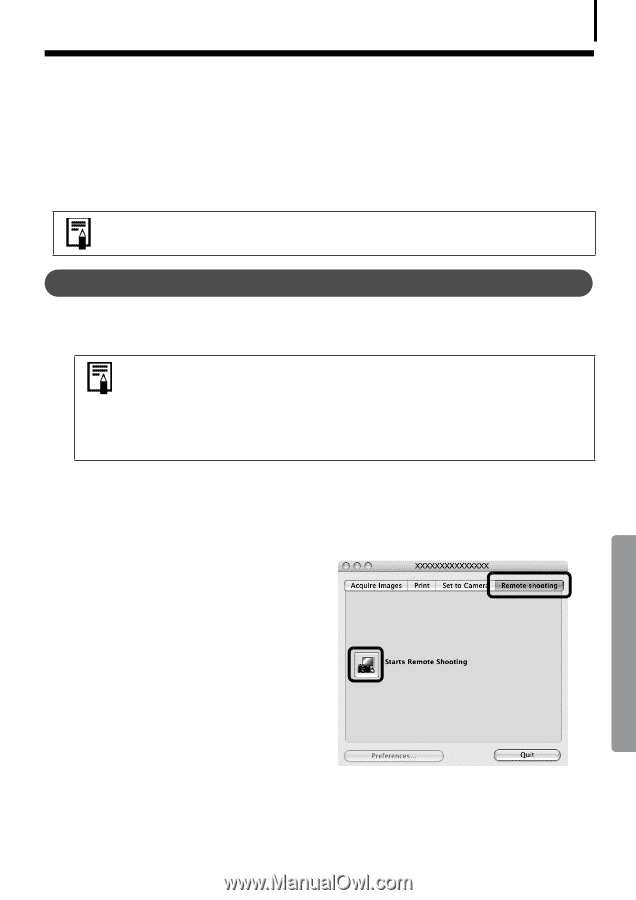
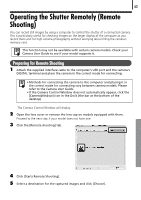
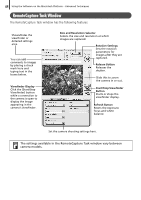
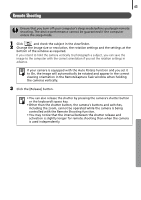
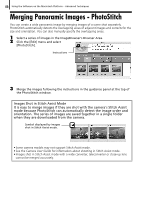
63 Operating the Shutter Remotely (Remote Shooting) YouÅcanÅrecordÅstillÅimagesÅbyÅusingÅaÅcomputerÅtoÅcontrolÅtheÅshutterÅofÅaÅconnectedÅcamera.Å ThisÅisÅparticularlyÅusefulÅforÅcheckingÅimagesÅonÅtheÅlargerÅdisplayÅofÅtheÅcomputerÅasÅyouÅ recordÅthemÅandÅforÅhighÅvolumeÅphotographyÅwithoutÅworryingÅaboutÅfillingÅtheÅcamera'sÅ memoryÅcard. This function may not be available with certain camera models. Check your Camera User Guide to see if your model supports it. Preparing for Remote Shooting 1 Attach the supplied interface cable to the computer's USB port and the camera's DIGITAL terminal and place the camera in the correct mode for connecting. • Methods for connecting the camera to the computer and placing it in the correct mode for connecting vary between camera models. Please refer to the Camera User Guide. • If the Camera Control Window does not automatically appear, click the [CameraWindow] icon in the Dock (the bar at the bottom of the desktop). TheÅCameraÅControlÅWindowÅwillÅdisplay.Å 2 Open the lens cover or remove the lens cap on models equipped with them. ProceedÅtoÅtheÅnextÅstepÅifÅyourÅmodelÅdoesÅnotÅhaveÅone.Å 3 Click the [Remote shooting] tab. 4 Click [Starts Remote Shooting]. 5 Select a destination for the captured images and click [Choose].
-
 1
1 -
2
-
3
-
4
-
5
-
6
-
7
-
8
-
9
-
10
-
11
-
12
-
13
-
14
-
15
-
16
-
17
-
18
-
19
-
20
-
21
-
22
-
23
-
24
-
25
-
26
-
27
-
28
-
29
-
30
-
31
-
32
-
33
-
34
-
35
-
36
-
37
-
38
-
39
-
40
-
41
-
42
-
43
-
44
-
45
-
46
-
47
-
48
-
49
-
50
-
51
-
52
-
53
-
54
-
55
-
56
-
57
-
58
-
59
-
 60
60 -
 61
61 -
 62
62 -
 63
63 -
 64
64 -
 65
65 -
 66
66 -
 67
67 -
 68
68 -
 69
69 -
 70
70 -
71
-
72
-
73
-
74
-
75
-
76
-
77
-
78
-
79
-
80
-
81
-
82
-
83
-
84
-
85
-
86
-
87
-
88
-
89
-
90
 |
 |