Canon PowerShot A570IS Software Starter Guide For the Canon Digital Camera Sol - Page 80
Maintenance], [System], [Hardware] tab, and the [Device Manager] button. - not recognized by computer
 |
UPC - 013803078442
View all Canon PowerShot A570IS manuals
Add to My Manuals
Save this manual to your list of manuals |
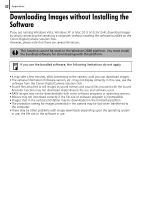
Page 80 highlights
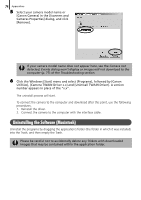
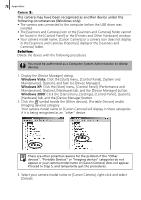
78 Appendices Cause 2: The camera may have been recognized as another device under the following circumstances (Windows only). • TheÅcameraÅwasÅconnectedÅtoÅtheÅcomputerÅbeforeÅtheÅUSBÅdriverÅwasÅ installed. • TheÅ[ScannersÅandÅCameras]ÅiconÅorÅtheÅ[ScannersÅandÅCameras]ÅfolderÅcannotÅ beÅfoundÅinÅtheÅ[ControlÅPanel]ÅorÅtheÅ[PrintersÅandÅOtherÅHardware]Åwindow. • YourÅcameraÅmodelÅname,Å[CanonÅCamera]ÅorÅaÅcameraÅiconÅdoesÅnotÅdisplayÅ inÅtheÅ[ScannersÅandÅCamerasÅProperties]ÅdialogÅorÅtheÅ[ScannersÅandÅ Cameras]Åfolder. Solution: DeleteÅtheÅdeviceÅwithÅtheÅfollowingÅprocedures.Å Å You must be authorized as a Computer System Administrator to delete devices. 1. DisplayÅtheÅ[DeviceÅManager]Ådialog. Windows Vista: ClickÅtheÅ[Start]Åmenu,Å[ControlÅPanel],Å[SystemÅandÅ Maintenance],Å[System],ÅandÅTaskÅlistÅ[DeviceÅManager]. Windows XP: ClickÅtheÅ[Start]Åmenu,Å[ControlÅPanel],Å[PerformanceÅandÅ Maintenance],Å[System],Å[Hardware]Åtab,ÅandÅtheÅ[DeviceÅManager]Åbutton. Windows 2000: ClickÅtheÅ[Start]Åmenu,Å[Settings],Å[ControlÅPanel],Å[System],Å [Hardware]Åtab,ÅandÅtheÅ[DeviceÅManager]Åbutton. 2. ClickÅtheÅ ÅsymbolÅbesideÅtheÅ[OtherÅdevices],Å[PortableÅDevices]Åand/orÅ [ImagingÅdevices]Åcategory. YourÅcameraÅmodelÅnameÅorÅ[CanonÅCamera]ÅwillÅdisplayÅinÅtheseÅcategoriesÅ ifÅitÅisÅbeingÅrecognizedÅasÅanÅ"other"Ådevice. There are other potential reasons for the problem if the "Other devices", "Portable Devices" or "Imaging devices" categories do not appear or your camera model name or [Canon Camera] does not appear. Proceed to Step 5, and temporarily quit the procedures. 3. SelectÅyourÅcameraÅmodelÅnameÅorÅ[CanonÅCamera],Åright-clickÅandÅselectÅ [Delete].
-
 1
1 -
2
-
3
-
4
-
5
-
6
-
7
-
8
-
9
-
10
-
11
-
12
-
13
-
14
-
15
-
16
-
17
-
18
-
19
-
20
-
21
-
22
-
23
-
24
-
25
-
26
-
27
-
28
-
29
-
30
-
31
-
32
-
33
-
34
-
35
-
36
-
37
-
38
-
39
-
40
-
41
-
42
-
43
-
44
-
45
-
46
-
47
-
48
-
49
-
50
-
51
-
52
-
53
-
54
-
55
-
56
-
57
-
58
-
59
-
60
-
61
-
62
-
63
-
64
-
65
-
66
-
67
-
68
-
69
-
70
-
71
-
72
-
73
-
74
-
 75
75 -
 76
76 -
 77
77 -
 78
78 -
 79
79 -
 80
80 -
 81
81 -
 82
82 -
 83
83 -
 84
84 -
 85
85 -
86
-
87
-
88
-
89
-
90
 |
 |