Canon PowerShot SD890 IS PowerShot SD890 IS / DIGITAL IXUS 970 IS Camera User - Page 63
LCD Monitor Brightness Settings, Night Display
 |
View all Canon PowerShot SD890 IS manuals
Add to My Manuals
Save this manual to your list of manuals |
Page 63 highlights
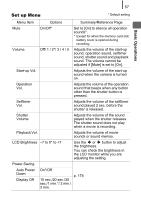
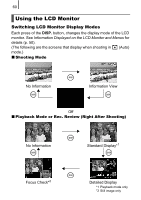
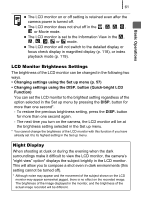
Basic Operations 61 z The LCD monitor on or off setting is retained even after the camera power is turned off. z The LCD monitor does not shut off in the , , , , or Movie mode. z The LCD monitor is set to the Information View in the , , , , or mode. z The LCD monitor will not switch to the detailed display or focus check display in magnified display (p. 118), or index playback mode (p. 119). LCD Monitor Brightness Settings The brightness of the LCD monitor can be changed in the following two ways. • Changing settings using the Set up menu (p. 57) • Changing settings using the DISP. button (Quick-bright LCD Function) You can set the LCD monitor to the brightest setting regardless of the option selected in the Set up menu by pressing the DISP. button for more than one second*. - To restore the previous brightness setting, press the DISP. button for more than one second again. - The next time you turn on the camera, the LCD monitor will be at the brightness setting selected in the Set up menu. * You cannot change the brightness of the LCD monitor with this function if you have already set it to its highest setting in the Set up menu. Night Display When shooting at dusk or during the evening when the dark surroundings make it difficult to view the LCD monitor, the camera's "night view" option* displays the subject brightly in the LCD monitor. This will allow you to compose a shot even in dark environments (this setting cannot be turned off). * Although noise may appear and the movement of the subject shown on the LCD monitor may appear somewhat jagged, there is no effect on the recorded image. The brightness of the image displayed in the monitor, and the brightness of the actual image recorded will be different.
-
 1
1 -
2
-
3
-
4
-
5
-
6
-
7
-
8
-
9
-
10
-
11
-
12
-
13
-
14
-
15
-
16
-
17
-
18
-
19
-
20
-
21
-
22
-
23
-
24
-
25
-
26
-
27
-
28
-
29
-
30
-
31
-
32
-
33
-
34
-
35
-
36
-
37
-
38
-
39
-
40
-
41
-
42
-
43
-
44
-
45
-
46
-
47
-
48
-
49
-
50
-
51
-
52
-
53
-
54
-
55
-
56
-
57
-
 58
58 -
 59
59 -
 60
60 -
 61
61 -
 62
62 -
 63
63 -
 64
64 -
 65
65 -
 66
66 -
 67
67 -
 68
68 -
69
-
70
-
71
-
72
-
73
-
74
-
75
-
76
-
77
-
78
-
79
-
80
-
81
-
82
-
83
-
84
-
85
-
86
-
87
-
88
-
89
-
90
-
91
-
92
-
93
-
94
-
95
-
96
-
97
-
98
-
99
-
100
-
101
-
102
-
103
-
104
-
105
-
106
-
107
-
108
-
109
-
110
-
111
-
112
-
113
-
114
-
115
-
116
-
117
-
118
-
119
-
120
-
121
-
122
-
123
-
124
-
125
-
126
-
127
-
128
-
129
-
130
-
131
-
132
-
133
-
134
-
135
-
136
-
137
-
138
-
139
-
140
-
141
-
142
-
143
-
144
-
145
-
146
-
147
-
148
-
149
-
150
-
151
-
152
-
153
-
154
-
155
-
156
-
157
-
158
-
159
-
160
-
161
-
162
-
163
-
164
-
165
-
166
-
167
-
168
-
169
-
170
-
171
-
172
-
173
-
174
-
175
-
176
-
177
-
178
-
179
-
180
-
181
-
182
-
183
-
184
-
185
-
186
-
187
-
188
-
189
-
190
-
191
-
192
-
193
-
194
-
195
-
196
-
197
-
198
-
199
-
200
-
201
-
202
-
203
-
204
-
205
-
206
-
207
-
208
-
209
-
210
-
211
-
212
-
213
-
214
-
215
-
216
-
217
-
218
-
219
-
220
-
221
-
222
-
223
-
224
-
225
-
226
-
227
-
228
-
229
-
230
-
231
-
232
-
233
-
234
-
235
-
236
-
237
-
238
-
239
-
240
-
241
-
242
-
243
-
244
 |
 |