Canon imageCLASS MF5770 imageCLASS MF5700 Series Basic Guide - Page 61
Making Copies
 |
View all Canon imageCLASS MF5770 manuals
Add to My Manuals
Save this manual to your list of manuals |
Page 61 highlights
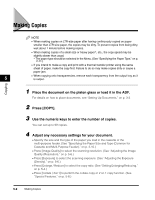
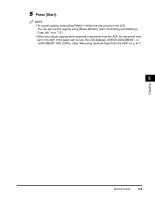
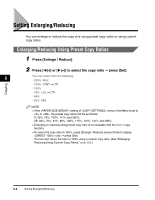
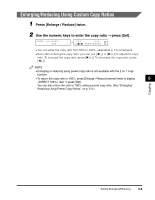
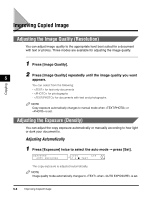
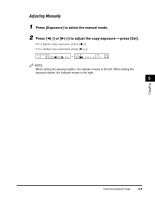
Making Copies NOTE • When making copies on LTR-size paper after having continuously copied on paper smaller than LTR-size paper, the copies may be dirty. To prevent copies from being dirty, wait about 1 minute before making copies. • When making copies of a small size or heavy paper*, etc., the copy speed may be slightly slower than usual. * The paper type should be selected in the Menu. (See "Specifying the Paper Type," on p. 2-11.) • If you intend to make a copy and print with a thermal transfer printer using the same sheet of paper, make the copy first. Failure to do so may make copies dirty or cause a paper jam. 5 • When copying onto transparencies, remove each transparency from the output tray as it is output. Copying 1 Place the document on the platen glass or load it in the ADF. For details on how to place documents, see "Setting Up Documents," on p. 3-3. 2 Press [COPY]. 3 Use the numeric keys to enter the number of copies. You can set up to 99 copies. 4 Adjust any necessary settings for your document. • Specify the size and the type of the paper you load in the cassette or the multi-purpose feeder. (See "Specifying the Paper Size and Type (Common for Cassette and Multi-Purpose Feeder)," on p. 2-10.) • Press [Image Quality] to select the scanning resolution. (See "Adjusting the Image Quality (Resolution)," on p. 5-6.) • Press [Exposure] to select the scanning exposure. (See "Adjusting the Exposure (Density)," on p. 5-6.) • Press [Enlarge / Reduce] to select the copy ratio. (See "Setting Enlarging/Reducing," on p. 5-4.) • Press [Collate / 2on1] to perform the collate copy or 2 on 1 copy function. (See "Special Features," on p. 5-8.) 5-2 Making Copies
-
 1
1 -
2
-
3
-
4
-
5
-
6
-
7
-
8
-
9
-
10
-
11
-
12
-
13
-
14
-
15
-
16
-
17
-
18
-
19
-
20
-
21
-
22
-
23
-
24
-
25
-
26
-
27
-
28
-
29
-
30
-
31
-
32
-
33
-
34
-
35
-
36
-
37
-
38
-
39
-
40
-
41
-
42
-
43
-
44
-
45
-
46
-
47
-
48
-
49
-
50
-
51
-
52
-
53
-
54
-
55
-
 56
56 -
 57
57 -
 58
58 -
 59
59 -
 60
60 -
 61
61 -
 62
62 -
 63
63 -
 64
64 -
 65
65 -
 66
66 -
67
-
68
-
69
-
70
-
71
-
72
-
73
-
74
-
75
-
76
-
77
-
78
-
79
-
80
-
81
-
82
-
83
-
84
-
85
-
86
-
87
-
88
-
89
-
90
-
91
-
92
-
93
-
94
-
95
-
96
-
97
-
98
-
99
-
100
-
101
-
102
-
103
-
104
-
105
-
106
-
107
-
108
-
109
-
110
-
111
-
112
-
113
-
114
-
115
-
116
-
117
-
118
-
119
-
120
-
121
-
122
-
123
-
124
-
125
-
126
-
127
-
128
-
129
-
130
-
131
-
132
-
133
-
134
-
135
-
136
-
137
-
138
-
139
 |
 |