Canon imageCLASS MF5770 imageCLASS MF5700 Series Basic Guide - Page 72
Adjust any necessary settings for your document., Press [Start].
 |
View all Canon imageCLASS MF5770 manuals
Add to My Manuals
Save this manual to your list of manuals |
Page 72 highlights
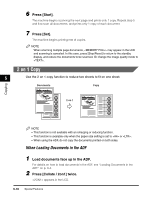
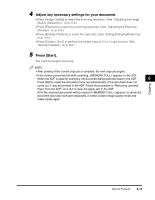
4 Adjust any necessary settings for your document. • Press [Image Quality] to select the scanning resolution. (See "Adjusting the Image Quality (Resolution)," on p. 5-6.) • Press [Exposure] to select the scanning exposure. (See "Adjusting the Exposure (Density)," on p. 5-6.) • Press [Enlarge / Reduce] to select the copy ratio. (See "Setting Enlarging/Reducing," on p. 5-4.) • Press [Collate / 2on1] to perform the collate copy or 2 on 1 copy function. (See "Special Features," on p. 5-8.) 5 Press [Start]. The machine begins scanning. NOTE • After printing of the current copy job is complete, the next copy job begins. • If the memory becomes full while scanning, appears in the LCD. When the ADF is used for scanning, the document being scanned stops in the ADF. 5 Press [Set] to make the document come out automatically. If the document does not come out, it may be jammed in the ADF. Follow the procedure in "Removing Jammed Paper from the ADF," on p. 9-7 to clear the paper jam in the ADF. All of the scanned documents will be erased if appears, so divide the document and copy each part separately, or select a lower image quality mode and make copies again. Copying Special Features 5-13
-
 1
1 -
2
-
3
-
4
-
5
-
6
-
7
-
8
-
9
-
10
-
11
-
12
-
13
-
14
-
15
-
16
-
17
-
18
-
19
-
20
-
21
-
22
-
23
-
24
-
25
-
26
-
27
-
28
-
29
-
30
-
31
-
32
-
33
-
34
-
35
-
36
-
37
-
38
-
39
-
40
-
41
-
42
-
43
-
44
-
45
-
46
-
47
-
48
-
49
-
50
-
51
-
52
-
53
-
54
-
55
-
56
-
57
-
58
-
59
-
60
-
61
-
62
-
63
-
64
-
65
-
66
-
 67
67 -
 68
68 -
 69
69 -
 70
70 -
 71
71 -
 72
72 -
 73
73 -
 74
74 -
 75
75 -
 76
76 -
 77
77 -
78
-
79
-
80
-
81
-
82
-
83
-
84
-
85
-
86
-
87
-
88
-
89
-
90
-
91
-
92
-
93
-
94
-
95
-
96
-
97
-
98
-
99
-
100
-
101
-
102
-
103
-
104
-
105
-
106
-
107
-
108
-
109
-
110
-
111
-
112
-
113
-
114
-
115
-
116
-
117
-
118
-
119
-
120
-
121
-
122
-
123
-
124
-
125
-
126
-
127
-
128
-
129
-
130
-
131
-
132
-
133
-
134
-
135
-
136
-
137
-
138
-
139
 |
 |