Canon imageCLASS MF5770 imageCLASS MF5700 Series Basic Guide - Page 68
When Placing a Document on the Platen Glass, Press [Collate / 2on1].
 |
View all Canon imageCLASS MF5770 manuals
Add to My Manuals
Save this manual to your list of manuals |
Page 68 highlights
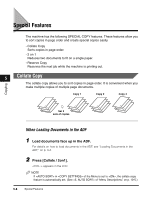
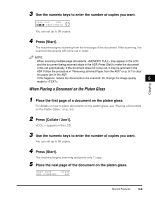
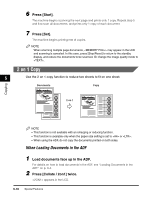
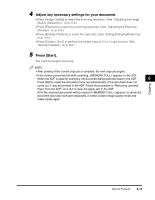
Copying 3 Use the numeric keys to enter the number of copies you want. 03 1 0 0 % C O L . L T R TEXT/PHOTO You can set up to 99 copies. 4 Press [Start]. The machine begins scanning from the first page of the document. After scanning, the scanned documents will come out in order. NOTE When scanning multiple page documents, may appear in the LCD, and the document being scanned stops in the ADF. Press [Set] to make the document come out automatically. If the document does not come out, it may be jammed in the ADF. Follow the procedure in "Removing Jammed Paper from the ADF," on p. 9-7 to clear the paper jam in the ADF. If this happens, reduce the documents to be scanned. Or, change the image quality 5 mode to . When Placing a Document on the Platen Glass 1 Place the first page of a document on the platen glass. For details on how to place documents on the platen glass, see "Placing a Document on the Platen Glass," on p. 3-3. 2 Press [Collate / 2on1]. appears in the LCD. 3 Use the numeric keys to enter the number of copies you want. You can set up to 99 copies. 4 Press [Start]. The machine begins scanning and prints only 1 copy. 5 Place the next page of the document on the platen glass. NEXT PAGE :START END SCANNING :SET Special Features 5-9
-
 1
1 -
2
-
3
-
4
-
5
-
6
-
7
-
8
-
9
-
10
-
11
-
12
-
13
-
14
-
15
-
16
-
17
-
18
-
19
-
20
-
21
-
22
-
23
-
24
-
25
-
26
-
27
-
28
-
29
-
30
-
31
-
32
-
33
-
34
-
35
-
36
-
37
-
38
-
39
-
40
-
41
-
42
-
43
-
44
-
45
-
46
-
47
-
48
-
49
-
50
-
51
-
52
-
53
-
54
-
55
-
56
-
57
-
58
-
59
-
60
-
61
-
62
-
 63
63 -
 64
64 -
 65
65 -
 66
66 -
 67
67 -
 68
68 -
 69
69 -
 70
70 -
 71
71 -
 72
72 -
 73
73 -
74
-
75
-
76
-
77
-
78
-
79
-
80
-
81
-
82
-
83
-
84
-
85
-
86
-
87
-
88
-
89
-
90
-
91
-
92
-
93
-
94
-
95
-
96
-
97
-
98
-
99
-
100
-
101
-
102
-
103
-
104
-
105
-
106
-
107
-
108
-
109
-
110
-
111
-
112
-
113
-
114
-
115
-
116
-
117
-
118
-
119
-
120
-
121
-
122
-
123
-
124
-
125
-
126
-
127
-
128
-
129
-
130
-
131
-
132
-
133
-
134
-
135
-
136
-
137
-
138
-
139
 |
 |