D-Link DES-3326SRM Product Manual
D-Link DES-3326SRM - Switch - Stackable Manual
 |
UPC - 790069255304
View all D-Link DES-3326SRM manuals
Add to My Manuals
Save this manual to your list of manuals |
D-Link DES-3326SRM manual content summary:
- D-Link DES-3326SRM | Product Manual - Page 1
D-Link ™ DES-3326S 24-Port Layer 3 Stackable Switch Manual May 2005 651ES3326S055 - D-Link DES-3326SRM | Product Manual - Page 2
D-Link DES-3326S Layer 3 Switch Information in this document is subject to change without notice. © 2005 D-Link Corporation. All rights reserved. Reproduction in any manner whatsoever without the written permission of D-Link Corporation is strictly forbidden. Trademarks used in this text: D-Link, - D-Link DES-3326SRM | Product Manual - Page 3
Devices to the Switch 29 Switch Management 30 Before You Start ...30 General Deployment Strategy 31 Web-based User Interface 32 Basic Setup...34 Switch Information ...34 Switch IP Settings ...35 User Accounts Management 37 Admin and User Privileges 39 Saving Changes ...40 Factory Reset...40 - D-Link DES-3326SRM | Product Manual - Page 4
Mode...42 Port Configuration 45 Configure Ports ...46 Traffic Segmentation...50 Link Aggregation ...51 Configure Link Aggregation 52 Port Mirroring ... STP Switch Settings 62 STP Port Settings ...64 Quality of Service Configuration 66 Configure QoS Output Scheduling 67 Configure 802.1p User - D-Link DES-3326SRM | Product Manual - Page 5
Status 124 Switch History ...125 Switch Utilities ...126 TFTP Services...126 Ping Test...128 DHCP, BOOTP and DNS Relay 129 VLANs and IP Interfaces 133 Understanding 802.1Q VLANs 133 Configure VLANs 137 Configure 802.1Q Static VLANs 137 802.1Q Port Settings...140 Switch GVRP ...141 - D-Link DES-3326SRM | Product Manual - Page 6
...203 Internet Group Management Protocol (IGMP 204 Multicast Routing Protocols 206 Routing Protocols...207 Glossary...210 LIMITED WARRANTY 212 FCC Warning ...214 Product Registration 218 D-Link Europe Limited Product Warranty 219 International Offices ...230 - D-Link DES-3326SRM | Product Manual - Page 7
Manual D-Link DES-3326S Layer 3 Switch This manual is organized to provide basic setup information in the beginning chapters, followed by presentation of more complex material concerning Layer 2 and Later 3 switching how to avoid the problem. CAUTION: A CAUTION indicates a potential for property damage, - D-Link DES-3326SRM | Product Manual - Page 8
D-Link DES-3326S Layer 3 Switch Safety Instructions Use the following safety guidelines to ensure your own personal safety and to help protect your system from potential damage. Throughout this safety section, the caution icon ( ) is used to indicate cautions and precautions that you need to review - D-Link DES-3326SRM | Product Manual - Page 9
D-Link DES-3326S Layer 3 Switch • Position system cables and power , "component" refers to any system as well as to various peripherals or supporting hardware. CAUTION: Installing systems in a rack without the front and side stabilizers on any component when servicing other components in a rack. ix - D-Link DES-3326SRM | Product Manual - Page 10
D-Link DES-3326S Layer 3 Switch NOTE: A qualified electrician must perform all connections to DC power and to safety grounds. All electrical wiring must comply with applicable local or national codes - D-Link DES-3326SRM | Product Manual - Page 11
packets via an ASIC - in hardware instead of software. The DES-3326S can also replace key traditional routers for data centers and server farms, routing between these locations and the rest of the network, and providing 24 ports of Layer 2 switching performance combined with wire-speed routing. 1 - D-Link DES-3326SRM | Product Manual - Page 12
Layer 3 Switch • 8.8 Gbps Switching fabric capacity • Supports 802.1w Rapid Spanning Tree and 802.1D STP compatible operation for redundant back up bridge paths • Supports 802.1Q VLAN • Supports IGMP snooping • Supports 802.1p Priority Queues • Supports 802.3ad LACP Link Aggregation • Supports port - D-Link DES-3326SRM | Product Manual - Page 13
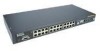
D-Link DES-3326S Layer 3 Switch Front Panel Components The front panel of the Switch consists of LED indicators, an RS-232 communication port, a slide-in module slot, and 24 (10/100 Mbps) Ethernet/Fast Ethernet ports. Figure 1 - 1. Front Panel View of the Switch as shipped (no modules are installed - D-Link DES-3326SRM | Product Manual - Page 14
D-Link DES-3326S Layer 3 Switch Stacking LED Indicators Stacking LED indicators include the Stack ID indicator on the front panel and the Link/Act indicators on the front of the DES332GS stacking module. Each stacking module has Link and Act LED indicators on its front panel for the IEEE 1394 IN/OUT - D-Link DES-3326SRM | Product Manual - Page 15
D-Link DES-3326S Layer 3 Switch Rear Panel Description The rear panel of the Switch contains an AC power connector. Figure 1 - 3. Rear panel view of the Switch The AC power connector is a standard three-pronged connector that supports the power cord. Plug-in the female connector of the provided - D-Link DES-3326SRM | Product Manual - Page 16
D-Link DES-3326S Layer 3 Switch Optional Plug-in Modules The DES-3326S 24-port Fast Ethernet Switch is able to accommodate a range of optional plug-in modules in order to increase functionality and performance. These modules must be purchased separately. DES-132 2-port 100BASE-TX Module Figure 1 - - D-Link DES-3326SRM | Product Manual - Page 17
D-Link DES-3326S Layer 3 Switch DES-131F/132F 1/2-port 100BASE-FX Module Figure 1 - 6. 100BASE-FX two-port module Port Functions • Fully compliant with IEEE802.3u 100BASE-FX • Supports auto-negotiation in the following operation: 100M / Full-duplex / Flow control • IEEE 802.3x compliant Flow - D-Link DES-3326SRM | Product Manual - Page 18
D-Link DES-3326S Layer 3 Switch DES-131FL/132FL 1/2-port 100BASE-FX Module Port Functions Figure 1 - 7. 100BASE-FX module • Fully compliant with IEEE802.3u 100BASE-FX • Supports auto-negotiation in the following operation: 100M / Full-duplex / Flow control • IEEE 802.3x compliant Flow Control - D-Link DES-3326SRM | Product Manual - Page 19
D-Link DES-3326S Layer 3 Switch DES-132T 2-port 1000BASE-T Module Figure 1 - 8. 1000BASE-T two-port module Port Functions • 2 1000BASE-T Gigabit Ethernet ports • Fully compliant with IEEE802.3 10BASE-T, IEEE802.3u 100BASE-TX, and IEEE802.3ab 1000BASE-T • Supports auto-negotiation in the following - D-Link DES-3326SRM | Product Manual - Page 20
D-Link DES-3326S Layer 3 Switch DES-132G 2-port 1000BASE-SX Gigabit Ethernet Module Figure 1 - 9. 1000BASE-SX two-port module Port Functions • 2 1000BASE-SX Gigabit Ethernet ports • IEEE 802.3z 1000BASE-SX compliance • Supports Full-duplex operations • IEEE 802.3x compliant Flow Control support for - D-Link DES-3326SRM | Product Manual - Page 21
D-Link DES-3326S Layer 3 Switch DES-132GL 2-port 1000BASE-LX Gigabit Ethernet Module Figure 1 - 10. 1000BASE-LX two-port module Port Functions • 2 1000BASE-LX Gigabit Ethernet ports • IEEE 802.3z 1000BASE-LX compliance • Supports Full-duplex operations • IEEE 802.3x compliant Flow Control support - D-Link DES-3326SRM | Product Manual - Page 22
D-Link DES-3326S Layer 3 Switch DES-132GB 2-port GBIC-based Gigabit Ethernet Module Figure 1 - 11. GBIC two-port module Port Functions • 2 GBIC-based Gigabit Ethernet ports • Allows multi-mode fiber optic connections of up to 550 m (SX and LX) and single-mode fiber optic connections of up to 5 km ( - D-Link DES-3326SRM | Product Manual - Page 23
• IEEE 802.3x compliant Flow Control support for full-duplex Stacking Port Function • 1 transmitting port and 1 receiving port • IEEE1394.b compliance • Forwarding rate up to 965Mbps LED Indicators* The optional Stacking Module allows up to eight DES-3326S Switches to be interconnected via their - D-Link DES-3326SRM | Product Manual - Page 24
in the stack. In this way, a loop is made such that all of the switches in the switch stack have the IN stacking port connected to another switch's OUT stacking port. See Connecting Stacked Switch Groups on page 24 for an illustration of a properly connected stack. Stack order can be automatically - D-Link DES-3326SRM | Product Manual - Page 25
D-Link DES-3326S Layer 3 Switch Management Options The system may be managed out-of-band through the console port on the front panel or in-band using Telnet, a web browser or SNMP-based management. Web-based Management Interface After you have successfully installed the Switch, you can configure the - D-Link DES-3326SRM | Product Manual - Page 26
D-Link DES-3326S Layer 3 Switch Chapter 2 Installation Package Contents Before You Connect to the Network Connecting the Console Port Password Protection SNMP Settings IP Address Assignment Connecting Stacked Switch Groups Configuring a Switch Group for Stacking Connecting Devices to the Switch - D-Link DES-3326SRM | Product Manual - Page 27
to the network until you have established the correct IP settings, user accounts and proper stacking configuration (if the Switch is stacked). Connecting the Console Port The Switch provides an RS-232 serial port that enables a connection to a computer or terminal for monitoring and configuring - D-Link DES-3326SRM | Product Manual - Page 28
D-Link DES-3326S Layer 3 Switch Password Protection The DES-3326S does not have a default user name and password. One of the first tasks when settings up the Switch is to create user accounts. If you log in using a predefined administrator-level user name you have privileged access to the Switch's - D-Link DES-3326SRM | Product Manual - Page 29
D-Link DES-3326S Layer 3 Switch IP Address Assignment Each Switch must be assigned its own IP Address, which is used for communication with an SNMP network manager or other TCP/IP application (for example BOOTP, TFTP). The Switch's default IP address is 10.90.90.90. You can change the default Switch - D-Link DES-3326SRM | Product Manual - Page 30
D-Link DES-3326S Layer 3 Switch Figure 2 - 3. Assigning the Switch an IP Address In the above example, the Switch was assigned an IP address of 10.10.1.100 with a subnet mask of 255.0.0.0. The system message Success indicates that the command was executed successfully. The Switch can now be - D-Link DES-3326SRM | Product Manual - Page 31
other network devices. Use SNMP to configure system features for proper operation, monitor performance and detect potential problems in the Switch, Switch group or network. Managed devices that support SNMP include software (referred to as an agent), which runs locally on the device. A defined set - D-Link DES-3326SRM | Product Manual - Page 32
D-Link DES-3326S Layer 3 Switch Installing the Switch without the Rack The Switch is supplied with rubber feet for stationing it on a flat surface and mounting brackets and screws for mounting the Switch in a rack. If you intend to use a stacked Switch arrangement, place the Master unit in the top - D-Link DES-3326SRM | Product Manual - Page 33
D-Link DES-3326S Layer 3 Switch Installing the Switch in a Rack You can install the Switch in most standard 19-inch (48.3-cm) racks. Refer to the illustrations below. 1. Use the supplied screws to attach a mounting bracket to each side of the Switch. 2. Align the holes in the mounting bracket with - D-Link DES-3326SRM | Product Manual - Page 34
Switch will be the Switch connected to the OUT port on the Master, the Number 3 Switch is connected to the OUT port on the Number 2 Switch, and so on. NOTICE: If a link between stacked switches again. Read the CLI Reference for information on manual configuration of Switch Stacking Commands. 24 - D-Link DES-3326SRM | Product Manual - Page 35
same model, that is (at the time of the writing of this manual), the slaves must be all DES-3326S Switches. The slave unit types cannot be mixed within a single stacked group. • All Switches must have the same firmware version loaded to operate in a stacked group. • A Master should be designated for - D-Link DES-3326SRM | Product Manual - Page 36
D-Link DES-3326S Layer 3 Switch Configuring a Switch Group for Stacking In order to set up a stack of DES-3326S Switches it is only necessary to designate a single Switch as Master if all the Switches are using the default auto setting for the stacking mode configuration. Stacking mode may also be - D-Link DES-3326SRM | Product Manual - Page 37
D-Link DES-3326S Layer 3 Switch Figure 2 - 9. config stacking mode enable master The remaining slave units in the stack can be set to the default configuration to automatically recognize the presence - D-Link DES-3326SRM | Product Manual - Page 38
D-Link DES-3326S Layer 3 Switch Notes on Standalone Operation The DES-3326S operates as a standalone Switch using the default configuration settings when it is not connected to another Switch through a stacking port. It may also be configured to disable stacking for the Switch, in which case, if a - D-Link DES-3326SRM | Product Manual - Page 39
in the logical stack order. Figure 2 - 11. DES-3326S Stacking Module Front Panel Connecting Devices to the Switch These connections can be accomplished at any port in either straight-through cable or a crossover cable because the switch supports Auto-MDIX function. NOTE: Auto-MDIX function is not - D-Link DES-3326SRM | Product Manual - Page 40
D-Link DES-3326S Layer 3 Switch Chapter 3 Switch Management Before You Start General Deployment Strategy Web-based User Interface Basic Setup Switch Information Switch IP Settings User Accounts Management Saving Changes Factory Reset Restart System All software function of the DES-3326S can - D-Link DES-3326SRM | Product Manual - Page 41
save valuable time in case of a link or device failure. The DES-3326S Spanning Tree function can be used to block the redundant link until it is needed. VLAN Setup VLANs setup in Layer 3 Switching is more complicated than in conventional Layer 2 Switching environments. Be sure to carefully plan the - D-Link DES-3326SRM | Product Manual - Page 42
D-Link DES-3326S Layer 3 Switch Web-based User Interface The user interface provides access to various Switch configuration and management screens, allows you to view performance statistics, and permits you to graphically monitor the system status. Areas of the User Interface The figure below shows - D-Link DES-3326SRM | Product Manual - Page 43
Switch Setup (includes IP settings), Serial Port Settings, Port Configuration, Port Security Settings, Traffic Segmentation, User Accounts, Factory Reset, Save Changes and Restart System. Advanced Setup includes subdirectories for Spanning Tree, MAC Notification, Forwarding, Configure QoS, VLAN - D-Link DES-3326SRM | Product Manual - Page 44
Basic Setup folder. The hyperlinked menu buttons in this folder include: Switch Information, Basic Switch Setup, Serial Port Settings, Port Configurations, Port Security Settings, Traffic Segmentation Table, User Accounts, Factory Reset, Save Changes and Restart System. Most of these menus and the - D-Link DES-3326SRM | Product Manual - Page 45
IP Settings D-Link DES-3326S Layer 3 Switch Switch IP settings may initially be set using the console interface prior to connecting to it through the Ethernet. If the Switch IP address has not yet been changed, read the Introduction of the CLI Reference or read the instructions below on how to - D-Link DES-3326SRM | Product Manual - Page 46
D-Link DES-3326S Layer 3 Switch BOOTP The Switch will entered settings. Manual Allows the entry of an IP address, Subnet Mask, and a Default Gateway for the Switch. These fields Switch must be known. The IP address may be set using the Command Line Interface (CLI) over the console serial port - D-Link DES-3326SRM | Product Manual - Page 47
D-Link DES-3326S Layer 3 Switch User Accounts Management Use the User Accounts table to control user privileges. To view existing User Accounts, open the Basic Setup folder and click on the User Accounts link. This will open the User Accounts Table, as shown below. If no user accounts have et been - D-Link DES-3326SRM | Product Manual - Page 48
D-Link DES-3326S Layer 3 Switch Figure 3- 6. User Accounts - Edit To change the password, type in the New Password and retype it in the Confirm New Password entry field. Choose the level of privilege (Admin or User) from the Access Level drop-down menu. 38 - D-Link DES-3326SRM | Product Manual - Page 49
D-Link DES-3326S Layer 3 Switch Admin and User Privileges There are two levels of user privileges: Admin and User. Some menu selections available to users with Admin privileges may not be available to those with User privileges. The following table summarizes the Admin and User privileges: - D-Link DES-3326SRM | Product Manual - Page 50
the NV-RAM. Thus, it is necessary to save all setting changes to NV-RAM before rebooting the Switch. Factory Reset Click the Factory Reset link in the Basic Setup folder to bring up the reset menu. Figure 3- 8. Factory Reset to Default Value The following options are available to perform a factory - D-Link DES-3326SRM | Product Manual - Page 51
Restart System D-Link DES-3326S Layer 3 Switch The following menu is used to restart the Switch. Access this menu by clicking on the Restart System link in the Basic Setup folder. Click the Yes after Do you want to save the settings? to instruct the Switch to save the current configuration to non- - D-Link DES-3326SRM | Product Manual - Page 52
stacking module is described on page 13. 2. Currently the firmware for the DES-3326S and DES-3326SR does not yet support stacking with the DGS-3312SR Layer 3 Switch or the DES-3226S Layer 2 Switch. Furthermore, the two models (DES-3326S and DES-3326SR) cannot be mixed in a stack as of this writing - D-Link DES-3326SRM | Product Manual - Page 53
show stacking. The illustration below shows a typical Switch stack information display. DES-3326S:4# DES-3326S:4#sh stack Command: show stacking ID MAC Address Port Range Mode Version RPS Status Model Name 1 00-00-81-00-01-E0 1 - 26 AUTO 4.01-B27 Not Support DES-3326S 2 00-36-57-01-00-00 27 - D-Link DES-3326SRM | Product Manual - Page 54
. This displays the stacking mode configured for the Switch. The possible stacking modes are Auto, Master and Slave. The Version in this menu refers to the Switch firmware version. Displays the status of an optional Redundant Power Supply for DES-3326SR. Displays the model name of the corresponding - D-Link DES-3326SRM | Product Manual - Page 55
D-Link DES-3326S Layer 3 Switch Chapter 5 Port Configuration Configure Ports Serial Port Settings Port Security Settings Traffic Segmentation This section contains information for configuring various attributes and properties for individual physical ports and port mirroring. 45 - D-Link DES-3326SRM | Product Manual - Page 56
Configure Ports D-Link DES-3326S Layer 3 Switch Click the Port Configurations link in the Basic Setup folder: For stacked switch installations, it will be necessary to select the Unit (switch) according to its logical position in the stack. Figure 5- 1. Choose switch from stack Click the radio - D-Link DES-3326SRM | Product Manual - Page 57
D-Link DES-3326S Layer 3 Switch Click on the port you want to configure on the Port Configurations menu and then click the Edit button. This will open the following dialog box: Figure 5- 3. Port Configurations − Edit The Unit drop-down dialog box allows you to select different switches in a switch - D-Link DES-3326SRM | Product Manual - Page 58
D-Link DES-3326S Layer 3 Switch Serial Port Settings The Serial Port Settings window allows the configuration of the switch's serial port. Click on the Serial Port Settings link from the Basic Setup folder. Figure 5- 4. Serial Port Settings The following fields can then be set for the serial port: - D-Link DES-3326SRM | Product Manual - Page 59
D-Link DES-3326S Layer 3 Switch Port Security Settings Port security settings instruct the Switch on how to handle MAC address table entries for each port. The Port Security Settings menu link is located in the Basic Setup folder. For stacked Switches, select the Switch form the Unit drop-down menu - D-Link DES-3326SRM | Product Manual - Page 60
Traffic Segmentation D-Link DES-3326S Layer 3 Switch The traffic segmentation table is used to limit traffic flow from a single port to other ports on the switch. It cannot be used to segment traffic between switch units in a stack. For this it would be appropriate to use VLANs or a filtering - D-Link DES-3326SRM | Product Manual - Page 61
D-Link DES-3326S Layer 3 Switch Chapter 6 Link Aggregation Configure Link Aggregation Link aggregation allows several ports to be grouped together and to act as a single link. This gives a bandwidth that is a multiple of a single link's bandwidth. Link aggregation is most commonly used to link a - D-Link DES-3326SRM | Product Manual - Page 62
The Switch supports Link Aggregation Control Protocol and allows for a choice of the Link Aggregation Algorithm. The links to the menus used to set it up are located in the Link Aggregation subdirectory, in the Advanced Settings folder. Use the Link Aggregation Algorithm menu to instruct the Switch - D-Link DES-3326SRM | Product Manual - Page 63
D-Link DES-3326S Layer 3 Switch Configure the Link Aggregation Groups Follow the instructions below to set up Link Aggregation on the Switch. To configure a link aggregation group, click on the Link Aggregation link from the Advanced Setup folder: Figure 6- 2. Link Aggregation Any Link Aggregation - D-Link DES-3326SRM | Product Manual - Page 64
and both devices connected to the static trunk group must be manually configured if the composition of the group is changed. The Master port of link aggregation group. Allows the selection of a particular switch in a switch stack, if you have the optional stacking module installed and have - D-Link DES-3326SRM | Product Manual - Page 65
D-Link DES-3326S Layer 3 Switch Chapter 7 Port Mirroring The Switch allows you to copy frames transmitted and received on a port and redirect the copies to another port. You can attach a monitoring device to the mirrored port, such as a sniffer or an RMON probe, to view details about the packets - D-Link DES-3326SRM | Product Manual - Page 66
D-Link DES-3326S Layer 3 Switch Chapter 8 MAC Forwarding Static Unicast Forwarding Static Multicast Forwarding Broadcast/Multicast Storm Control The Switch allows permanent or static entries into the forwarding database (FDB). These FDB entries are MAC addresses that will not age out. The menu - D-Link DES-3326SRM | Product Manual - Page 67
D-Link DES-3326S Layer 3 Switch To add a new MAC address to the MAC Address Forwarding Table, click be set: Parameter Description MAC Address VLAN Name Unit Port Allows the entry of the MAC address of an end station that will be entered into the switch's static forwarding table when adding a - D-Link DES-3326SRM | Product Manual - Page 68
D-Link DES-3326S Layer 3 Switch Multicast MAC Address Forwarding Multicast MAC addresses can be statically entered into the switch's MAC Address Forwarding Table. These addresses will never age out. To enter a Multicast MAC address into the switch's forwarding table, click on the Forwarding folder - D-Link DES-3326SRM | Product Manual - Page 69
: Parameter Description D-Link DES-3326S Layer 3 Switch MAC Address:[ ] VLAN Name Port: [ ] None Egress Forbidden Allows the entry of the MAC address of an end station that will be entered into the switch's static forwarding table. Allows the entry of the VLAN name of the VLAN the MAC address - D-Link DES-3326SRM | Product Manual - Page 70
D-Link DES-3326S Layer 3 Switch than specified in the Upper Threshold (Kpps) field, the switch will drop all broadcast packets received by any port in the port group until the rate of broadcast packets received by the port group falls. The Multicast Storm Mode is Enabled or Disabled using the pull- - D-Link DES-3326SRM | Product Manual - Page 71
D-Link DES-3326S Layer 3 Switch Chapter 9 Spanning Tree Protocol 802.1w Rapid Spanning Tree Configure STP The Switch supports 802.1d Spanning compliant bridges are sensitive to feedback from other RSTP compliant bridge links. Ports do not need to wait for the topology to stabilize before - D-Link DES-3326SRM | Product Manual - Page 72
D-Link DES-3326S Layer 3 Switch P2P Port A P2P port is also capable of rapid transition. P2P ports may be used to connect to other bridges. Under RSTP, all ports operating in full-duplex mode are considered to be P2P ports, unless manually overridden through configuration. 802.1w/802.1d - D-Link DES-3326SRM | Product Manual - Page 73
D-Link DES-3326S Layer 3 Switch Configure the following STP Switch parameters and click the Apply button to implement them: Parameter time any port on the switch spends in the listening state while moving from the blocking state to the forwarding state. A Priority for the switch can be - D-Link DES-3326SRM | Product Manual - Page 74
The STP on the switch level blocks redundant links between switches (and similar network devices). The port level STP will block redundant links within an STP Group. Under most circumstances, an STP Group should correspond to a VLAN group of ports. For stacked switch installations, first select the - D-Link DES-3326SRM | Product Manual - Page 75
D-Link DES-3326S Layer 3 Switch The following fields are configured in the STP Port Settings - Edit menu: Parameter Description Cost Priority Migration Edge P2P Configure Ports from __ to __ A Port Cost can be set from 1 to 200000000. The lower the number, the greater the - D-Link DES-3326SRM | Product Manual - Page 76
D-Link DES-3326S Layer 3 Switch Chapter 10 Quality of Service Configuration Configure QoS Output Scheduling Configure 802.1p User Priority Configure Default Priority Configure Bandwidth The DES-3326S switch supports 802.1p priority queuing. The switch has 4 priority queues. These priority queues are - D-Link DES-3326SRM | Product Manual - Page 77
D-Link DES-3326S Layer 3 Switch Configure QoS Output Scheduling Open the QoS Output Scheduling menu to adjust settings for the four QoS Classes. You may then change the Priority settings mapped to these Classes in the 802.1p User Priority setting menu (see below). Figure 10- 1. QoS Output Scheduling - D-Link DES-3326SRM | Product Manual - Page 78
D-Link DES-3326S Layer 3 Switch Configure 802.1p User Priority Once you have assigned a maximum number of packets and a maximum latency to a given Class of Service on the switch, you can then assign this Class to each of the 8 levels of 802.1p priorities. Open the 802.1 User Priority configuration - D-Link DES-3326SRM | Product Manual - Page 79
D-Link DES-3326S Layer 3 Switch Configure Default Priority The default 802.1p priority to each port can be changed to suit conditions. Click on the 802.1p Default Priority link: Figure 10- 3. Priority Based on Port This window allows you to assign a default 802.1p priority to any given port on the - D-Link DES-3326SRM | Product Manual - Page 80
D-Link DES-3326S Layer 3 Switch Configure Bandwidth Control The bandwidth control settings are used to place a ceiling on the transmitting and receiving data bit rates for any port. To change the maximum allowed bandwidth for a given port: Click the selection button in the far left column that - D-Link DES-3326SRM | Product Manual - Page 81
D-Link DES-3326S Layer 3 Switch Chapter 11 MAC Notification MAC Notification Global Setting MAC Notification Port Settings MAC address notification is used to monitor MAC addresses as they are learned and entered into the Switch's MAC forwarding database. MAC Notification Global Settings Figure 11- - D-Link DES-3326SRM | Product Manual - Page 82
Link DES-3326S Layer 3 Switch MAC Notification Port Settings Enable or disable MAC notification for ports with the menu below. Figure 11- 2. MAC Notification Port Settings To change MAC Notification settings for a port or a group of ports on the same switch, select the first (lowest numbered) port - D-Link DES-3326SRM | Product Manual - Page 83
D-Link DES-3326S Layer 3 Switch Chapter 12 System Log The menu links to set up a System Log are located in their own of whether the system log is on or off. Figure 12- 1. System Log State menu The switch can send system log messages to up to four designated servers. Use the System Log Server menu to - D-Link DES-3326SRM | Product Manual - Page 84
Link DES-3326S Layer 3 Switch Use the descriptions here as a guide to set up the System Log Server settings. Parameter Description Index Server IP Severity Facility UDP Port the facility values the switch supports now. Numerical Facility Code 0 kernel messages 1 user-level messages 2 mail - D-Link DES-3326SRM | Product Manual - Page 85
D-Link DES-3326S Layer 3 Switch Chapter 13 SNTP Settings The Simple Network Time Protocol (SNTP), an adaptation of the Network Time Protocol (NPT) is configured on the Switch using the following pages. The SNTP subdirectory in the Basic Setup contains the links to the menus used to configure SNTP. - D-Link DES-3326SRM | Product Manual - Page 86
D-Link DES-3326S Layer 3 Switch Time Zone and DST See the table below for a description of the Time Zone and DST parameters. Figure 13- 2. Time Zone and DST Settings 76 - D-Link DES-3326SRM | Product Manual - Page 87
The following parameters can set: Parameter Description D-Link DES-3326S Layer 3 Switch Daylight Time State Saving Use this pull-down menu to Enable or Disable the DST Settings. Daylight Saving Time Offset in Minutes Use this pull- - D-Link DES-3326SRM | Product Manual - Page 88
Link DES-3326S Layer 3 Switch Chapter 14 Security Management Access Profile Configuration CPU Interface Filtering 802.1X Port-based Network Access Control 802.1X Configuration Various security mechanisms are available with the DES can be specified on a basis of VLAN, MAC address or IP address. First, - D-Link DES-3326SRM | Product Manual - Page 89
D-Link DES-3326S Layer 3 Switch There are two different menus used to create an of each packet header. Select IP to instruct the switch to examine the IP address in each frame's header. VLAN Selecting this option instructs the switch to examine the VLAN part of each packet header and use this - D-Link DES-3326SRM | Product Manual - Page 90
D-Link DES-3326S Layer 3 Switch IP-based Access Profile Mask: Select the IP option from the Access Profile pull-down menu to view the following: Figure 14- 3. IP Address Access Profile Mask - Add 80 - D-Link DES-3326SRM | Product Manual - Page 91
D-Link DES-3326S Layer 3 Switch Parameter Description Profile ID Type in a unique of each packet header. Select IP to instruct the switch to examine the IP address in each frame's header. VLAN Selecting this option instructs the switch to examine the VLAN part of each packet header and use - D-Link DES-3326SRM | Product Manual - Page 92
D-Link DES-3326S Layer 3 Switch To establish the rule for a previously created Access Profile Mask: Select the Access Profile from the Access Profile Mask Setting Table and click the Edit - D-Link DES-3326SRM | Product Manual - Page 93
D-Link DES-3326S Layer 3 Switch Configure the following Access Profile Rule - Ethernet settings number for this access. This value can be set from 1 - 255. Select this option to instruct the switch to use the 802.1p priority value entered in the adjacent field for packets that meet the criteria. - D-Link DES-3326SRM | Product Manual - Page 94
D-Link DES-3326S Layer 3 Switch The following window is used for the IP Rule configuration. Figure 14 0 − lowest priority, and 7 − highest priority, can be entered. Select this option to instruct the switch to replace the 802.1p value (in a packet that meets the selected criteria). In this way - D-Link DES-3326SRM | Product Manual - Page 95
D-Link DES-3326S Layer 3 Switch CPU Interface Filtering There are specific circumstances under which the ACL cannot filter a packet even when there is a condition match that should deny forwarding. This is a limitation that may arise if: • the destination MAC is the same as the Switch (system) MAC • - D-Link DES-3326SRM | Product Manual - Page 96
D-Link DES-3326S Layer 3 Switch CPU Interface Filtering Mask Creating an access profile is divided into two basic parts. The first is to specify which part or parts of a frame the switch will examine, such as the MAC source address or the IP destination address. The second part is entering the - D-Link DES-3326SRM | Product Manual - Page 97
D-Link DES-3326S Layer 3 Switch Parameter Description Profile ID Type in a unique of each packet header. Select IP to instruct the switch to examine the IP address in each frame's header. VLAN Selecting this option instructs the switch to examine the VLAN part of each packet header and use - D-Link DES-3326SRM | Product Manual - Page 98
D-Link DES-3326S Layer 3 Switch Parameter Description Profile ID Type in a unique of each packet header. Select IP to instruct the switch to examine the IP address in each frame's header. VLAN Selecting this option instructs the switch to examine the VLAN part of each packet header and use - D-Link DES-3326SRM | Product Manual - Page 99
D-Link DES-3326S Layer 3 Switch To establish the rule for a previously created CPU Interface Select Deny to specify that packets that do not match the access profile are not forwarded by the switch and will be filtered. Access Rule ID Adds an additional rule to the above specified access profile - D-Link DES-3326SRM | Product Manual - Page 100
D-Link DES-3326S Layer 3 Switch The following window is used for the IP Rule configuration. Select Deny to specify that packets that do not match the access profile are not forwarded by the switch and will be filtered. Access Rule ID Adds an additional rule to the above specified access profile - D-Link DES-3326SRM | Product Manual - Page 101
D-Link DES-3326S Layer 3 Switch 802.1X Port-based Network Access Control The Switch is an implementation of the server side of IEEE 802.1X-Port Based Network Access Control. Through this mechanism, users have to be authorized before being able to access the network. See the following figure: DES- - D-Link DES-3326SRM | Product Manual - Page 102
D-Link DES-3326S Layer 3 Switch The user's information, including account number, password, and configuration details such as IP Implemented Table 2. Conformance to IEEE 802.1X Standards State Machine Name Port Timers state machine Authenticator PAE state machine The Authenticator Key Transmit state - D-Link DES-3326SRM | Product Manual - Page 103
D-Link DES-3326S Layer 3 Switch 802.1X Configuration The DES-3326S implements the server-side of the IEEE 802.1x Port-based Network Access Control. This mechanism is intended to allow only authorized users, or other network devices, access to network resources by establishing criteria for each port - D-Link DES-3326SRM | Product Manual - Page 104
D-Link DES-3326S Layer 3 Switch 802.1X Port Settings Existing 802.1X port settings are displayed and can be con figured using the menu below. Figure 14- 18. 802.1X Port Settings Click the selection button on the far left that corresponds to the port you want to configure and click the Edit button, - D-Link DES-3326SRM | Product Manual - Page 105
D-Link DES-3326S Layer 3 Switch Figure 14- 19. 802.1X Port Settings - Edit Configure the following 802.1x port settings: Parameter Description Port AdminCtlDir Port Control Quiet Period Tx Period Support Timeout Server Timeout MaxReq ReAuthPeriod ReAuthenticate Port being configured for 802.1x - D-Link DES-3326SRM | Product Manual - Page 106
Port Capability D-Link DES-3326S Layer 3 Switch Click the selection button on the far left that corresponds to the port you want to configure and click the Next button. This will open the Port Capability Settings Edit menu Figure 14- 20. 802.1x Port Capability Settings - Edit Figure 14- 21. 802. - D-Link DES-3326SRM | Product Manual - Page 107
D-Link DES-3326S Layer 3 Switch Initialize Ports Use this to initialize the 802.1x functions on specified ports or for specified MAC addresses operating from a specified range of ports. Figure 14- 22. Initialize Ports The Initialize Ports settings are as follows: Parameter Description Port - D-Link DES-3326SRM | Product Manual - Page 108
D-Link DES-3326S Layer 3 Switch Re-Authenticate Ports 802.1x ports must be periodically re-authenticated (when the re-authentication period lapses). Use this menu to determine if previously authenticated devices are re-authenticated based on either MAC address or port number. Figure 14- 23. - D-Link DES-3326SRM | Product Manual - Page 109
D-Link DES-3326S Layer 3 Switch Radius Server Settings Use this menu to configure the settings the switch will use to communicate with and the switch. Up to 32 characters can be used. Type the UDP port number for authentication requests. The default is 1812. Type the UDP port number for accounting - D-Link DES-3326SRM | Product Manual - Page 110
D-Link DES-3326S Layer 3 Switch Chapter 15 SNMP Network Management SNMP View Table SNMP Group Table SNMP Community Table SNMP Engine ID SNMP Host Table SNMP User Table Security IP Management The DES-3326S incorporates a flexible SNMP management for the switching environment. SNMP management can be - D-Link DES-3326SRM | Product Manual - Page 111
View Table D-Link DES-3326S Layer 3 Switch The SNMP View Table is used to assign views to community strings that define which MIB objects can be accessed by an SNMP manager. To delete an existing View Table entry, click the selection button on the far left that corresponds to the port you want to - D-Link DES-3326SRM | Product Manual - Page 112
D-Link DES-3326S Layer 3 Switch The SNMP Group created with this table maps SNMP users (identified in the SNMP User Table) to the views created in the previous menu. Figure 15- 3. SNMP Group Table To delete an existing entry, click the selection button on the far left that corresponds to the port - D-Link DES-3326SRM | Product Manual - Page 113
Link DES-3326S Layer 3 Switch Parameter Description Group Name Read View Name Write View Name Notify View Name Security Model Security Level Type an alphanumeric string of up to 32 characters. This is used to identify the new SNMP group of SNMP users that corresponds to the port you want to configure - D-Link DES-3326SRM | Product Manual - Page 114
D-Link DES-3326S Layer 3 Switch Figure 15- 6. SNMP Community Table - Add Configure the following for string created with this command can read from and write to the contents of the MIBs on the switch. SNMP Engine ID The Engine ID is a unique identifier used for SNMP V3 implementations. This is - D-Link DES-3326SRM | Product Manual - Page 115
SNMP Host Table D-Link DES-3326S Layer 3 Switch Use the SNMP Host Table to set up trap recipients. Figure 15- 8. SNMP Host Table To delete an existing entry, click the selection button on the far left that corresponds to the port you want to configure and click the Delete button. To create a new - D-Link DES-3326SRM | Product Manual - Page 116
User Table D-Link DES-3326S Layer 3 Switch Use the SNMP User Table to create a new SNMP user and add the user to an existing SNMP group or to a newly created group. Figure 15- 10. SNMP User Table To delete an existing entry, click the selection button on the far left that corresponds to the port - D-Link DES-3326SRM | Product Manual - Page 117
D-Link DES-3326S Layer 3 Switch Security IP Management Management Stations IP Addresses designate stations that are allowed to make configuration changes to the Switch. This can be used in addition to standard SNMP security precautions (community strings). IP Management Stations may also be used - D-Link DES-3326SRM | Product Manual - Page 118
D-Link DES-3326S Layer 3 Switch Chapter 16 Network Monitoring and Statistics Port Utilization Statistics Port Packets Statistics MAC Address Table IP Address Table Routing Table ARP Table OSPF Information DVMRP Information PIM Neighbor Address Table GVRP Status Router Ports IGMP and IGMP Snooping - D-Link DES-3326SRM | Product Manual - Page 119
D-Link DES-3326S Layer 3 Switch Port Utilization Statistics Port Utilization can be viewed for individual ports using the Line Chart or you can opt to see all ports displayed in Port Utilization Table. These windows display the percentage of the total available bandwidth being used on the port. To - D-Link DES-3326SRM | Product Manual - Page 120
Packet Statistics D-Link DES-3326S Layer 3 Switch Packets statistics are viewed in the following menus: Port Packet Analysis Port Error Packets Port Packet Analysis The Port Packet Analysis window displays the size of packets received or transmitted by a given switch port. In addition, statistics - D-Link DES-3326SRM | Product Manual - Page 121
D-Link DES-3326S Layer 3 Switch The packet analysis fields are switch can detect and displays the results on a per port basis. To view the error statistics for a port, open the Network Monitoring folder and the Statistics subdirectory and click on the Port Packet Analysis link: Figure 16- 4. Port - D-Link DES-3326SRM | Product Manual - Page 122
D-Link DES-3326S Layer 3 Switch The following fields from above are described in more detail: Parameter Description Unit Port Update RX Frames CRC Error Interval Undersize Oversize Fragment Jabber Drop Packets TX Frames Excessive Deferral CRC Error Late Collision Excessive Collision - D-Link DES-3326SRM | Product Manual - Page 123
MAC Address Table D-Link DES-3326S Layer 3 Switch This allows the switch's dynamic MAC address forwarding table to be viewed. When the switch learns an association between a MAC address and a port number, it makes an entry into its forwarding table. These entries are then used to forward packets - D-Link DES-3326SRM | Product Manual - Page 124
Routing Table D-Link DES-3326S Layer 3 Switch To view Routing Table, open the Network Monitoring folder and the Address Tables subdirectory and click on the Routing Table link: Parameter IP Address Netmask Gateway Interface Name Hops Protocol Description Figure 16- 6. Routing Table The IP - D-Link DES-3326SRM | Product Manual - Page 125
ARP Table D-Link DES-3326S Layer 3 Switch To view ARP Table, open the Network Monitoring folder and the Address Tables subdirectory and click on the ARP Table link: Figure 16- 7. ARP Table Use the ARP Table to search for MAC addresses. Enter the Interface Name and IP Address and click on the Find - D-Link DES-3326SRM | Product Manual - Page 126
D-Link DES-3326S Layer 3 Switch To view information relevant to OSPF operations, open the Network Monitoring and use the links located in the OSPF subdirectory. OSPF information can be viewed in the following menus: OSPF LSDB Table OSPF Neighbor Table OSPF Virtual Neighbor Table OSPF Link State - D-Link DES-3326SRM | Product Manual - Page 127
OSPF Neighbor Table D-Link DES-3326S Layer 3 Switch The following fields are displayed. Figure 16- 9. OSPF Neighbor Table Parameter Description Neighbor ID IP Address Neighbor Options Neighbor Priority Neighbor State State Changes The - D-Link DES-3326SRM | Product Manual - Page 128
DVMRP Information D-Link DES-3326S Layer 3 Switch To view DVMRP information, open the Network Monitoring folder and use the links located in a separate DVMRP subdirectory. DVMRP information can be viewed in the following menus: DVMRP Routing Table DVMRP Neighbor Address Table DVMRP Next Hop Table - D-Link DES-3326SRM | Product Manual - Page 129
DVMRP Neighbor Address Table D-Link DES-3326S Layer 3 Switch Figure 16- 12. DVMRP Neighbor Table The following fields are displayed. Parameter Description Interface Neighbor Address Generation ID Expire Time The name of the IP - D-Link DES-3326SRM | Product Manual - Page 130
D-Link DES-3326S Layer 3 Switch PIM Neighbor Address Table Multicast routers VLAN. The GVRP status screen displays the ports on the switch that are currently Egress or Untagged ports. To view GVRP Status, open the Network Monitoring folder and the Status subdirectory. Click on the GVRP Status link - D-Link DES-3326SRM | Product Manual - Page 131
Router Ports D-Link DES-3326S Layer 3 Switch This displays which of the switch's ports are currently configured as router ports. A router port configured by a user (using the console or Web-based management interfaces) is displayed as a static router port, designated by S. A router port that is - D-Link DES-3326SRM | Product Manual - Page 132
D-Link DES-3326S Layer 3 Switch IGMP Snooping Group Table This allows the Switch's IGMP Snooping table to be viewed. IGMP Snooping allows the switch to read the Multicast Group IP address and the corresponding MAC address from IGMP packets that pass through the Switch. You may specify a VLAN by name - D-Link DES-3326SRM | Product Manual - Page 133
D-Link DES-3326S Layer 3 Switch Specify the VLAN and click on the Find button. The following information is displayed in the IGMP Snooping Forwarding table: Parameter Description Source IP Multicast Group Port Map The IP address of the device sending the IGMP packets. The IP address of the - D-Link DES-3326SRM | Product Manual - Page 134
D-Link DES-3326S Layer 3 Switch IP Multicast Forwarding Table To browse the IP Multicast Forwarding table, open the Network Monitoring folder and the Status subdirectory. Click on the IP Multicast Forwarding Table link to see the following menu: Figure 16- 20. IP Multicast Forwarding Table Specify - D-Link DES-3326SRM | Product Manual - Page 135
Switch History D-Link DES-3326S Layer 3 Switch This allows the Switch History Log to be viewed. The Switch records all traps, in sequence, that identify events on the switch. The time since the last cold start of the switch is also recorded. The link to view Switch History is located in the Status - D-Link DES-3326SRM | Product Manual - Page 136
D-Link DES-3326S Layer 3 Switch Chapter 17 Switch Utilities Download Firmware Download Configuration File Save Settings to TFTP Server Save Switch History to TFTP Server Ping Test BOOTP/DHCP Relay BOOTP/DHCP Relay Interface Configuration DNS Relay DNS Relay Interface Configuration TFTP Services - D-Link DES-3326SRM | Product Manual - Page 137
. Save Settings to Server To download a configuration file for the switch's, click on the Basic Setup folder and then the switch Utilities folder and then the TFTP Services folder and finally click on the Upload Settings to TFTP Server link: Figure 17- 3. Save Settings To TFTP Server Enter the IP - D-Link DES-3326SRM | Product Manual - Page 138
D-Link DES-3326S Layer 3 Switch Figure 17- 4. Save Switch History To TFTP Server Enter the IP address address you specify. The destination node then returns the packets to the switch. This is very useful to verify connectivity between the switch and other nodes on the network. Figure 17- 5. Ping Test - D-Link DES-3326SRM | Product Manual - Page 139
D-Link DES-3326S Layer 3 Switch DHCP, BOOTP and DNS Relay Use DHCP/BOOTP and DNS Relay configuration to allow the Switch to relay DHCP/BOOTP and -down menu. It is used to enable or disable the BOOTP/DHCP Relay service on the switch. The default is Disabled This field allows an entry between 1 and 16 - D-Link DES-3326SRM | Product Manual - Page 140
D-Link DES-3326S Layer 3 Switch BOOTP/DHCP Relay Interface Configuration To configure BOOTP relay for individual IP interfaces, use the DHCP/BOOTP Relay Settings menu. Figure 17- 7. DHCP/BOOTP Relay - D-Link DES-3326SRM | Product Manual - Page 141
D-Link DES-3326S Layer 3 Switch DNS Relay To configure DNS Relay, click on the DNS Relay link: Figure 17- 9. DNS Relay using the pull-down menu, and is used to enable or disable the DNS Relay service on the switch. Name Server (1) Allows the entry of the IP address of a primary domain - D-Link DES-3326SRM | Product Manual - Page 142
D-Link DES-3326S Layer 3 Switch DNS Relay Interface Configuration To configure permanent entries for the DNS Relay Static Table, use the DNS Relay Static Settings menu. Figure 17- 10. DNS - D-Link DES-3326SRM | Product Manual - Page 143
D-Link DES-3326S Layer 3 Switch Chapter 18 VLANS AND IP INTERFACES VLANs can function somewhat differently in a Layer 3 Switch, that is when the VLANs are Layer 3-based, than if they are strictly based on Layer 2 information. Since IP Switching among VLANs may be unfamiliar to users who are - D-Link DES-3326SRM | Product Manual - Page 144
port - A port on a Switch where packets are flowing out of the Switch, either to another Switch or to an end station, and tagging decisions must be made. IEEE 802.1Q (tagged) VLANs are implemented on the DES-3326S Switch. 802.1Q VLANs and consists of 3 bits or user priority, 1 bit of Canonical Format - D-Link DES-3326SRM | Product Manual - Page 145
D-Link DES-3326S Layer 3 Switch The EtherType and VLAN ID are inserted after the MAC source address, but before the original EtherType/Length or Logical Link Control. Because the packet is now a bit longer than it was originally, the Cyclic Redundancy Check (CRC) must be recalculated. Port VLAN ID - D-Link DES-3326SRM | Product Manual - Page 146
Link DES-3326S Layer 3 Switch Switch will drop the packet. Because of the existence of the PVID for untagged packets and the VID for tagged packets, tagaware and tag-unaware network devices can coexist on the same network. A Switch port can have only one PVID, but can have as many VIDs as the Switch - D-Link DES-3326SRM | Product Manual - Page 147
D-Link DES-3326S Layer 3 Switch Chapter 19 Configure VLANs Configure 802.1Q Static VLANs 802.1Q Port Settings Switch GVRP This chapter describes how to use the web manager to configure VLANs in the Switch. If you are not familiar with using VLANs on a Layer 3 Switch, it would be a good idea to read - D-Link DES-3326SRM | Product Manual - Page 148
D-Link DES-3326S Layer 3 Switch Figure 19- 2. 802.1Q Static VLANs Entry Settings - Add To edit an existing 802.1Q VLAN, click the corresponding click-box and then click the Edit button to open the following dialog box: Figure 19- 3. 802.1Q Static VLANs Entry Settings - Edit See below for a - D-Link DES-3326SRM | Product Manual - Page 149
D-Link DES-3326S Layer 3 Switch The following fields can then be set in either the Add or Edit dialog boxes: Parameter Description Unit Choose the Switch that the VLAN will be created on. VID (VLAN ID) Allows the entry of a VLAN ID in the Add dialog box, or displays the VLAN ID of an existing - D-Link DES-3326SRM | Product Manual - Page 150
802.1Q Port Settings D-Link DES-3326S Layer 3 Switch The Port VLAN ID (PVID) menu, shown below, allows you to determine whether the switch will share its VLAN configuration information with other GARP VLAN Registration Protocol (GVRP) enabled switches. In addition, Ingress Checking can be used to - D-Link DES-3326SRM | Product Manual - Page 151
Switch GVRP D-Link DES-3326S Layer 3 Switch To enable GVRP for the Switch, access the Switch GVRP menu in the VLAN Configurations folder, select Enabled from the drop-down menu and click on the Apply button. GVRP may be disabled universally without changing any of the per-port GVRP settings so - D-Link DES-3326SRM | Product Manual - Page 152
must be configured prior to setting up the VLAN's corresponding IP interface. An example is presented below: Table 3. VLAN Example - Assigned Ports VLAN Name VID Switch Ports System (default) 1 Engineer 2 5, 6, 7, 8, 21, 22, 23, 24 9, 10, 11, 12 Marketing 3 Finance 4 13, 14, 15, 16 17 - D-Link DES-3326SRM | Product Manual - Page 153
D-Link DES-3326S Layer 3 Switch Figure 20- 1. Setup IP Interface To setup an new IP interface, click the New button: Figure 20- 2. Setup IP Interface - Add 143 - D-Link DES-3326SRM | Product Manual - Page 154
D-Link DES-3326S Layer 3 Switch To edit an existing IP interface, click on the Edit following fields can be set: Parameter Description Interface Name IP Address Subnet Mask VLAN Name Active Switch Port/Member This field displays the name for the IP interface. The default IP interface - D-Link DES-3326SRM | Product Manual - Page 155
D-Link DES-3326S Layer 3 Switch Chapter 21 Multicast Routing Configuration Multicast Global Configurations IGMP Snooping Settings IGMP Interface Configurations DVMRP Interface Configuration PIM-DM Settings Controlling Multicast Routing on the Switch includes setting up IGMP for IP interfaces, PIM - D-Link DES-3326SRM | Product Manual - Page 156
D-Link DES-3326S Layer 3 Switch IGMP Snooping Settings To configure IGMP Snooping, click the IGMP Snooping Configurations to open the following menu: Figure 21- 2. IGMP Snooping Configuration To edit an IGMP Snooping entry on the switch, select the entry on the IGMP Snooping Configurations screen - D-Link DES-3326SRM | Product Manual - Page 157
D-Link DES-3326S Layer 3 Switch The following fields can be set: Parameter Description VLAN Name Query Interval Max Response Robustness Variable Last Member Query Interval Querier State Host Timeout Host Leave Timer Route Timeout State Allows the entry of the name of the VLAN for - D-Link DES-3326SRM | Product Manual - Page 158
D-Link DES-3326S Layer 3 Switch IGMP Interface Configuration IGMP for IP interfaces function the same way they do for individual ports or VLANs in Layer 2. Most of the parameters are the same as well, except instead of configuring for VLANs you are setting up IGMP for different subnets (IP - D-Link DES-3326SRM | Product Manual - Page 159
D-Link DES-3326S Layer 3 Switch The following fields can be set for IGMP Interfaces: Parameter Description Interface Name IP Address Version Query Interval Max Response Time Robustness - D-Link DES-3326SRM | Product Manual - Page 160
Link DES-3326S Layer 3 Switch DVMRP Interface Configuration To configure DVMRP for an IP interface, Click the DVMRP Interface Configurations link established. When a sender initiates a multicast, DVMRP initially assumes that all users on the network will want to receive the multicast message. When an - D-Link DES-3326SRM | Product Manual - Page 161
D-Link DES-3326S Layer 3 Switch The following fields for DVMRP can be set: Parameter Description Interface Name < -Dense Mode (PIM-DM) functions, please read Appendix C. The PIM-DM settings menu links are located in the PIM-DM subdirectory located in the Layer 3 IP Networking configuration folder - D-Link DES-3326SRM | Product Manual - Page 162
D-Link DES-3326S Layer 3 Switch Figure 21- 8. PIM-DM Interface Configuration The Protocol Independent Multicast − Dense Mode (PIM-DM) protocol can be individually configured for each IP interface on the switch. The PIM-DM Interface Configurations dialog box will display all of the IP interfaces - D-Link DES-3326SRM | Product Manual - Page 163
D-Link DES-3326S Layer 3 Switch Chapter 22 Static Route, Static ARP and RIP Configuration Configure Static Routes Configure Static ARP Routing Information Protocol (RIP) Configuration This chapter describes how to - D-Link DES-3326SRM | Product Manual - Page 164
Parameter D-Link DES-3326S Layer 3 Switch Description IP Address Subnet Mask Gateway IP Metric Backup Status Allows the entry of an IP address that will be a static entry into the Switch's Routing Table. Allows the entry of a subnet mask corresponding to the IP - D-Link DES-3326SRM | Product Manual - Page 165
D-Link DES-3326S Layer 3 Switch Routing Information Protocol (RIP) Configuration To setup RIP for the IP interfaces configured in the Switch, open the RIP folder and click on the RIP Global Setting link. Use the RIP Global Setting menu to first enable RIP and then configure RIP settings for the - D-Link DES-3326SRM | Product Manual - Page 166
D-Link DES-3326S Layer 3 Switch The following RIP settings can be applied to each IP interface: the IP interface on which RIP is to be setup. This interface must be previously configured on the Switch. Toggle among Disabled, V1 Only, V1 Compatible, and V2 Only. This entry specifies which version of - D-Link DES-3326SRM | Product Manual - Page 167
Link DES-3326S Layer 3 Switch Chapter 22 Introduction to OSPF The Open Shortest Path First (OSPF) routing protocol that uses a link-state algorithm to determine routes to network destinations. A "link hop to reach each destination. 4. Once the link-state databases are updated, Shortest Path Trees - D-Link DES-3326SRM | Product Manual - Page 168
D-Link DES-3326S Layer 3 Switch OSPF Cost Each OSPF interface has an associated cost (also called "metric") that is diagramed below, Router A is put at the root of the tree and the smallest cost link to each destination network is calculated. Figure 23- 1. Constructing a Shortest Path Tree 158 - D-Link DES-3326SRM | Product Manual - Page 169
D-Link DES-3326S Layer 3 Switch Router A 128.213.0.0 0 10 10 5 192.213.11.0 Router B 5 Router D 10 that this shortest path tree is only from the viewpoint of Router A. The cost of the link from Router B to Router A, for instance is not important to constructing Router A's shortest path tree - D-Link DES-3326SRM | Product Manual - Page 170
D-Link DES-3326S Layer 3 Switch Areas and Border Routers OSPF link-state updates are forwarded to other routers by flooding to all routers on the network. OSPF uses the concept of areas to define where on the network routers that need to receive particular link-state updates are located. This helps - D-Link DES-3326SRM | Product Manual - Page 171
D-Link DES-3326S Layer 3 Switch OSPF Authentication OSPF packets can be authenticated as coming it is not possible to physically connect a remote area to the backbone. In these cases, a virtual link is configured to connect the remote area to the backbone. A virtual path is a logical path between two - D-Link DES-3326SRM | Product Manual - Page 172
D-Link DES-3326S Layer 3 Switch Neighbors Routers that are connected to the same area or to become neighbors. Adjacencies Adjacent routers go beyond the simple Hello exchange and participate in the link-state database exchange process. OSPF elects one router as the Designated Router (DR) and a - D-Link DES-3326SRM | Product Manual - Page 173
D-Link DES-3326S Layer 3 Switch Building Adjacency Two routers undergo a multi-step process in linked using point-to-point interfaces (such as serial links) will always form adjacencies. The concepts of DR and BDR are unnecessary. OSPF Packet Formats All OSPF packet types begin with a standard 24 - D-Link DES-3326SRM | Product Manual - Page 174
D-Link DES-3326S Layer 3 Switch OSPF Packet Header Version No. Type Packet Length Router follows: Type Description Hello Database Description Link-State Request Link-State Update Link-State Acknowledgment The length of the packet in bytes. This length includes the 24 byte header. The Router ID of - D-Link DES-3326SRM | Product Manual - Page 175
D-Link DES-3326S Layer 3 Switch Hello Packet Version No. 1 Packet Length Router ID Area ID Checksum Router Field Neighbor Description The network mask associated with this interface. The optional capabilities supported by the router. The number of seconds between this router's Hello packets. - D-Link DES-3326SRM | Product Manual - Page 176
Link DES-3326S Layer 3 Switch Database Description Packet Version No. 2 Packet Length Router ID Area ID Checksum Authentication Type Authentication Authentication Reserved I M MS Reserved Options DD Sequence No. Link A zero indicates the opposite. User to sequence the collection of - D-Link DES-3326SRM | Product Manual - Page 177
D-Link DES-3326S Layer 3 Switch Link-State Request Packet Version No. 3 Packet Length Router ID Area ID Checksum Authentication Type Authentication Authentication Link-State Type Link-State ID Advertising Router Each advertisement requested is specified by its Link-State Type, Link-State ID, - D-Link DES-3326SRM | Product Manual - Page 178
D-Link DES-3326S Layer 3 Switch The Link-State Acknowledgment Packet Link-State Acknowledgment packets are OSPF packet type 5. To make the folding of link-state advertisements reliable, flooded advertisements are explicitly acknowledged. This acknowledgment is accomplished through the sending and - D-Link DES-3326SRM | Product Manual - Page 179
D-Link DES-3326S Layer 3 Switch recent. This is accomplished by examining the link state age, link state sequence number and link state checksum fields that are also contained in the link state advertisement header. The format of the Link State Advertisement Header is shown below: Link-State - D-Link DES-3326SRM | Product Manual - Page 180
D-Link DES-3326S Layer 3 Switch Router Links Advertisements Router links advertisements are type 1 link state advertisements. Each router in an area originates a routers links advertisement. The advertisement describes the state and cost of the router's links to the area. All of the router's links - D-Link DES-3326SRM | Product Manual - Page 181
Link DES-3326S Layer 3 Switch Field Type Link ID Link Data No. of TOS TOS 0 Metric Field TOS Metric Description A quick classification of the router link of the next hop. The number of different Type of Service (TOS) metrics given for this link, not counting the required metric for TOS 0. If no - D-Link DES-3326SRM | Product Manual - Page 182
D-Link DES-3326S Layer 3 Switch Network Links Advertisements Network links advertisements are Type 2 link state advertisements. A network links advertisement is originated for each transit network in the area. A transit network is a multi-access network that has more than one attached router. The - D-Link DES-3326SRM | Product Manual - Page 183
D-Link DES-3326S Layer 3 Switch Summary Link Advertisements Link-State Age Options 2 Link-State ID Advertising Router Link-State Sequence Number Link-State Checksum Length TOS Network Mask Metric For stub area, Type 3 summary link advertisements can also be used to describe a default - D-Link DES-3326SRM | Product Manual - Page 184
D-Link DES-3326S Layer 3 Switch Autonomous Systems External Link Advertisements Autonomous Systems (AS) link advertisements are Type 5 link data traffic will be forwarded instead to the advertisement's originator. The Type of Service that the following cost is relevant to. The cost of this route. - D-Link DES-3326SRM | Product Manual - Page 185
D-Link DES-3326S Layer 3 Switch Chapter 24 Configure OSPF MD5 Key Table Configuration Configure OSPF Settings OSPF Settings Route Redistribution Settings This chapter describes how to configure OSPF settings for the Switch. If you are not familiar with the basic concepts associated of OSPF protocol, - D-Link DES-3326SRM | Product Manual - Page 186
D-Link DES-3326S Layer 3 Switch MD5 Key Table Configuration MD5 authentication is used the MD5 Key Table Configuration screen, and click the Edit button: The following fields can be set: Figure 24- 3. MD5 Key Table − Edit Parameter Description Key ID Key A number from 1 to 255 used to - D-Link DES-3326SRM | Product Manual - Page 187
D-Link DES-3326S Layer 3 Switch Configure OSPF Settings All the links for OSPF configuration menus are contained within a subdirectory of the Layer 3 IP Networking subdirectory (located in the Configuration folder). The OSPF tables used to monitor OSPF information can be accessed using the links - D-Link DES-3326SRM | Product Manual - Page 188
D-Link DES-3326S Layer 3 Switch To set up an OSPF Area configuration click the OSPF Area Settings link to open the following dialog box: Figure 24- 5. OSPF Area Setting The first OSPF Area Setting screen displays a summary of all of the OSPF areas defined on the switch. OSPF areas can be added, - D-Link DES-3326SRM | Product Manual - Page 189
D-Link DES-3326S Layer 3 Switch OSPF Interface Configuration To set up OSPF interfaces, click the OSPF Interface Settings link to view the OSPF Interface Configuration link: Figure 24- 8. OSPF Interface Configuration All of the IP Interfaces currently configured on the switch will be displayed. - D-Link DES-3326SRM | Product Manual - Page 190
be not interfaces listed. A new menu appears (see below). To setup an OSPF Virtual Interface on the switch, click the Virtual Interface Configuration link under the OSPF folder: Figure 24- 10. Virtual Interface Configuration To add a new OSPF virtual interface configuration set to the table, click - D-Link DES-3326SRM | Product Manual - Page 191
D-Link DES-3326S Layer 3 Switch Figure 24- 11. Virtual Interface Configuration − Add Configure the Type Password/Auth. Key ID Allows the entry of an OSPF Area ID − previously defined on the Switch − that allows a remote area to communicate with the backbone (area 0). A Transit Area cannot be - D-Link DES-3326SRM | Product Manual - Page 192
D-Link DES-3326S Layer 3 Switch Area Aggregation Configuration Area Aggregation allows all of the accessing the menu. To configure OSPF Area Aggregation on the switch, click the Area Aggregation Configuration link in the OSPF folder: Figure 24- 12. OSPF Aggregation Configuration To add an OSPF Area - D-Link DES-3326SRM | Product Manual - Page 193
D-Link DES-3326S Layer 3 Switch OSPF Host Route Settings OSPF host routes work in a way analogous to RIP, only this is used to share OSPF information with other OSPF routers. This is used to work around problems that might prevent OSPF information sharing between routers. To configure OSPF host - D-Link DES-3326SRM | Product Manual - Page 194
entered into the Static Routing Table on the local DES-3326Ss Switch is also redistributed. To configure Route Redistribution on the switch, click on the Route Redistribution link in the Layer 3 IP Network folder. Figure 24- 16. Route Redistribution Settings To add a Route Redistribution setting - D-Link DES-3326SRM | Product Manual - Page 195
D-Link DES-3326S Layer 3 Switch To edit an existing Route Redistribution entry on the switch, select the entry from the Route Redistribution screen and click on the Edit button: Figure 24- 18. Route Redistribution − Edit Refer to the table below for descriptions of the Router Redistribution Table - D-Link DES-3326SRM | Product Manual - Page 196
D-Link DES-3326S Layer 3 Switch Appendix A Technical Specifications General Standard Protocols Data Transfer Rates: IEEE 802.3 10BASE-T Ethernet IEEE 802.3u 100BASE-TX Fast Ethernet IEEE 802.3ab 1000BASE-T Gigabit Ethernet IEEE 802.3z 1000BASE-X Ethernet IEEE 802.1 P/Q VLAN IEEE 802.3x Full- - D-Link DES-3326SRM | Product Manual - Page 197
D-Link DES-3326S Layer 3 Switch Physical & Environmental AC inputs: 100 - 240 VAC, 50/60 Hz (internal universal power supply) Power Consumption: 29 watts maximum DC fans: 2 built-in 40 x 40 - D-Link DES-3326SRM | Product Manual - Page 198
D-Link DES-3326S Layer 3 Switch Appendix B Network Addressing and Protocols This appendix provides background IP Addressing and Subnetting This section gives basic information needed to configure your Layer 3 Switch for IP routing. The information includes how IP addresses are broken down and how - D-Link DES-3326SRM | Product Manual - Page 199
D-Link DES-3326S Layer 3 Switch The dots are included to make the numbers easier to vice-versa), you can use the following chart: Binary to Decimal Conversion Binary Octet Digit Decimal Equivalent 27 26 25 24 23 22 21 20 128 64 32 16 8 4 2 1 Binary Number 128+64+32+16+8+4+2+1= 1 1 - D-Link DES-3326SRM | Product Manual - Page 200
D-Link DES-3326S Layer 3 Switch Subnet Masking A subnet mask can be applied to an IP address are not allowed, so 2 subnets are subtracted from the total. The number of bits used in the node part of the address is 24 - 3 = 21 bits, so the total number of nodes is: 221 - 2 = 2,097,152 - 2 = 2,097, - D-Link DES-3326SRM | Product Manual - Page 201
D-Link DES-3326S Layer 3 Switch Class A Subnet Masks # of Bit Subnet Mask s 2 255.192.0.0 3 255.224.0.0 4 255.240.0.0 5 255.248.0.0 CIDR Notation /10 /11 /12 /13 /14 /15 /16 /17 /18 /19 /20 /21 /22 /23 /24 /25 /26 /27 /28 /29 /30 # of Subnets 2 6 14 30 62 126 254 510 1022 2046 4094 8190 - D-Link DES-3326SRM | Product Manual - Page 202
D-Link DES-3326S Layer 3 Switch Class B Subnet Masks # of Bit Subnet Mask s CIDR Notation 2 255.255.192 /18 3 255.255.224.0 /19 4 255.255.240.0 /20 5 255.255.248.0 /21 6 255.255.252.0 /22 7 255.255.254.0 /23 8 255.255.255.0 /24 9 255.255.255.128 /25 10 255.255.255.192 /26 11 - D-Link DES-3326SRM | Product Manual - Page 203
Internet Protocols D-Link DES-3326S Layer 3 Switch This is a brief introduction to the suite of Internet Protocols the necessary software and hardware in a network. In this view, Layer 2 represents Switching and Layer 3 represents routing. Protocol layering is actually a set of guidelines used in - D-Link DES-3326SRM | Product Manual - Page 204
D-Link DES-3326S Layer 3 Switch Figure logical partitioning of networks (subnetting), scalability, security, and Quality of Service (QoS). The backbone of the Internet is built using Layer 3 encryption. IP not only allows for user-to-user communication, but also for transmission from point-to-multipoint - D-Link DES-3326SRM | Product Manual - Page 205
D-Link DES-3326S Layer 3 Switch Layer 4 This layer, known as the transport layer, establishes the communication path between user applications and the network infrastructure and defines the method of communicating. TCP and UDP are well-known protocols in the transport layer. TCP is a "connection- - D-Link DES-3326SRM | Product Manual - Page 206
D-Link DES-3326S Layer 3 Switch The TCP header contains at least 20 octets. The source and destination TCP port numbers are the most important fields. These specify the connection between two TCP protocols on two network devices. The header also contains a sequence number that - D-Link DES-3326SRM | Product Manual - Page 207
D-Link DES-3326S Layer 3 Switch The flags and fragment offset are used to keep track of packets that must be divided among several smaller packets to cross networks for which - D-Link DES-3326SRM | Product Manual - Page 208
D-Link DES-3326S Layer 3 Switch TCP and UDP Well-Known Ports Application protocols run 'on top of' TCP/IP to the query after a period of time, the query can simply be resent. The User Datagram Protocol (UDP) is designed for communications that do not require division among multiple packets - D-Link DES-3326SRM | Product Manual - Page 209
D-Link DES-3326S Layer 3 Switch The does not, however use ports because its messages are processed by the network software. The Domain Name System Computer users usually prefer to use name service is often supplied by a DCHP or BOOTP server, or can be entered manually and configured into the operating - D-Link DES-3326SRM | Product Manual - Page 210
D-Link DES-3326S Layer 3 Switch DHCP Servers The Dynamic Host Configuration Protocol (DHCP) is used to dynamically assign a TCP/IP . For two DHCP servers to communicate across different subnets, the BOOTP/DHCP Relay of the DES-3326S must be used. The DHCP servers are identified by IP addresses. 200 - D-Link DES-3326SRM | Product Manual - Page 211
D-Link DES-3326S Layer 3 Switch Appendix C IP Routing, Multicasting, Multicast Routing and Routing Protocols IP handles the task of determining how packets will get from their source to their destination. - D-Link DES-3326SRM | Product Manual - Page 212
ARP D-Link DES-3326S Layer 3 Switch The Address Resolution Protocol (ARP) determines the MAC address and IP address correspondence for a network device. A local computer will maintain an ARP cache which is a - D-Link DES-3326SRM | Product Manual - Page 213
Multicasting D-Link DES-3326S Layer 3 Switch Multicasting is a group of protocols and tools that enable a single source point to send packets to groups of multiple destination points with persistent connections that - D-Link DES-3326SRM | Product Manual - Page 214
D-Link DES-3326S Layer 3 Switch Internet Group Management Protocol (IGMP) End users that want to receive multicast is forwarded. If there are no members, the packet is dropped. IGMP Versions 1 and 2 Users that want to receive multicast packets need to be able to join and leave multicast groups. This - D-Link DES-3326SRM | Product Manual - Page 215
D-Link DES-3326S Layer 3 Switch Multicast Routing Algorithms An algorithm is not a program. An algorithm is a statement of how a problem can be solved. A program is written to implement an algorithm. Multicast packets are delivered by constructing multicast trees where the multicast router is the - D-Link DES-3326SRM | Product Manual - Page 216
Link DES-3326S Layer 3 Switch if the packet was received on the shortest path back from the router to the source. If the packet was received on the shortest path back to the source, the packet is forwarded on all links except the link the network. It also gives all users a chance to join a given - D-Link DES-3326SRM | Product Manual - Page 217
Link DES-3326S Layer 3 Switch two multicast routers on a network have the same distance back to a multicast source, the router with the lowest IP address is elected. DVMRP also supports an intranetwork (LAN) where the distance between users is minimal. Routing Protocols Routing Information Protocol ( - D-Link DES-3326SRM | Product Manual - Page 218
D-Link DES-3326S Layer 3 Switch The COMMAND field specifies an operation according the following table: RIP Command Codes packet was sent. RIP 1 Message RIP is not limited to TCP/IP. Its address format can support up to 14 octets (when using IP, the remaining 10 octets must be zeros). Other network - D-Link DES-3326SRM | Product Manual - Page 219
D-Link DES-3326S Layer 3 Switch Routers running RIP version 1 must send different update messages for each IP interface to which it is connected. Interfaces that use the same subnet mask - D-Link DES-3326SRM | Product Manual - Page 220
an end station that also supports auto-negotiation, the link can self-detect its optimum operating setup. backbone port: A port that does not learn device addresses, and which receives all frames with an unknown address. Backbone ports are normally used to connect the Switch to the backbone of your - D-Link DES-3326SRM | Product Manual - Page 221
learns the addresses associated with each switch port and builds tables based on this information to be used for the switching decision. TCP/IP: A layered set of communications protocols providing Telnet terminal emulation, FTP file transfer, and other services for communication among a wide range - D-Link DES-3326SRM | Product Manual - Page 222
Link DES-3326S Layer 3 Switch LIMITED WARRANTY D-Link provides this limited warranty for its product only to the person or entity who originally purchased the product from D-Link or its authorized reseller or distributor. D-Link received by an authorized D-Link Service Office within such ninety ( - D-Link DES-3326SRM | Product Manual - Page 223
D-Link DES-3326S Layer 3 Switch What You Must Do For Warranty Service: Registration Card. The Registration Card provided at the back of this manual must be completed and returned to an Authorized D-Link Service Office for each D-Link product within ninety (90) days after the product is purchased and - D-Link DES-3326SRM | Product Manual - Page 224
Link DES-3326S Layer 3 Switch Limitation of Liability: TO THE MAXIMUM EXTENT PERMITTED BY LAW, D-LINK LINK FOR WARRANTY SERVICE) RESULTING FROM THE USE OF THE PRODUCT, RELATING TO WARRANTY SERVICE, OR ARISING OUT OF ANY BREACH OF THIS LIMITED WARRANTY, EVEN IF D-LINK with this manual, may cause - D-Link DES-3326SRM | Product Manual - Page 225
defective Hardware during the Warranty Period at no charge to the original owner or to refund the actual purchase price paid. Any repair or replacement will be rendered by D-Link at an Authorized D-Link Service Office. The replacement hardware need not be new or have an identical make, model or part - D-Link DES-3326SRM | Product Manual - Page 226
covered in the operating manual for the product, and normal maintenance; Damage that occurs in shipment, due to act of God, failures due to power surge, and cosmetic damage; Any hardware, software, firmware or other products or services provided by anyone other than D-Link; and Products that have - D-Link DES-3326SRM | Product Manual - Page 227
Link DES-3326S Layer 3 Switch Limitation of Liability: TO THE MAXIMUM EXTENT PERMITTED BY LAW, D-LINK D-LINK UNDER THIS WARRANTY IS LIMITED TO THE PURCHASE PRICE OF in accordance with the instructions, may cause harmful interference the equipment off and on, the user is encouraged to try to correct - D-Link DES-3326SRM | Product Manual - Page 228
D-Link DES-3326S Layer 3 Switch Product Registration Register online your D-Link product at http://support.dlink.com/register/ Product registration is entirely voluntary and failure to complete or return this form will not diminish your warranty rights. 218 - D-Link DES-3326SRM | Product Manual - Page 229
below ("Limited Product Warranty Period"), if the product is used and serviced in accordance with the user manual and other documentation provided to the purchaser at the time of purchase (or as amended from time to time). D-LINK does not warrant that the products will operate uninterrupted or error - D-Link DES-3326SRM | Product Manual - Page 230
D-Link DES-3326S Layer 3 Switch The warranty period stated in this card supersedes and replaces the warranty period as stated in the user's manual or in the purchase contract for the relevant products. For the avoidance of doubt, if you have purchased the relevant D-LINK product as a consumer your - D-Link DES-3326SRM | Product Manual - Page 231
Link DES-3326S Layer 3 Switch Performance of the Limited Product Warranty If a product defect occurs, D-LINK's sole obligation shall be to repair or replace any defective product free of charge to the original purchaser provided it is returned to an Authorized D-LINK Service part; D-LINK may in its - D-Link DES-3326SRM | Product Manual - Page 232
D-Link DES-3326S Layer 3 Switch D-Link Europe Limited Produktgarantie Allgemeine Bedingungen Die hierin beschriebene eingeschränkte Garantie wird durch D-LINK (Europe) Ltd. gewährt (im Folgenden: „D-LINK"). Diese eingeschränkte Garantie setzt voraus, dass der Kauf des Produkts nachgewiesen wird. - D-Link DES-3326SRM | Product Manual - Page 233
D-Link DES-3326S Layer 3 Switch Leistungsumfang der eingeschränkten Garantie Bei Auftreten eines Produktfehlers besteht die einzige Verpflichtung von D-LINK darin, dem ursprünglichen Käufer das defekte Produkt kostenlos zu reparieren oder es auszutauschen. Voraussetzung hierfür ist, dass das Produkt - D-Link DES-3326SRM | Product Manual - Page 234
un produit dont le numéro de série D-LINK aurait été retiré ou altéré de quelque manière que ce soit. D-LINK N'EST NULLEMENT RESPONSABLE DE DOMMAGES RESULTANT DE VOTRE INOBSERVATION DES INSTRUCTIONS FOURNIES POUR L'UTILISATION DE SON PRODUIT MATERIEL. Période de Garantie Produit Limitée La Période - D-Link DES-3326SRM | Product Manual - Page 235
ée D-Link DES-3326S Layer 3 Switch En cas de défaut ou d'erreur d'un produit, l'unique obligation de D-LINK se limite à la réparation ou au remplacement gratuit du produit défectueux, au bénéfice de l'acheteur initial, sous réserve que le produit soit rapporté à un Centre de Service Agréé D-LINK - D-Link DES-3326SRM | Product Manual - Page 236
limitada del producto es válida en todos los países europeos que figuran en el apéndice "Países europeos de la garantía limitada del producto D-LINK". En esta garantía limitada del producto DLink, el término "países europeos" sólo incluye los países que figuran en el apéndice. La garantía limitada - D-Link DES-3326SRM | Product Manual - Page 237
D-Link DES-3326S Layer 3 Switch Si un producto presenta algún defecto, la obligación exclusiva de D-LINK será reparar o reemplazar, sin coste alguno para el comprador originario, cualquier producto defectuoso siempre y cuando éste sea entregado en un centro autorizado de servicio D-LINK durante - D-Link DES-3326SRM | Product Manual - Page 238
D-Link DES-3326S Layer 3 Switch D-Link Europe Termini di Garanzia dei Prodotti Generalità La presente Garanzia viene fornita da D-LINK (Europe) Ltd. (di seguito denominata "D-LINK"). Essa viene riconosciuta solo se accompagnata dalla prova di acquisto. D-LINK può richiedere anche l'esibizione della - D-Link DES-3326SRM | Product Manual - Page 239
Link DES-3326S Layer 3 Switch Qualora comparisse un difetto o una non conformità, D-LINK di proprietà di D-LINK. Il pezzo o il fattura, modello o composizione; D-LINK può a sua discrezione sostituire conforme. D-LINK può richiedere che venga esibita la prova di acquisto. Garante D-Link (Europe) - D-Link DES-3326SRM | Product Manual - Page 240
, S-167 15 Bromma Sweden TEL: 46-(0)8564-61900 FAX: 46-(0)8564-61901 URL: www.dlink.se D-Link DES-3326S Layer 3 Switch Denmark Naverland 2, DK-2600 Glostrup, Copenhagen, TEL: 45-43-969040 FAX: 45-43-424347 URL:www.dlink.dk Norway Karihaugveien 89 1086 Oslo Norway TEL: 47-23-897189 FAX: 47-22-309085 - D-Link DES-3326SRM | Product Manual - Page 241
Reseller's full address Answers to the following questions help us to support your product: 1. Where and how will the product primarily be DECnet Others 4. What network operating system(s) does your organization use ? D-Link LANsmart Novell NetWare NetWare Lite SCO Unix/Xenix PC NFS 3Com 3+Open - D-Link DES-3326SRM | Product Manual - Page 242
-
 1
1 -
 2
2 -
 3
3 -
 4
4 -
 5
5 -
 6
6 -
 7
7 -
8
-
9
-
10
-
11
-
12
-
13
-
14
-
15
-
16
-
17
-
18
-
19
-
20
-
21
-
22
-
23
-
24
-
25
-
26
-
27
-
28
-
29
-
30
-
31
-
32
-
33
-
34
-
35
-
36
-
37
-
38
-
39
-
40
-
41
-
42
-
43
-
44
-
45
-
46
-
47
-
48
-
49
-
50
-
51
-
52
-
53
-
54
-
55
-
56
-
57
-
58
-
59
-
60
-
61
-
62
-
63
-
64
-
65
-
66
-
67
-
68
-
69
-
70
-
71
-
72
-
73
-
74
-
75
-
76
-
77
-
78
-
79
-
80
-
81
-
82
-
83
-
84
-
85
-
86
-
87
-
88
-
89
-
90
-
91
-
92
-
93
-
94
-
95
-
96
-
97
-
98
-
99
-
100
-
101
-
102
-
103
-
104
-
105
-
106
-
107
-
108
-
109
-
110
-
111
-
112
-
113
-
114
-
115
-
116
-
117
-
118
-
119
-
120
-
121
-
122
-
123
-
124
-
125
-
126
-
127
-
128
-
129
-
130
-
131
-
132
-
133
-
134
-
135
-
136
-
137
-
138
-
139
-
140
-
141
-
142
-
143
-
144
-
145
-
146
-
147
-
148
-
149
-
150
-
151
-
152
-
153
-
154
-
155
-
156
-
157
-
158
-
159
-
160
-
161
-
162
-
163
-
164
-
165
-
166
-
167
-
168
-
169
-
170
-
171
-
172
-
173
-
174
-
175
-
176
-
177
-
178
-
179
-
180
-
181
-
182
-
183
-
184
-
185
-
186
-
187
-
188
-
189
-
190
-
191
-
192
-
193
-
194
-
195
-
196
-
197
-
198
-
199
-
200
-
201
-
202
-
203
-
204
-
205
-
206
-
207
-
208
-
209
-
210
-
211
-
212
-
213
-
214
-
215
-
216
-
217
-
218
-
219
-
220
-
221
-
222
-
223
-
224
-
225
-
226
-
227
-
228
-
229
-
230
-
231
-
232
-
233
-
234
-
235
-
236
-
237
-
238
-
239
-
240
-
241
-
242
 |
 |

D-Link
™
DES-3326S
24-Port Layer 3 Stackable Switch
Manual
May 2005
651ES3326S055