D-Link DES-3326SRM Product Manual - Page 43
Login to Web Manager, Web s and Menus, Access Profile Mask Setup - vlan
 |
UPC - 790069255304
View all D-Link DES-3326SRM manuals
Add to My Manuals
Save this manual to your list of manuals |
Page 43 highlights
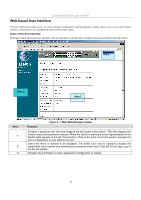
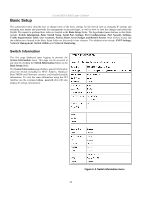
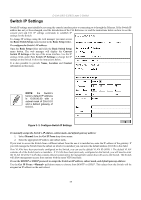
Login to Web Manager D-Link DES-3326S Layer 3 Switch To begin managing the Switch simply run the browser you have installed on your computer and point it to the IP address you have defined for the device. The URL in the address bar should read something like: http://123.123.123.123, where the numbers 123 represent the IP address of the Switch. NOTE: The Factory default IP address for the Switch is 10.90.90.90. In the Welcome page, click on the Login hyperlink; this opens a login screen. Enter a user name and password to access the Switch's management main page (pictured above). There is no user name or password configured for the Switch in the default settings, so if this is the first time logging in it is not necessary to enter these. NOTICE: Any changes made to the Switch configuration during the current session must be saved in the Save Changes web menu (explained below) or use the command line interface (CLI) command save. Web Pages and Menus Menus for configuration and information are organized in two folders or directories, Basic Setup and Advanced Setup. These folders contain all the menus and subdirectories used to configure, manage and view information for the DES-3326S. The Basic Setup directory includes the SNTP Settings, Network Management, Switch Utilities and Network Monitoring subdirectories as well as the menus for Switch Information, Basic Switch Setup (includes IP settings), Serial Port Settings, Port Configuration, Port Security Settings, Traffic Segmentation, User Accounts, Factory Reset, Save Changes and Restart System. Advanced Setup includes subdirectories for Spanning Tree, MAC Notification, Forwarding, Configure QoS, VLAN Configuration, Link Aggregation, 802.1x, System Log and Layer 3 IP Networking. Other menus included are (Port) Mirroring Configuration and Access Profile Mask Setup. NOTE: Configure the user name and password in the User Accounts menu before connecting the Switch to the greater network. 33
-
 1
1 -
2
-
3
-
4
-
5
-
6
-
7
-
8
-
9
-
10
-
11
-
12
-
13
-
14
-
15
-
16
-
17
-
18
-
19
-
20
-
21
-
22
-
23
-
24
-
25
-
26
-
27
-
28
-
29
-
30
-
31
-
32
-
33
-
34
-
35
-
36
-
37
-
 38
38 -
 39
39 -
 40
40 -
 41
41 -
 42
42 -
 43
43 -
 44
44 -
 45
45 -
 46
46 -
 47
47 -
 48
48 -
49
-
50
-
51
-
52
-
53
-
54
-
55
-
56
-
57
-
58
-
59
-
60
-
61
-
62
-
63
-
64
-
65
-
66
-
67
-
68
-
69
-
70
-
71
-
72
-
73
-
74
-
75
-
76
-
77
-
78
-
79
-
80
-
81
-
82
-
83
-
84
-
85
-
86
-
87
-
88
-
89
-
90
-
91
-
92
-
93
-
94
-
95
-
96
-
97
-
98
-
99
-
100
-
101
-
102
-
103
-
104
-
105
-
106
-
107
-
108
-
109
-
110
-
111
-
112
-
113
-
114
-
115
-
116
-
117
-
118
-
119
-
120
-
121
-
122
-
123
-
124
-
125
-
126
-
127
-
128
-
129
-
130
-
131
-
132
-
133
-
134
-
135
-
136
-
137
-
138
-
139
-
140
-
141
-
142
-
143
-
144
-
145
-
146
-
147
-
148
-
149
-
150
-
151
-
152
-
153
-
154
-
155
-
156
-
157
-
158
-
159
-
160
-
161
-
162
-
163
-
164
-
165
-
166
-
167
-
168
-
169
-
170
-
171
-
172
-
173
-
174
-
175
-
176
-
177
-
178
-
179
-
180
-
181
-
182
-
183
-
184
-
185
-
186
-
187
-
188
-
189
-
190
-
191
-
192
-
193
-
194
-
195
-
196
-
197
-
198
-
199
-
200
-
201
-
202
-
203
-
204
-
205
-
206
-
207
-
208
-
209
-
210
-
211
-
212
-
213
-
214
-
215
-
216
-
217
-
218
-
219
-
220
-
221
-
222
-
223
-
224
-
225
-
226
-
227
-
228
-
229
-
230
-
231
-
232
-
233
-
234
-
235
-
236
-
237
-
238
-
239
-
240
-
241
-
242
 |
 |
