D-Link DWR-512 User Manual - Page 11
Installation, Connect to Your Network - follow me
 |
View all D-Link DWR-512 manuals
Add to My Manuals
Save this manual to your list of manuals |
Page 11 highlights
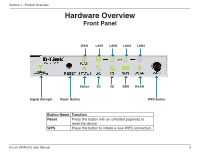
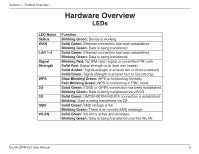
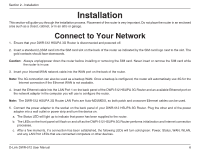
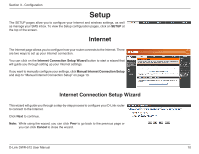
Section 2 - Installation Installation This section will guide you through the installation process. Placement of the router is very important. Do not place the router in an enclosed area such as a closet, cabinet, or in an attic or garage. Connect to Your Network 1. Ensure that your DWR-512 HSUPA 3G Router is disconnected and powered off. 2. Insert a standard (U)SIM card into the SIM card slot on the back of the router as indicated by the SIM card logo next to the slot. The gold contacts should face downwards. Caution: Always unplug/power down the router before installing or removing the SIM card. Never insert or remove the SIM card while the router is in use. 3. Insert your Internet/WAN network cable into the WAN port on the back of the router. Note: The 3G connection can also be used as a backup WAN. Once a backup is configured, the router will automatically use 3G for the Internet connection if the Ethernet WAN is not available. 4. Insert the Ethernet cable into the LAN Port 1 on the back panel of the DWR-512 HSUPA 3G Router and an available Ethernet port on the network adapter in the computer you will use to configure the router. Note: The DWR-512 HSUPA 3G Router LAN Ports are Auto-MDI/MDIX, so both patch and crossover Ethernet cables can be used. 5. Connect the power adapter to the socket on the back panel of your DWR-512 HSUPA 3G Router. Plug the other end of the power adapter into a wall outlet or power strip and turn the device on. a. The Status LED will light up to indicate that power has been supplied to the router. b. The LEDs on the front panel will flash on and off as the DWR-512 HSUPA 3G Router performs initialization and Internet connection processes. c. After a few moments, if a connection has been established, the following LEDs will turn solid green: Power, Status, WAN, WLAN, and any LAN Port LEDs that are connected computers or other devices. D-Link DWR-512 User Manual 6
-
 1
1 -
2
-
3
-
4
-
5
-
 6
6 -
 7
7 -
 8
8 -
 9
9 -
 10
10 -
 11
11 -
 12
12 -
 13
13 -
 14
14 -
 15
15 -
 16
16 -
17
-
18
-
19
-
20
-
21
-
22
-
23
-
24
-
25
-
26
-
27
-
28
-
29
-
30
-
31
-
32
-
33
-
34
-
35
-
36
-
37
-
38
-
39
-
40
-
41
-
42
-
43
-
44
-
45
-
46
-
47
-
48
-
49
-
50
-
51
-
52
-
53
-
54
-
55
-
56
-
57
-
58
-
59
-
60
-
61
-
62
-
63
-
64
-
65
-
66
-
67
-
68
-
69
-
70
-
71
-
72
-
73
-
74
-
75
-
76
-
77
-
78
-
79
-
80
-
81
-
82
-
83
-
84
-
85
-
86
-
87
-
88
 |
 |