Dell Inspiron 9100 Owner's Manual - Page 100
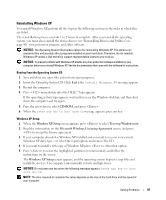
Disconnect any telephone or telecommunication lines from the computer. - replacement battery
 |
View all Dell Inspiron 9100 manuals
Add to My Manuals
Save this manual to your list of manuals |
Page 100 highlights
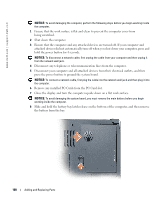
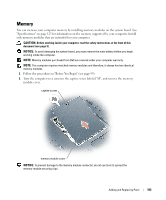
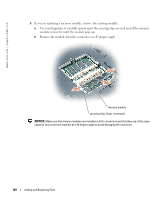
www.dell.com | support.dell.com NOTICE: To avoid damaging the computer, perform the following steps before you begin working inside the computer. 1 Ensure that the work surface is flat and clean to prevent the computer cover from being scratched. 2 Shut down the computer. 3 Ensure that the computer and any attached devices are turned off. If your computer and attached devices did not automatically turn off when you shut down your computer, press and hold the power button for 4 seconds. NOTICE: To disconnect a network cable, first unplug the cable from your computer and then unplug it from the network wall jack. 4 Disconnect any telephone or telecommunication lines from the computer. 5 Disconnect your computer and all attached devices from their electrical outlets, and then press the power button to ground the system board. NOTICE: To connect a network cable, first plug the cable into the network wall jack and then plug it into the computer. 6 Remove any installed PC Cards from the PC Card slot. 7 Close the display and turn the computer upside down on a flat work surface. NOTICE: To avoid damaging the system board, you must remove the main battery before you begin working inside the computer. 8 Slide and hold the battery-bay latch release on the bottom of the computer, and then remove the battery from the bay. 100 Adding and Replacing Parts
-
 1
1 -
2
-
3
-
4
-
5
-
6
-
7
-
8
-
9
-
10
-
11
-
12
-
13
-
14
-
15
-
16
-
17
-
18
-
19
-
20
-
21
-
22
-
23
-
24
-
25
-
26
-
27
-
28
-
29
-
30
-
31
-
32
-
33
-
34
-
35
-
36
-
37
-
38
-
39
-
40
-
41
-
42
-
43
-
44
-
45
-
46
-
47
-
48
-
49
-
50
-
51
-
52
-
53
-
54
-
55
-
56
-
57
-
58
-
59
-
60
-
61
-
62
-
63
-
64
-
65
-
66
-
67
-
68
-
69
-
70
-
71
-
72
-
73
-
74
-
75
-
76
-
77
-
78
-
79
-
80
-
81
-
82
-
83
-
84
-
85
-
86
-
87
-
88
-
89
-
90
-
91
-
92
-
93
-
94
-
 95
95 -
 96
96 -
 97
97 -
 98
98 -
 99
99 -
 100
100 -
 101
101 -
 102
102 -
 103
103 -
 104
104 -
 105
105 -
106
-
107
-
108
-
109
-
110
-
111
-
112
-
113
-
114
-
115
-
116
-
117
-
118
-
119
-
120
-
121
-
122
-
123
-
124
-
125
-
126
-
127
-
128
-
129
-
130
-
131
-
132
-
133
-
134
-
135
-
136
-
137
-
138
-
139
-
140
-
141
-
142
-
143
-
144
-
145
-
146
-
147
-
148
-
149
-
150
-
151
-
152
-
153
-
154
-
155
-
156
-
157
-
158
-
159
-
160
-
161
-
162
 |
 |