Denon AVR-3311CI Owners Manual - English - Page 26
Connecting an external control device, Connecting a external power, amplifier - a v surround receiver
 |
UPC - 883795001380
View all Denon AVR-3311CI manuals
Add to My Manuals
Save this manual to your list of manuals |
Page 26 highlights
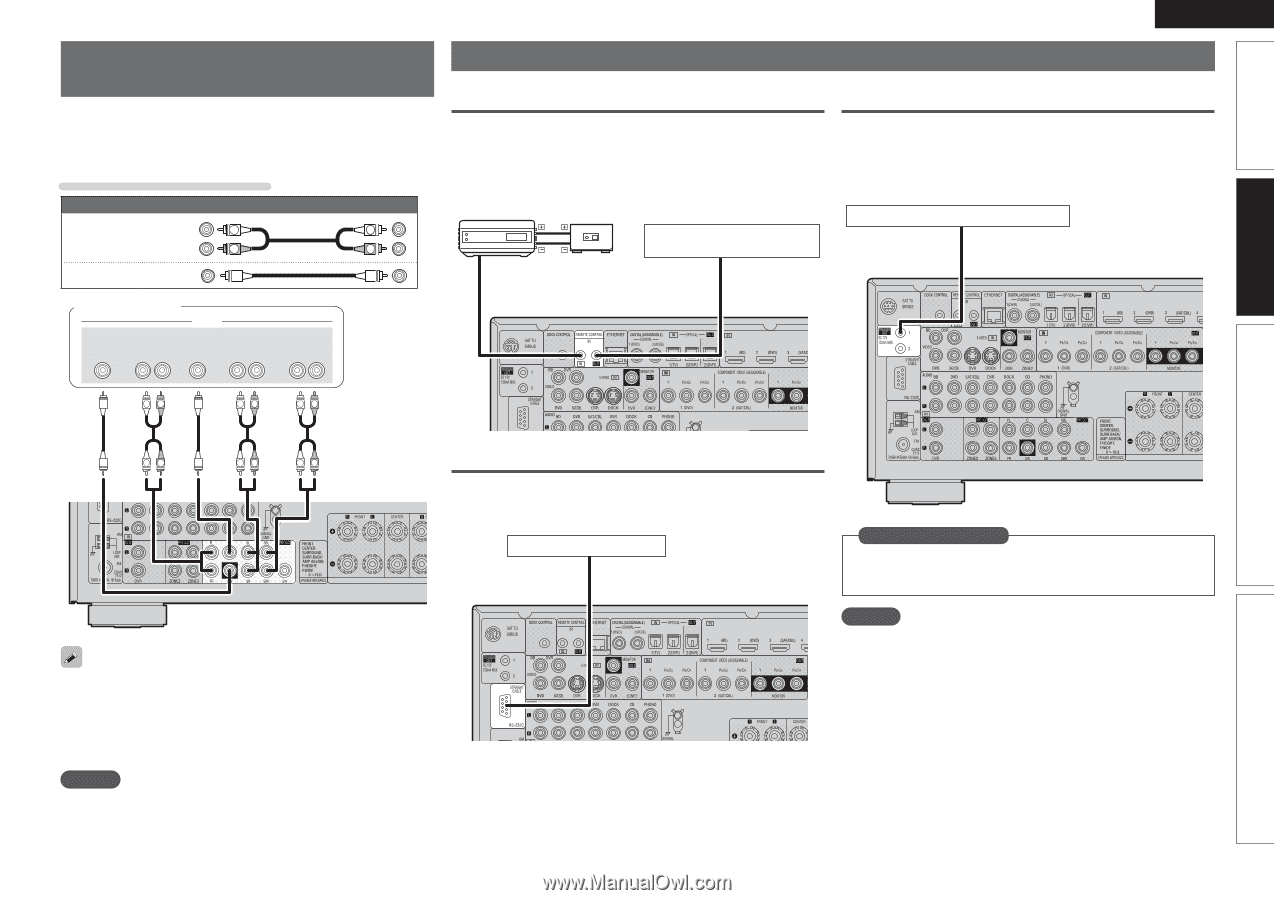
Simple version ENGLISH Connecting a external power amplifier • You can use this unit as a pre-amp by connecting a commercially available power amp to the PRE OUT connector. Adding a power amp to each of the channels provides an even greater sound presence. • Select the terminal to use and connect the device. Cables used for connections Audio cable (sold separately) Audio cable (White) L L (Red) R R Audio cable Connecting an external control device REMOTE CONTROL jacks If this unit is installed in a location that is out of range of the signal from the remote control unit, you can still operate the unit and the devices connected to it by using a commercially available IR receiver. You can also use it to remotely control ZONE2, ZONE3 (another room). Infrared retransmitter Infrared sensor AUX Input OUT Output Device equipped with a REMOTE CONTROL IN jack TRIGGER OUT jacks When a device with TRIGGER IN jack is connected, the connected device's power on/standby can be controlled through linked operation to this unit. The TRIGGER OUT jack outputs a maximum 12 V/150 mA electrical signal. 12 V/150 mA trigger-compatible device Power amplifier SUBWOOFER FRONT AUDIO CENTER SURROUND LR LR SURROUND BACK LR Basic version LR LR LR Advanced version LR LR LR RS-232C connector By connecting an external serial controller, you can control all sorts of household electrical devices (including lights, electric curtains, and air conditioning units) in addition to your audio and video devices. External serial controller in Set as Necessary Set to change the conditions for linked operation via the TRIGGER OUT 1 or 2 jack. "Trigger Out 1" or "Trigger Out 2" (vpage 88) • When using just one surround back speaker, connect it to the left channel (L) terminal. • Use the volume control on the subwoofer to control subwoofer volume. • If the subwoofer volume sounds low, use the volume control provided on the subwoofer to adjust the volume. NOTE • When speakers have been connected to PRE OUT terminals, do not connect the speakers to the speaker terminals. • The output channels for the PRE OUT connector change to SBL and SBR in the "Amp Assign" (vpage 79) settings in the menu. Perform the operation below beforehand. q Turn on the power of this unit. w Turn off the power of this unit from the external controller. e Check that the unit is in the standby mode. NOTE If the permissible trigger input level for the connected device is larger than 12V/150mA, or has shorted, the TRIGGER OUT jack cannot be used. In this case, turn off the power to the unit, and disconnect it. 23 Information
-
 1
1 -
2
-
3
-
4
-
5
-
6
-
7
-
8
-
9
-
10
-
11
-
12
-
13
-
14
-
15
-
16
-
17
-
18
-
19
-
20
-
 21
21 -
 22
22 -
 23
23 -
 24
24 -
 25
25 -
 26
26 -
 27
27 -
 28
28 -
 29
29 -
 30
30 -
 31
31 -
32
-
33
-
34
-
35
-
36
-
37
-
38
-
39
-
40
-
41
-
42
-
43
-
44
-
45
-
46
-
47
-
48
-
49
-
50
-
51
-
52
-
53
-
54
-
55
-
56
-
57
-
58
-
59
-
60
-
61
-
62
-
63
-
64
-
65
-
66
-
67
-
68
-
69
-
70
-
71
-
72
-
73
-
74
-
75
-
76
-
77
-
78
-
79
-
80
-
81
-
82
-
83
-
84
-
85
-
86
-
87
-
88
-
89
-
90
-
91
-
92
-
93
-
94
-
95
-
96
-
97
-
98
-
99
-
100
-
101
-
102
-
103
-
104
-
105
-
106
-
107
-
108
-
109
-
110
-
111
-
112
-
113
-
114
-
115
-
116
-
117
-
118
-
119
-
120
-
121
-
122
-
123
 |
 |