Denon AVR-3311CI Owners Manual - English - Page 56
Set up Amp Assign, Set up Channel Select - 3 1 speaker configuration
 |
UPC - 883795001380
View all Denon AVR-3311CI manuals
Add to My Manuals
Save this manual to your list of manuals |
Page 56 highlights
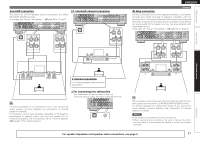
Simple version Basic version 3 Set up "Amp Assign" Use ui to select "Amp Assign", and then press ENTER. AUTO SETUP AUDYSSEY AUTO SETUP MultEQ XT STEP1 Preparation Connect the speakers and place them according to the recommendations in the manual. Set the following items if necessary. Amp Assign Channel Select Auto Setup Start [1/6] ENTER Enter RETURN Cancel Set use of surround back ch. for your system 4 Use o p to select the configuration of the connected speakers, and then press RETURN. Normal ZONE2 ZONE3 ZONE2/3MONO Bi-Amp 2CH Set when using surround back, front height or front wide speakers. In this case, go to step 6. Set for connecting the speakers for ZONE2 to the SURR. BACK/ AMP ASSIGN terminals. Set for connecting the speakers for ZONE3 to the SURR. BACK/ AMP ASSIGN terminals. Set to output the ZONE2 and ZONE3 sound in monaural, and to output the L side of the SURR. BACK/AMP ASSIGN terminal from ZONE2, and the R side from ZONE3. Set for connecting a tweeter of a front speaker to the SURR. BACK/AMP ASSIGN terminals and a woofer of the front speaker to the FRONT terminals. Set for 2-channel direct/stereo playback. When "2CH" is set, connect the second set of front speakers to the SURR.BACK/ AMP ASSIGN terminals. Front B Set for connecting the second set of front speakers to the SURR. BACK/AMP ASSIGN terminals. 5 Set up "Channel Select" Use ui to select "Channel Select", and then press ENTER. AUTO SETUP AUDYSSEY AUTO SETUP MultEQ XT STEP1 Preparation Connect the speakers and place them according to the recommendations in the manual. Set the following items if necessary. Amp Assign Channel Select Auto Setup Start [1/6] ENTER Enter RETURN Cancel Skip unused ch's measurement for timesaving 6 Use ui to select a channel. Front Subwoofer Surround Back Front Height Front Wide Select for setting the front speakers to be used. In this case, go to step 7. • "Front" can be set when "Amp Assign" is set to "Front B". Select for no subwoofers to be used. In this case, go to step 8. Select for no surround back speakers to be used. In this case, go to step 9. • "Surround Back" can be set when "Amp Assign" is set to "Normal". Select for no front height speakers to be used. In this case, go to step 10. • "Front Height" can be set when "Amp Assign" is set to "Normal". Select for no front wide speakers to be used. In this case, go to step 10. • "Front Wide" can be set when "Amp Assign" is set to "Normal". ENGLISH 7 GWhen "Front" is selected in step 6H Press o p to select a front speaker. A Select this to use front speaker A. B Select this to use front speaker B. A+B Select this to use front speakers A and B simultaneously. 8 GWhen "Subwoofer" is selected in step 6H Use o p to select the item. Measure Set for measuring a subwoofer. Skip Set for no measuring of a subwoofer. Set up speakers NOTE After performing Audyssey® Auto Setup, do not change the speaker connections or subwoofer volume. In event of a change, perform Audyssey Auto Setup again. 9 GWhen "Surround Back" is selected in step 6H Use o p to select the item. Measure Set for measuring two surround back (2spkrs) speakers. Measure Set for measuring a surround back (1spkr) speaker. Skip Set for no measuring of a surround back speaker. 10 GWhen "F.Height" or "F.Wide" is selected in step 6H Use o p to select the item. Measure Set to measure the front height speakers or front wide speakers. Skip Set when you do not want to measure the front height speakers or front wide speakers. 11 Press RETURN. Proceed to page 8 STEP1 Preparation step 6. Advanced version Information Remote control operation buttons Move the cursor (Up/Down/Left/Right) Confirm the setting Return to previous menu 53
-
 1
1 -
2
-
3
-
4
-
5
-
6
-
7
-
8
-
9
-
10
-
11
-
12
-
13
-
14
-
15
-
16
-
17
-
18
-
19
-
20
-
21
-
22
-
23
-
24
-
25
-
26
-
27
-
28
-
29
-
30
-
31
-
32
-
33
-
34
-
35
-
36
-
37
-
38
-
39
-
40
-
41
-
42
-
43
-
44
-
45
-
46
-
47
-
48
-
49
-
50
-
 51
51 -
 52
52 -
 53
53 -
 54
54 -
 55
55 -
 56
56 -
 57
57 -
 58
58 -
 59
59 -
 60
60 -
 61
61 -
62
-
63
-
64
-
65
-
66
-
67
-
68
-
69
-
70
-
71
-
72
-
73
-
74
-
75
-
76
-
77
-
78
-
79
-
80
-
81
-
82
-
83
-
84
-
85
-
86
-
87
-
88
-
89
-
90
-
91
-
92
-
93
-
94
-
95
-
96
-
97
-
98
-
99
-
100
-
101
-
102
-
103
-
104
-
105
-
106
-
107
-
108
-
109
-
110
-
111
-
112
-
113
-
114
-
115
-
116
-
117
-
118
-
119
-
120
-
121
-
122
-
123
 |
 |
