Epson C82N Printer Basics - Page 17
Lets you see what your printout will look like before you, If you're done, click
 |
UPC - 010343845039
View all Epson C82N manuals
Add to My Manuals
Save this manual to your list of manuals |
Page 17 highlights
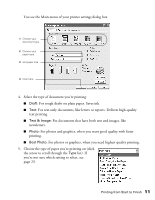
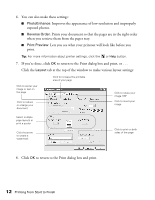
6. You can also make these settings: ■ PhotoEnhance: Improves the appearance of low-resolution and improperly exposed photos. ■ Reverse Order: Prints your document so that the pages are in the right order when you retrieve them from the paper tray. ■ Print Preview: Lets you see what your printout will look like before you print. Tip: For more information about printer settings, click the or Help button. 7. If you're done, click OK to return to the Print dialog box and print, or . . . Click the Layout tab at the top of the window to make various layout settings: Click to center your image or text on the page Click to reduce or enlarge your document Click to increase the printable area of your page Click to rotate your image 180° Click to invert your image Select multiple page layouts or print a poster Click the arrow to create a watermark Click to print on both sides of the page 8. Click OK to return to the Print dialog box and print. 12 Printing from Start to Finish
-
 1
1 -
2
-
3
-
4
-
5
-
6
-
7
-
8
-
9
-
10
-
11
-
 12
12 -
 13
13 -
 14
14 -
 15
15 -
 16
16 -
 17
17 -
 18
18 -
 19
19 -
 20
20 -
 21
21 -
 22
22 -
23
-
24
-
25
-
26
-
27
-
28
-
29
-
30
-
31
-
32
-
33
-
34
-
35
-
36
-
37
-
38
-
39
-
40
-
41
-
42
-
43
-
44
-
45
-
46
-
47
-
48
-
49
-
50
-
51
-
52
-
53
-
54
-
55
-
56
-
57
-
58
-
59
-
60
-
61
-
62
-
63
-
64
-
65
-
66
-
67
-
68
-
69
-
70
-
71
-
72
-
73
-
74
-
75
-
76
-
77
 |
 |
