GE 60-806-95R-16Z Installation Instructions - Page 23
Touchpad Button Programming Functions, Moving Through Program Mode Tiers and Menus
 |
UPC - 046188090938
View all GE 60-806-95R-16Z manuals
Add to My Manuals
Save this manual to your list of manuals |
Page 23 highlights
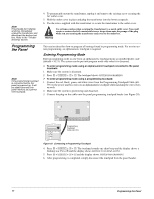
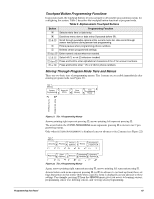
Touchpad Button Programming Functions In program mode, the touchpad buttons let you navigate to all installer programming menus for configuring the system. Table 3 describes the touchpad button functions in program mode. Table 3: Alphanumeric Touchpad Buttons Button Programming Function ƒ Selects menu item or data entry. , Deselects menu item or data entry (if pressed before ƒ). A & B Scroll through available options at the current menu tier. Also scroll through sensor text options during sensor text programming. C Enters pauses when programming phone numbers. D Deletes certain programmed settings. 0 thru 9 Enter numeric values wherever needed. 1 & 2 Select off (1) or on (2) wherever needed. 1 thru 6 Press and hold to enter alphabetical characters A thru F for account numbers. 7 or 9 Press and hold to enter * (7) or # (9) for phone numbers. Moving Through Program Mode Tiers and Menus There are two basic tiers of programming menus. Tier 1 menus are accessible immediately after entering program mode (see Figure 21). Tier 1 Menus B System Programming A # * B Demo Kit Off/On A Clear Memory B Exit B Programming A Ready From Tier 2 Menus To Tier 2 Menus Figure 21. Tier 1 Programming Menus Arrows pointing right represent pressing B, arrows pointing left represent pressing A. The arrow below the SYSTEM PROGRAMMING menu represents pressing ƒ to move to tier 2 programming menus. Only when SYSTEM PROGRAMMING is displayed can you advance to tier 2 menus (see Figure 22). Tier 2 Menus B Security Phones A # *# * B Phone Options A # * B Timers A # * B Touchpad B Options A A # * B Reporting Siren Options A # *# * B Sensors B Accessory B Modules Onboard B Options A A A A # *# # * Figure 22. Tier 2 Programming Menus Again, arrows pointing right represent pressing B, arrows pointing left represent pressing A. Arrows below each menu represent pressing ƒ (or ,) to advance to (or back up from) those settings that pertain to that menu. Only when a specific menu is displayed can you advance to those settings. For example, pressing ƒ from the SENSORS menu gives you access to learning sensors, programming sensor text, deleting sensors, and viewing sensor programming. Programming the Panel 18
-
 1
1 -
2
-
3
-
4
-
5
-
6
-
7
-
8
-
9
-
10
-
11
-
12
-
13
-
14
-
15
-
16
-
17
-
 18
18 -
 19
19 -
 20
20 -
 21
21 -
 22
22 -
 23
23 -
 24
24 -
 25
25 -
 26
26 -
 27
27 -
 28
28 -
29
-
30
-
31
-
32
-
33
-
34
-
35
-
36
-
37
-
38
-
39
-
40
-
41
-
42
-
43
-
44
-
45
-
46
-
47
-
48
-
49
-
50
-
51
-
52
-
53
-
54
-
55
-
56
-
57
-
58
-
59
-
60
-
61
-
62
-
63
-
64
-
65
-
66
-
67
-
68
-
69
-
70
-
71
-
72
-
73
-
74
-
75
-
76
 |
 |
