HP 950c (English) Windows Connect * User's Guide - C6428-90035 - Page 12
Printer Properties Dialog Box, Setup Tab - color ink
 |
View all HP 950c manuals
Add to My Manuals
Save this manual to your list of manuals |
Page 12 highlights
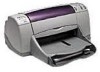
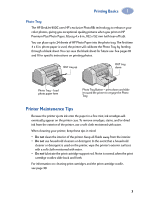
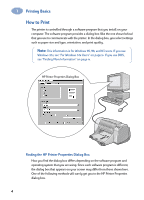
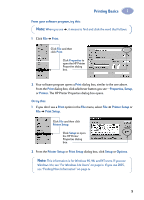
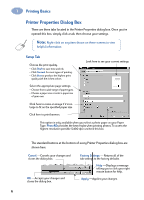
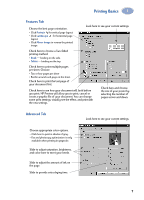
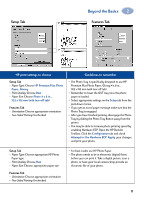
1 Printing Basics Printer Properties Dialog Box There are three tabs located in the Printer Properties dialog box. Once you've opened this box, simply click a tab, then choose your settings. Note: Right-click on any item shown on these screens to view helpful information. Setup Tab Choose the print quality. • Click Draft to save time and ink. • Click Normal for most types of printing. • Click Best to produce the highest print quality with the richest colors. Select the appropriate page settings. • Choose from a wide range of paper types. • Choose a paper size or enter a paper size of your own. Look here to see your current settings. Click here to resize an image if it's too large to fit on the specified paper size. Click here to print banners. This option is only available when you select a photo paper as your Paper Type. PhotoREt provides the best results when printing photos. To access the highest resolution possible (2400 dpi), uncheck this box. The standard buttons at the bottom of every Printer Properties dialog box are shown here. Cancel -Cancels your changes and closes the dialog box. OK -Accepts your changes and closes the dialog box. Factory Settings - Returns all of the tab settings to the factory defaults. Help -Displays a message telling you to click your right mouse button for help. Apply -Applies your changes. 6
-
 1
1 -
2
-
3
-
4
-
5
-
6
-
 7
7 -
 8
8 -
 9
9 -
 10
10 -
 11
11 -
 12
12 -
 13
13 -
 14
14 -
 15
15 -
 16
16 -
 17
17 -
18
-
19
-
20
-
21
-
22
-
23
-
24
-
25
-
26
-
27
-
28
-
29
-
30
-
31
-
32
-
33
-
34
-
35
-
36
-
37
-
38
-
39
-
40
-
41
-
42
-
43
-
44
-
45
-
46
-
47
-
48
-
49
-
50
-
51
-
52
-
53
-
54
-
55
-
56
-
57
-
58
-
59
-
60
-
61
-
62
-
63
-
64
-
65
-
66
-
67
-
68
-
69
-
70
-
71
-
72
-
73
-
74
 |
 |