HP LaserJet Pro M1212nf HP LaserJet M1130/M1210 MFP User Guide - Page 113
Set up fax with a telephone answering machine, Set up fax with an extension phone
 |
View all HP LaserJet Pro M1212nf manuals
Add to My Manuals
Save this manual to your list of manuals |
Page 113 highlights
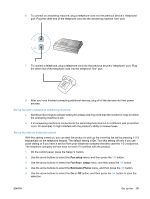
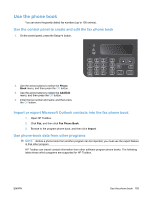
6. To connect an answering machine, plug a telephone cord into the previous device's "telephone" port. Plug the other end of the telephone cord into the answering machine "line" port. 7. To connect a telephone, plug a telephone cord into the previous device's "telephone" port. Plug the other end of the telephone cord into the telephone "line" port. 8. After you have finished connecting additional devices, plug all of the devices into their power sources. Set up fax with a telephone answering machine ● Set the product rings-to-answer setting for at least one ring more than the number of rings for which the answering machine is set. ● If an answering machine is connected to the same telephone line but on a different jack (in another room, for example), it might interfere with the product's ability to receive faxes. Set up fax with an extension phone With this setting turned on, you can alert the product to pick up the incoming fax call by pressing 1-2-3 sequentially on the telephone keypad. The default setting is On. Turn this setting off only if you use pulse dialing or if you have a service from your telephone company that also uses the 1-2-3 sequence. The telephone company service does not work if it conflicts with the product. 1. On the control panel, press the Setup button. 2. Use the arrow buttons to select the Fax setup menu, and then press the OK button. 3. Use the arrow buttons to select the Fax Recv. setup menu, and then press the OK button. 4. Use the arrow buttons to select the Extension Phone menu, and then press the OK button. 5. Use the arrow buttons to select the On or Off option, and then press the OK button to save the selection. ENWW Set up fax 99
-
 1
1 -
2
-
3
-
4
-
5
-
6
-
7
-
8
-
9
-
10
-
11
-
12
-
13
-
14
-
15
-
16
-
17
-
18
-
19
-
20
-
21
-
22
-
23
-
24
-
25
-
26
-
27
-
28
-
29
-
30
-
31
-
32
-
33
-
34
-
35
-
36
-
37
-
38
-
39
-
40
-
41
-
42
-
43
-
44
-
45
-
46
-
47
-
48
-
49
-
50
-
51
-
52
-
53
-
54
-
55
-
56
-
57
-
58
-
59
-
60
-
61
-
62
-
63
-
64
-
65
-
66
-
67
-
68
-
69
-
70
-
71
-
72
-
73
-
74
-
75
-
76
-
77
-
78
-
79
-
80
-
81
-
82
-
83
-
84
-
85
-
86
-
87
-
88
-
89
-
90
-
91
-
92
-
93
-
94
-
95
-
96
-
97
-
98
-
99
-
100
-
101
-
102
-
103
-
104
-
105
-
106
-
107
-
 108
108 -
 109
109 -
 110
110 -
 111
111 -
 112
112 -
 113
113 -
 114
114 -
 115
115 -
 116
116 -
 117
117 -
 118
118 -
119
-
120
-
121
-
122
-
123
-
124
-
125
-
126
-
127
-
128
-
129
-
130
-
131
-
132
-
133
-
134
-
135
-
136
-
137
-
138
-
139
-
140
-
141
-
142
-
143
-
144
-
145
-
146
-
147
-
148
-
149
-
150
-
151
-
152
-
153
-
154
-
155
-
156
-
157
-
158
-
159
-
160
-
161
-
162
-
163
-
164
-
165
-
166
-
167
-
168
-
169
-
170
-
171
-
172
-
173
-
174
-
175
-
176
-
177
-
178
-
179
-
180
-
181
-
182
-
183
-
184
-
185
-
186
-
187
-
188
-
189
-
190
-
191
-
192
-
193
-
194
-
195
-
196
-
197
-
198
-
199
-
200
-
201
-
202
-
203
-
204
-
205
-
206
-
207
-
208
-
209
-
210
-
211
-
212
-
213
-
214
-
215
-
216
-
217
-
218
-
219
-
220
-
221
-
222
-
223
-
224
-
225
-
226
-
227
-
228
-
229
-
230
-
231
-
232
-
233
-
234
-
235
-
236
-
237
-
238
-
239
-
240
-
241
-
242
-
243
-
244
-
245
-
246
-
247
-
248
-
249
-
250
-
251
-
252
-
253
-
254
-
255
-
256
-
257
-
258
-
259
-
260
-
261
-
262
-
263
-
264
-
265
-
266
 |
 |
