| Section |
Page |
| Product basics |
15 |
| Product comparison |
16 |
| Environmental features |
17 |
| Product features |
18 |
| Product views |
20 |
| Front view |
20 |
| M1130 Series |
20 |
| M1210 Series |
21 |
| Back view |
22 |
| M1130 Series |
22 |
| M1210 Series |
23 |
| Serial number and model number location |
24 |
| Control-panel layout |
25 |
| M1130 Series |
25 |
| M1210 Series |
26 |
| Control panel menus (M1210 Series only) |
27 |
| Control-panel menus |
28 |
| Software for Windows |
35 |
| Supported operating systems for Windows |
36 |
| Printer driver |
36 |
| Priority for print settings |
36 |
| Change printer-driver settings for Windows |
37 |
| Change the settings for all print jobs until the software program is closed |
37 |
| Change the default settings for all print jobs |
37 |
| Change the product configuration settings |
37 |
| Remove software for Windows |
37 |
| Supported utilities for Windows |
38 |
| HP Toolbox software |
38 |
| HP Embedded Web Server (M1210 Series only) |
38 |
| Other Windows components and utilities |
38 |
| Use the product with Mac |
39 |
| Software for Mac |
40 |
| Supported operating systems for Macintosh |
40 |
| Supported printer drivers for Macintosh |
40 |
| Remove software for Mac |
40 |
| Priority for print settings for Macintosh |
40 |
| Change printer-driver settings for Mac |
41 |
| Print with Mac |
42 |
| Create and use printing presets with Mac |
42 |
| Resize documents or print on a custom paper size with Mac |
42 |
| Print a cover page with Mac |
42 |
| Print multiple pages on one sheet of paper with Mac |
43 |
| Print on both sides (duplex) with Mac |
43 |
| Print on both sides manually |
43 |
| Fax with Mac (M1210 Series only) |
45 |
| Scan with Mac |
46 |
| Connect the product |
47 |
| Supported network operating systems |
48 |
| Printer sharing disclaimer |
48 |
| Connect with USB |
49 |
| CD installation |
49 |
| HP Smart Install |
49 |
| Connect to a network (M1210 Series only) |
50 |
| Supported network protocols |
50 |
| Install the product on a wired network |
50 |
| Configure network settings |
51 |
| View or change network settings |
51 |
| Set or change the network password |
51 |
| IP address |
51 |
| Link speeds and duplex settings |
51 |
| Paper and print media |
53 |
| Understand paper use |
54 |
| Special paper guidelines |
54 |
| Change the printer driver to match the paper type and size |
56 |
| Supported paper sizes |
57 |
| Supported paper types |
58 |
| Load paper trays |
59 |
| Load the input tray |
59 |
| Tray adjustment for short media |
60 |
| Load the document feeder (M1210 Series only) |
62 |
| Tray and bin capacity |
63 |
| Paper orientation for loading trays |
63 |
| Configure trays |
64 |
| Change the default paper-size setting (M1130 Series) |
64 |
| Change the default paper-size setting (M1210 Series) |
64 |
| Change the default paper-type setting (M1130 Series) |
65 |
| Change the default paper-type setting (M1210 Series) |
65 |
| Print tasks |
67 |
| Cancel a print job |
68 |
| Print with Windows |
69 |
| Open the printer driver with Windows |
69 |
| Get help for any printing option with Windows |
69 |
| Change the number of print copies with Windows |
70 |
| Print colored text as black with Windows |
70 |
| Save custom print settings for reuse with Windows |
71 |
| Use a printing quick set |
71 |
| Create a custom printing quick set |
71 |
| Improve print quality with Windows |
73 |
| Select a page size |
73 |
| Select a custom page size |
73 |
| Select a paper type |
73 |
| Select the print resolution |
73 |
| Print on preprinted letterhead or forms with Windows |
74 |
| Print on special paper, labels, or transparencies with Windows |
75 |
| Print the first or last page on different paper with Windows |
77 |
| Scale a document to fit page size |
78 |
| Add a watermark to a document with Windows |
80 |
| Print on both sides (duplex) with Windows |
80 |
| Manually print on both sides (duplex) with Windows |
80 |
| Create a booklet with Windows |
82 |
| Print multiple pages per sheet with Windows |
84 |
| Select page orientation with Windows |
85 |
| Copy |
87 |
| Use copy functions |
88 |
| One-touch copy |
88 |
| Multiple copies |
88 |
| Create multiple copies (M1130 Series) |
88 |
| Create multiple copies (M1210 Series) |
89 |
| Copy a multiple-page original |
89 |
| Copy identification cards (M1210 Series only) |
89 |
| Cancel a copy job |
90 |
| Cancel a copy job (M1130 Series) |
90 |
| Cancel a copy job (M1210 Series) |
90 |
| Reduce or enlarge a copy image |
90 |
| Reduce or enlarge copies (M1130 Series) |
90 |
| Reduce or enlarge copies (M1210 Series) |
91 |
| Collate a copy job |
93 |
| Collate copies (M1210 Series) |
93 |
| Copy settings |
93 |
| Change copy quality |
93 |
| Change the copy quality setting (M1130 Series) |
94 |
| Change the copy quality setting (M1210 Series) |
95 |
| Check the scanner glass for dirt and smudges |
95 |
| Adjust the lightness or darkness for copies |
96 |
| Adjust the lightness or darkness for copies (M1130 Series) |
96 |
| Adjust the lightness or darkness for copies (M1210 Series) |
97 |
| Copy on both sides (duplex) |
98 |
| Copy a two-sided original to a one-sided document |
98 |
| Copy a two-sided original to a two-sided document |
98 |
| Scan |
101 |
| Use scan functions |
102 |
| Scan methods |
102 |
| Scan by using HP LaserJet Scan (Windows) |
102 |
| Scan by using HP Director (Mac) |
102 |
| Scan by using other software |
103 |
| Scan from a TWAIN-compliant program |
103 |
| Scan from a WIA-compliant program |
103 |
| Scanning by using optical character recognition (OCR) software |
103 |
| Readiris |
103 |
| Cancel a scan |
104 |
| Scan settings |
105 |
| Scan file format |
105 |
| Scanner resolution and color |
105 |
| Resolution and color guidelines |
106 |
| Color |
106 |
| Scan quality |
107 |
| Fax (M1210 Series only) |
109 |
| Fax features |
110 |
| Set up fax |
111 |
| Install and connect the hardware |
111 |
| Connect fax to a telephone line |
111 |
| Connect additional devices |
111 |
| Set up fax with a telephone answering machine |
113 |
| Set up fax with an extension phone |
113 |
| Setup for stand-alone fax |
114 |
| Configure fax settings |
114 |
| Use the control panel to set the fax time, date, and header |
114 |
| Use the HP Fax Setup Wizard |
116 |
| Set fax time, date, and header |
116 |
| Use of common localized letters in fax headers |
116 |
| Use the phone book |
117 |
| Use the control panel to create and edit the fax phone book |
117 |
| Import or export Microsoft Outlook contacts into the fax phone book |
117 |
| Use phone-book data from other programs |
117 |
| Delete phone book |
118 |
| Set fax settings |
119 |
| Send fax settings |
119 |
| Set special dialing symbols and options |
119 |
| Set a dialing prefix |
119 |
| Set the dial-tone detection |
119 |
| Set tone-dialing or pulse-dialing |
120 |
| Set autoredial and the time between redials |
120 |
| Set light/dark and resolution |
121 |
| Set the default light/dark (contrast) setting |
121 |
| Set resolution settings |
121 |
| Cover-page templates |
122 |
| Customize a fax cover sheet |
122 |
| Receive fax settings |
122 |
| Set fax forwarding |
122 |
| Set the answer mode |
123 |
| Block or unblock fax numbers |
123 |
| Set the number of rings-to-answer |
124 |
| Set distinctive ring |
125 |
| Use autoreduction for incoming faxes |
125 |
| Set fax reprint settings |
126 |
| Set the silence-detect mode |
126 |
| Set the fax volume |
126 |
| Set the alert volume, phone-line volume, and ring volume |
127 |
| Set stamp-received faxes |
127 |
| Set the private receive feature |
127 |
| Set fax polling |
128 |
| Use fax |
129 |
| Fax software |
129 |
| Supported fax programs |
129 |
| Cancel a fax |
129 |
| Cancel the current fax |
129 |
| Cancel a pending fax job |
129 |
| Delete faxes from memory |
129 |
| Use fax on a DSL, PBX, or ISDN system |
130 |
| DSL |
130 |
| PBX |
130 |
| ISDN |
130 |
| Use fax on a VoIP service |
130 |
| Fax memory |
131 |
| Fax memory is retained when there is a loss of power |
131 |
| Send a fax |
131 |
| Fax from the flatbed scanner |
131 |
| Fax from the document feeder |
132 |
| Manual dial faxing |
132 |
| Send a fax from the software |
134 |
| Send a fax by dialing from a telephone connected to the fax line |
136 |
| Schedule a fax to be sent later |
136 |
| Use access codes, credit cards, or calling cards |
137 |
| Send faxes internationally |
137 |
| Receive a fax |
138 |
| Print a fax |
138 |
| Print a stored fax when the private receive feature is on |
138 |
| Reprint a fax |
138 |
| Receive faxes when fax tones are audible on the phone line |
138 |
| Receive faxes to a computer |
139 |
| Solve fax problems |
140 |
| Fax troubleshooting checklist |
140 |
| Fax error messages |
140 |
| Alert and warning messages |
141 |
| Fax logs and reports |
146 |
| Print all fax reports |
146 |
| Print individual fax reports |
146 |
| Set the fax activity log to print automatically |
147 |
| Set the fax error report |
147 |
| Set the fax confirmation report |
147 |
| Include the first page of each fax on the fax confirmation, fax error, and last call reports |
148 |
| Change error correction and fax speed |
148 |
| Set the fax-error-correction mode |
148 |
| Change the fax speed |
149 |
| Problems sending faxes |
149 |
| Problems receiving faxes |
152 |
| Regulatory information and warranties |
155 |
| Manage and maintain the product |
157 |
| Print information pages |
158 |
| Use the HP Toolbox software |
160 |
| View HP Toolbox software |
160 |
| Status |
161 |
| Fax (M1210 Series only) |
161 |
| Fax tasks |
161 |
| Fax phone book |
161 |
| Fax send log |
163 |
| Fax receive log |
163 |
| Shop for Supplies |
164 |
| Other Links |
164 |
| Use the HP Embedded Web Server (M1210 Series only) |
165 |
| Open the HP Embedded Web Server |
165 |
| Features |
165 |
| Information tab |
165 |
| Settings tab |
166 |
| Networking tab |
166 |
| HP Smart Install tab |
166 |
| Links |
166 |
| Product security features |
167 |
| Lock the formatter |
167 |
| Economy settings |
168 |
| Print with EconoMode |
168 |
| Auto-Off mode |
168 |
| Manage supplies and accessories |
170 |
| Print when a cartridge reaches estimated end of life |
170 |
| Manage print cartridges |
170 |
| Print-cartridge storage |
170 |
| HP policy on non-HP print cartridges |
170 |
| HP fraud hotline and Web site |
170 |
| Recycle supplies |
170 |
| Replacement instructions |
171 |
| Redistribute toner |
171 |
| Replace the print cartridge |
173 |
| Replace the pickup roller |
176 |
| Replace the separation pad |
180 |
| Clean the product |
182 |
| Clean the pickup roller |
182 |
| Clean the separation pad |
186 |
| Clean the paper path |
189 |
| Clean the print-cartridge area |
191 |
| Clean the exterior |
194 |
| Clean the scanner glass strip and platen |
194 |
| Product updates |
196 |
| Solve problems |
197 |
| Solve general problems |
198 |
| Troubleshooting checklist |
198 |
| Factors that affect product performance |
199 |
| Restore the factory-set defaults (M1210 Series only) |
199 |
| Interpret control-panel light patterns (M1130 Series only) |
200 |
| Interpret control-panel messages (M1210 Series only) |
203 |
| Control-panel message types |
203 |
| Control-panel messages |
203 |
| Clear jams |
206 |
| Common causes of jams |
206 |
| Jam locations |
207 |
| Clear jams from the document feeder (M1210 Series only) |
208 |
| Clear jams from the output areas |
209 |
| Clear jams from the input tray |
211 |
| Clear jams from inside the product |
213 |
| Change the jam recovery setting |
214 |
| Solve paper-handling problems |
216 |
| Solve image-quality problems |
217 |
| Print-quality examples |
217 |
| General print-quality issues |
217 |
| Copy print-quality problems |
221 |
| Scan-quality problems |
222 |
| Prevent scan-quality problems |
222 |
| Solve scan-quality problems |
222 |
| Repetitive defects ruler |
223 |
| Optimize and improve image quality |
224 |
| Change print density |
224 |
| Manage and configure printer drivers |
224 |
| Solve performance problems |
225 |
| Solve connectivity problems |
225 |
| Solve direct-connect problems |
225 |
| Solve network problems |
225 |
| Solve software problems |
227 |
| Solve common Windows problems |
227 |
| Solve common Mac problems |
227 |
| Supplies and accessories |
231 |
| Order parts, accessories, and supplies |
232 |
| Part numbers |
232 |
| Paper-handling accessories |
232 |
| Print cartridges |
232 |
| Cables and interfaces |
232 |
| Service and support |
233 |
| Hewlett-Packard limited warranty statement |
234 |
| HP's Premium Protection Warranty: LaserJet print cartridge limited warranty statement |
235 |
| End User License Agreement |
236 |
| Customer self-repair warranty service |
238 |
| Customer support |
238 |
| Repack the product |
239 |
| Service information form |
240 |
| Specifications |
241 |
| Physical specifications |
242 |
| Power consumption, electrical specifications, and acoustic emissions |
242 |
| Environmental specifications |
242 |
| Regulatory information |
243 |
| FCC regulations |
244 |
| Environmental product stewardship program |
244 |
| Protecting the environment |
244 |
| Ozone production |
244 |
| Power consumption |
244 |
| Toner consumption |
245 |
| Paper use |
245 |
| Plastics |
245 |
| HP LaserJet print supplies |
245 |
| Return and recycling instructions |
245 |
| United States and Puerto Rico |
245 |
| Multiple returns (more than one cartridge) |
245 |
| Single returns |
246 |
| Shipping |
246 |
| Residents of Alaska and Hawaii |
246 |
| Non-U.S. returns |
246 |
| Paper |
246 |
| Material restrictions (M1130 Series) |
246 |
| Material restrictions (M1210 Series) |
246 |
| Disposal of waste equipment by users in private households in the European Union |
247 |
| Chemical substances |
247 |
| Material Safety Data Sheet (MSDS) |
247 |
| For more information |
247 |
| Declaration of conformity (base model) |
248 |
| Declaration of conformity (fax model) |
249 |
| Safety statements |
250 |
| Laser safety |
250 |
| Canadian DOC regulations |
250 |
| Power cord instructions |
250 |
| EMC statement (Korea) |
250 |
| Laser statement for Finland |
251 |
| GS statement (Germany) |
251 |
| Substances Table (China) |
252 |
| Restriction on Hazardous Substances statement (Turkey) |
252 |
| Additional statements for telecom (fax) products |
253 |
| EU Statement for Telecom Operation |
253 |
| New Zealand Telecom Statements |
253 |
| Additional FCC statement for telecom products (US) |
253 |
| Telephone Consumer Protection Act (US) |
254 |
| Industry Canada CS-03 requirements |
254 |

 1
1 176
176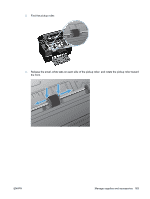 177
177 178
178 179
179 180
180 181
181 182
182 183
183 184
184 185
185 186
186

