HP LaserJet Pro M1212nf HP LaserJet M1130/M1210 MFP User Guide - Page 73
Improve print quality with Windows, Select a size, Select the print resolution
 |
View all HP LaserJet Pro M1212nf manuals
Add to My Manuals
Save this manual to your list of manuals |
Page 73 highlights
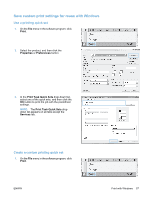
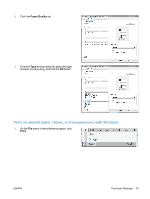
Improve print quality with Windows Select a page size 1. On the File menu in the software program, click Print. 2. Select the product, and then click the Properties or Preferences button. 3. Click the Paper/Quality tab. 4. Select a size from the Size is drop-down list. Select a custom page size 1. On the File menu in the software program, click Print. 2. Select the product, and then click the Properties or Preferences button. 3. Click the Paper/Quality tab. 4. Click the Custom button. The Custom Paper Size dialog box opens. 5. Type a name for the custom size, specify the dimensions, and then click the Save button. 6. Click the Close button, and then click the OK button. Select a paper type 1. On the File menu in the software program, click Print. 2. Select the product, and then click the Properties or Preferences button. 3. Click the Paper/Quality tab. 4. Select a type from the Type is drop-down list. Select the print resolution 1. On the File menu in the software program, click Print. 2. Select the product, and then click the Properties or Preferences button. 3. Click the Paper/Quality tab. 4. In the Print Quality area, select an option from the drop-down list. See the printer-driver online Help for information about each of the available options. NOTE: To use a draft-quality resolution, in the Print Quality area, click the EconoMode check box. ENWW Print with Windows 59
-
 1
1 -
2
-
3
-
4
-
5
-
6
-
7
-
8
-
9
-
10
-
11
-
12
-
13
-
14
-
15
-
16
-
17
-
18
-
19
-
20
-
21
-
22
-
23
-
24
-
25
-
26
-
27
-
28
-
29
-
30
-
31
-
32
-
33
-
34
-
35
-
36
-
37
-
38
-
39
-
40
-
41
-
42
-
43
-
44
-
45
-
46
-
47
-
48
-
49
-
50
-
51
-
52
-
53
-
54
-
55
-
56
-
57
-
58
-
59
-
60
-
61
-
62
-
63
-
64
-
65
-
66
-
67
-
 68
68 -
 69
69 -
 70
70 -
 71
71 -
 72
72 -
 73
73 -
 74
74 -
 75
75 -
 76
76 -
 77
77 -
 78
78 -
79
-
80
-
81
-
82
-
83
-
84
-
85
-
86
-
87
-
88
-
89
-
90
-
91
-
92
-
93
-
94
-
95
-
96
-
97
-
98
-
99
-
100
-
101
-
102
-
103
-
104
-
105
-
106
-
107
-
108
-
109
-
110
-
111
-
112
-
113
-
114
-
115
-
116
-
117
-
118
-
119
-
120
-
121
-
122
-
123
-
124
-
125
-
126
-
127
-
128
-
129
-
130
-
131
-
132
-
133
-
134
-
135
-
136
-
137
-
138
-
139
-
140
-
141
-
142
-
143
-
144
-
145
-
146
-
147
-
148
-
149
-
150
-
151
-
152
-
153
-
154
-
155
-
156
-
157
-
158
-
159
-
160
-
161
-
162
-
163
-
164
-
165
-
166
-
167
-
168
-
169
-
170
-
171
-
172
-
173
-
174
-
175
-
176
-
177
-
178
-
179
-
180
-
181
-
182
-
183
-
184
-
185
-
186
-
187
-
188
-
189
-
190
-
191
-
192
-
193
-
194
-
195
-
196
-
197
-
198
-
199
-
200
-
201
-
202
-
203
-
204
-
205
-
206
-
207
-
208
-
209
-
210
-
211
-
212
-
213
-
214
-
215
-
216
-
217
-
218
-
219
-
220
-
221
-
222
-
223
-
224
-
225
-
226
-
227
-
228
-
229
-
230
-
231
-
232
-
233
-
234
-
235
-
236
-
237
-
238
-
239
-
240
-
241
-
242
-
243
-
244
-
245
-
246
-
247
-
248
-
249
-
250
-
251
-
252
-
253
-
254
-
255
-
256
-
257
-
258
-
259
-
260
-
261
-
262
-
263
-
264
-
265
-
266
 |
 |
