HP StorageWorks 8/80 HP StorageWorks 8-Gb SAN Switch hardware reference manual - Page 36
Installation and safety guidelines, Installing the HP SAN Switch Rack Mount Kit in your HP custom rack
 |
View all HP StorageWorks 8/80 manuals
Add to My Manuals
Save this manual to your list of manuals |
Page 36 highlights
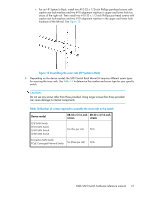
Installation and safety guidelines Verify that the rack and the area around the rack meet the following requirements: • Plan a rack space that is 1.5 units high (which equals 6.7 cm or 2.6 inches), 48.3 cm (19 inches) wide, and at least 68.6 cm (23 inches) deep. For the MP Router, 4/64 SAN Switch, or 8/80 SAN Switch, plan a rack space that is at least 2 units high. • Ground all equipment in the rack through a reliable branch circuit connection, and maintain ground at all times. Do not rely on a secondary connection to a branch circuit, such as a power strip. • Ensure that airflow and temperature requirements are met on an ongoing basis. • Secure the rack to ensure stability in case of unexpected movement. Installing the HP SAN Switch Rack Mount Kit in your HP custom rack The SAN Switch Rack Mount Kit enables you to install your HP device in the following HP custom racks: • HP System/e Rack • HP 10000 G2 Series rack and HP 10000 Series rack For optimal cable management, HP recommends that you install the SAN Switch Rack Mount Kit to allow the nonport side of the switch to slide out of the cool-air side of the rack. In this installation, the port side of the switch is set 12.7 cm (5 inches) back from the edge of the rack, allowing a more gradual bend in the fiber optic cables. NOTE: The SAN Switch Rack Mount Kit installation requires one technician. 36 Installing and configuring an 8-Gb SAN Switch
-
 1
1 -
2
-
3
-
4
-
5
-
6
-
7
-
8
-
9
-
10
-
11
-
12
-
13
-
14
-
15
-
16
-
17
-
18
-
19
-
20
-
21
-
22
-
23
-
24
-
25
-
26
-
27
-
28
-
29
-
30
-
 31
31 -
 32
32 -
 33
33 -
 34
34 -
 35
35 -
 36
36 -
 37
37 -
 38
38 -
 39
39 -
 40
40 -
 41
41 -
42
-
43
-
44
-
45
-
46
-
47
-
48
-
49
-
50
-
51
-
52
-
53
-
54
-
55
-
56
-
57
-
58
-
59
-
60
-
61
-
62
-
63
-
64
-
65
-
66
-
67
-
68
-
69
-
70
-
71
-
72
-
73
-
74
-
75
-
76
-
77
-
78
-
79
-
80
-
81
-
82
-
83
-
84
-
85
-
86
-
87
-
88
-
89
-
90
-
91
-
92
-
93
-
94
-
95
-
96
-
97
-
98
-
99
-
100
-
101
-
102
-
103
-
104
-
105
-
106
-
107
-
108
-
109
-
110
 |
 |