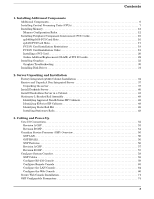
HP rp5400 Installation Guide, Third Edition - HP rp5400 Family of Servers - Page 8
Step 3., CAUTION
 |
View all HP rp5400 manuals
Add to My Manuals
Save this manual to your list of manuals |
Page 8 highlights
Installing Additional Components Installing Central Processing Units (CPUs) Step 3. Loosen the captive T-15 screws that hold the top cover in place, then grasp the strap handle, raise the cover slightly, and pull the cover toward the front of the server to free the cover tabs from the slots in the chassis. The air baffle will be exposed. Step 4. Loosen the captive T-15 screws on the air baffle. Grasp the two handles on the baffle, and lift the baffle remove it. CAUTION Observe all electrostatic discharge (ESD) precautions Do not touch internal components. Failure to observe ESD precautions can cause damage to components. 8 Chapter 1
-
 1
1 -
2
-
 3
3 -
 4
4 -
 5
5 -
 6
6 -
 7
7 -
 8
8 -
 9
9 -
 10
10 -
 11
11 -
 12
12 -
 13
13 -
14
-
15
-
16
-
17
-
18
-
19
-
20
-
21
-
22
-
23
-
24
-
25
-
26
-
27
-
28
-
29
-
30
-
31
-
32
-
33
-
34
-
35
-
36
-
37
-
38
-
39
-
40
-
41
-
42
-
43
-
44
-
45
-
46
-
47
-
48
-
49
-
50
-
51
-
52
-
53
-
54
-
55
-
56
-
57
-
58
-
59
-
60
-
61
-
62
-
63
-
64
-
65
-
66
-
67
-
68
-
69
-
70
-
71
-
72
-
73
-
74
-
75
-
76
-
77
-
78
-
79
-
80
-
81
-
82
-
83
-
84
 |
 |

Installing Additional Components
Installing Central Processing Units (CPUs)
Chapter 1
8
Step 3.
Loosen the captive T-15 screws that hold the top cover in place, then grasp the strap handle, raise
the cover slightly, and pull the cover toward the front of the server to free the cover tabs from the
slots in the chassis. The air baffle will be exposed.
Step 4.
Loosen the captive T-15 screws on the air baffle. Grasp the two handles on the baffle, and lift the
baffle remove it.
CAUTION
Observe all electrostatic discharge (ESD) precautions Do not touch internal
components. Failure to observe ESD precautions can cause damage to components.