IBM 436854u User Manual - Page 61
Installing, Remote, Supervisor, Adapter, SlimLine
 |
UPC - 883436026772
View all IBM 436854u manuals
Add to My Manuals
Save this manual to your list of manuals |
Page 61 highlights
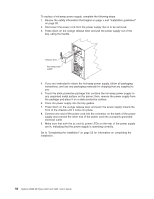
Mini-PCI slot Mini-PCI-X enablement card Mini-PCI-X enablement card connector 6. Install and lock the side cover (see "Reinstalling the side cover" on page 54). 7. Reconnect the external cables and power cords; then, turn on the attached devices and turn on the server. Installing an IBM Remote Supervisor Adapter II SlimLine An optional IBM Remote Supervisor Adapter II SlimLine must be installed only in its dedicated connector on the system board. See "System-board optional-device connectors" on page 18 for the location of this connector on the system board. After you install the Remote Supervisor Adapter II SlimLine, the systems-management Ethernet port on the rear of the server is active. To install a Remote Supervisor Adapter II SlimLine, complete the following steps: 1. Read the safety information that begins on page v and "Installation guidelines" on page 20. 2. Turn off the server and peripheral devices, and disconnect the power cords and all external cables. 3. Lay the server on its side. 4. Unlock the side cover. 5. Remove the side cover (see "Removing the side cover" on page 24). 6. Open the rear adapter-retention bracket and install the Remote Supervisor Adapter II SlimLine retention tab on the bracket by clipping it onto the rear adapter-retention bracket. Chapter 2. Installing optional devices 47
-
 1
1 -
2
-
3
-
4
-
5
-
6
-
7
-
8
-
9
-
10
-
11
-
12
-
13
-
14
-
15
-
16
-
17
-
18
-
19
-
20
-
21
-
22
-
23
-
24
-
25
-
26
-
27
-
28
-
29
-
30
-
31
-
32
-
33
-
34
-
35
-
36
-
37
-
38
-
39
-
40
-
41
-
42
-
43
-
44
-
45
-
46
-
47
-
48
-
49
-
50
-
51
-
52
-
53
-
54
-
55
-
 56
56 -
 57
57 -
 58
58 -
 59
59 -
 60
60 -
 61
61 -
 62
62 -
 63
63 -
 64
64 -
 65
65 -
 66
66 -
67
-
68
-
69
-
70
-
71
-
72
-
73
-
74
-
75
-
76
-
77
-
78
-
79
-
80
-
81
-
82
-
83
-
84
-
85
-
86
-
87
-
88
-
89
-
90
-
91
-
92
-
93
-
94
-
95
-
96
-
97
-
98
-
99
-
100
-
101
-
102
 |
 |
