IBM 79856au User Guide - Page 37
System-board, Installation, guidelines
 |
UPC - 883436004374
View all IBM 79856au manuals
Add to My Manuals
Save this manual to your list of manuals |
Page 37 highlights
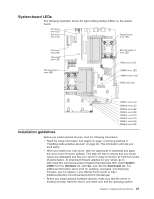
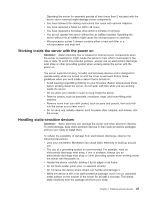
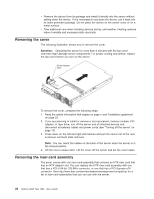
System-board LEDs The following illustration shows the light-emitting diodes (LEDs) on the system board. PCI slot 2 error LED PCI slot 3 error LED System board error LED PCI slot 4 error LED Riser-card error LED Microprocessor 1 error LED Microprocessor 2 error LED Battery error LED DIMM 9 error LED DIMM 16 error LED RAID Error LED DIMM 1 error LED DIMM 2 error LED DIMM 3 error LED DIMM 4 error LED DIMM 5 error LED DIMM 6 error LED DIMM 7 error LED DIMM 8 error LED Installation guidelines Before you install optional devices, read the following information: v Read the safety information that begins on page v and the guidelines in "Handling static-sensitive devices" on page 25. This information will help you work safely. v When you install your new server, take the opportunity to download and apply the most recent firmware updates. This step will help to ensure that any known issues are addressed and that your server is ready to function at maximum levels of performance. To download firmware updates for your server, go to http://www.ibm.com/servers/eserver/support/xseries/indes.html, select System x3655 from the Hardware list, click Go, and click the Downloads tab. For additional information about tools for updating, managing, and deploying firmware, see the System x and xSeries Tools Center at http:// publib.boulder.ibm.com/infocenter/toolsctr/v1r0/index.jsp. v Before you install optional hardware devices, make sure that the server is working correctly. Start the server, and make sure that the operating system Chapter 2. Installing optional devices 23
-
 1
1 -
2
-
3
-
4
-
5
-
6
-
7
-
8
-
9
-
10
-
11
-
12
-
13
-
14
-
15
-
16
-
17
-
18
-
19
-
20
-
21
-
22
-
23
-
24
-
25
-
26
-
27
-
28
-
29
-
30
-
31
-
 32
32 -
 33
33 -
 34
34 -
 35
35 -
 36
36 -
 37
37 -
 38
38 -
 39
39 -
 40
40 -
 41
41 -
 42
42 -
43
-
44
-
45
-
46
-
47
-
48
-
49
-
50
-
51
-
52
-
53
-
54
-
55
-
56
-
57
-
58
-
59
-
60
-
61
-
62
-
63
-
64
-
65
-
66
-
67
-
68
-
69
-
70
-
71
-
72
-
73
-
74
-
75
-
76
-
77
-
78
-
79
-
80
-
81
-
82
-
83
-
84
-
85
-
86
-
87
-
88
-
89
-
90
-
91
-
92
-
93
-
94
-
95
-
96
-
97
-
98
-
99
-
100
-
101
-
102
-
103
-
104
-
105
-
106
-
107
-
108
-
109
-
110
-
111
-
112
-
113
-
114
-
115
-
116
-
117
-
118
 |
 |
