IBM 79856au User Guide - Page 52
Installing, drive
 |
UPC - 883436004374
View all IBM 79856au manuals
Add to My Manuals
Save this manual to your list of manuals |
Page 52 highlights
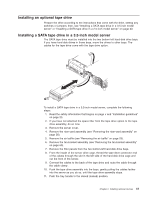
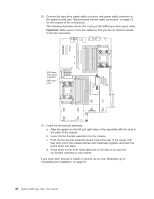
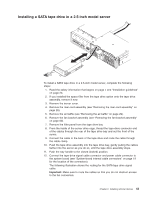
Note: If there is a gap between the controller and the retaining clips, the controller has not been properly installed. In this case, open the retaining clips and remove the controller; then, reinsert the card. 10. Remove the battery from the ServeRAID SAS controller package. 11. Slide the battery mounting tabs into the battery mounting clips on the wall of the power supply bay, next to the ServeRAID-8k SAS connector. 12. Connect the battery cable to the ServeRAID SAS controller card. 13. Reposition the SAS cable. If you have other devices to install or remove, do so now. Otherwise, go to "Completing the installation" on page 61. Note: When you restart the server, you will be given the opportunity to import the existing RAID configuration to the new RAID controller. Installing a hard disk drive Locate the documentation that comes with the hard disk drive and follow those instructions in addition to the instructions in this chapter. The following notes describe the type of hard disk drive that the server supports and other information that you must consider when installing a hard disk drive: v The server 3.5-inch models support six slim 3.5-inch hard disk drives installed on Ultra-Slim hard disk drive trays for 3.5-inch drives. For a list of supported 3.5-inch hard disk drives, see http://www.ibm.com/servers/eserver/serverproven/compat/ us/. v The server 2.5-inch models support eight 2.5-inch hot-swap hard disk drives installed on Ultra-Slim hard disk drive trays for 2.5-inch drives. For a list of supported 2.5-inch hard disk drives, see http://www.ibm.com/servers/eserver/ serverproven/compat/us/. v All hot-swap drives in the server should have the same throughput speed rating. Mixing hard disk drives with different speed ratings will cause all drives to operate at the lower throughput speed. v The ID that is assigned to each bay is printed on the server front. The following illustrations show how to install a hot-swap hard disk drive. 3.5-inch drives Important: Install only SAS or SATA 3.5-inch hard disk drives in this server. Filler panel Hard disk drive Tray handle 38 System x3655 Type 7985: User's Guide
-
 1
1 -
2
-
3
-
4
-
5
-
6
-
7
-
8
-
9
-
10
-
11
-
12
-
13
-
14
-
15
-
16
-
17
-
18
-
19
-
20
-
21
-
22
-
23
-
24
-
25
-
26
-
27
-
28
-
29
-
30
-
31
-
32
-
33
-
34
-
35
-
36
-
37
-
38
-
39
-
40
-
41
-
42
-
43
-
44
-
45
-
46
-
 47
47 -
 48
48 -
 49
49 -
 50
50 -
 51
51 -
 52
52 -
 53
53 -
 54
54 -
 55
55 -
 56
56 -
 57
57 -
58
-
59
-
60
-
61
-
62
-
63
-
64
-
65
-
66
-
67
-
68
-
69
-
70
-
71
-
72
-
73
-
74
-
75
-
76
-
77
-
78
-
79
-
80
-
81
-
82
-
83
-
84
-
85
-
86
-
87
-
88
-
89
-
90
-
91
-
92
-
93
-
94
-
95
-
96
-
97
-
98
-
99
-
100
-
101
-
102
-
103
-
104
-
105
-
106
-
107
-
108
-
109
-
110
-
111
-
112
-
113
-
114
-
115
-
116
-
117
-
118
 |
 |
