IBM 79856au User Guide - Page 47
Installing, external, cable
 |
UPC - 883436004374
View all IBM 79856au manuals
Add to My Manuals
Save this manual to your list of manuals |
Page 47 highlights
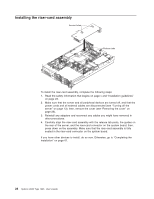
8. Connect any required cables to the adapter. Attention: v When you route cables, do not block any connectors or the ventilated space around any of the fans. v Make sure that cables are not routed on top of components under the riser-card assembly. v Make sure that the cables are not pinched by the server components 9. Perform any configuration tasks that are required for the adapter. If you have other devices to install or remove, do so now. Otherwise, go to "Completing the installation" on page 61. Installing the external SAS cable To install the external SAS cable, complete the following steps: 1. Read the safety information that begins on page v and "Installation guidelines" on page 23. 2. Turn off the server and all attached devices (see "Turning off the server" on page 13). 3. Disconnect all external cables and power cords. 4. Slide the server out of the rack. 5. Remove the cover (see "Removing the cover" on page 26). 6. Remove the riser-card assembly (see "Removing the riser-card assembly" on page 26). 7. Remove the air baffle (see "Removing the air baffle" on page 29). 8. Remove the cap on the external SAS connector on the system board. 9. Using the screws supplied with the cable, attach the end of the cable with the connector to the rear of the chassis. Attach the other end of the cable to the external SAS connector on the system board. Chapter 2. Installing optional devices 33
-
 1
1 -
2
-
3
-
4
-
5
-
6
-
7
-
8
-
9
-
10
-
11
-
12
-
13
-
14
-
15
-
16
-
17
-
18
-
19
-
20
-
21
-
22
-
23
-
24
-
25
-
26
-
27
-
28
-
29
-
30
-
31
-
32
-
33
-
34
-
35
-
36
-
37
-
38
-
39
-
40
-
41
-
 42
42 -
 43
43 -
 44
44 -
 45
45 -
 46
46 -
 47
47 -
 48
48 -
 49
49 -
 50
50 -
 51
51 -
 52
52 -
53
-
54
-
55
-
56
-
57
-
58
-
59
-
60
-
61
-
62
-
63
-
64
-
65
-
66
-
67
-
68
-
69
-
70
-
71
-
72
-
73
-
74
-
75
-
76
-
77
-
78
-
79
-
80
-
81
-
82
-
83
-
84
-
85
-
86
-
87
-
88
-
89
-
90
-
91
-
92
-
93
-
94
-
95
-
96
-
97
-
98
-
99
-
100
-
101
-
102
-
103
-
104
-
105
-
106
-
107
-
108
-
109
-
110
-
111
-
112
-
113
-
114
-
115
-
116
-
117
-
118
 |
 |
