IBM 79856au User Guide - Page 51
Attention
 |
UPC - 883436004374
View all IBM 79856au manuals
Add to My Manuals
Save this manual to your list of manuals |
Page 51 highlights
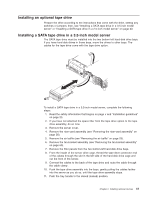
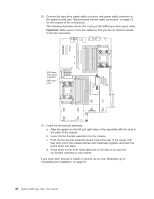
Note: The ServeRAID-8k-I SAS controller does not have a battery. Battery cable Battery RAID controller Battery mounting tabs Battery mounting clips Battery cable connector Attention: To avoid breaking the retaining clips or damaging the connectors, handle the clips gently. The ServeRAID SAS controller can be installed only in a dedicated slot on the system board. The server comes with a ServeRAID-8k-l SAS controller installed. To replace the ServeRAID-8k-l SAS controller with a ServeRAID-8k SAS controller, complete the following steps: 1. Read the safety information that begins on page v and "Installation guidelines" on page 23. 2. Turn off the server and peripheral devices and disconnect all power cords and external cables (see "Turning off the server" on page 13); then, remove the cover (see "Removing the cover" on page 26). 3. Locate the ServeRAID SAS controller on the system board. 4. Move the SAS cable so it is not interfering with removing the ServeRAID SAS controller. 5. Open the retaining clip on each end of the connector. 6. Lift the ServeRAID SAS controller out of the connector. 7. Touch the static-protective package that contains the new ServeRAID SAS controller to any unpainted metal surface on the server. Then, remove the ServeRAID SAS controller from the package. 8. Turn the new ServeRAID SAS controller card so that the key on the bottom edge aligns correctly with the connector. 9. Firmly press the ServeRAID SAS controller straight down into the connector by applying pressure on both ends of the card simultaneously. The retaining clips snap into the locked position when the card is firmly seated in the connector. Chapter 2. Installing optional devices 37
-
 1
1 -
2
-
3
-
4
-
5
-
6
-
7
-
8
-
9
-
10
-
11
-
12
-
13
-
14
-
15
-
16
-
17
-
18
-
19
-
20
-
21
-
22
-
23
-
24
-
25
-
26
-
27
-
28
-
29
-
30
-
31
-
32
-
33
-
34
-
35
-
36
-
37
-
38
-
39
-
40
-
41
-
42
-
43
-
44
-
45
-
 46
46 -
 47
47 -
 48
48 -
 49
49 -
 50
50 -
 51
51 -
 52
52 -
 53
53 -
 54
54 -
 55
55 -
 56
56 -
57
-
58
-
59
-
60
-
61
-
62
-
63
-
64
-
65
-
66
-
67
-
68
-
69
-
70
-
71
-
72
-
73
-
74
-
75
-
76
-
77
-
78
-
79
-
80
-
81
-
82
-
83
-
84
-
85
-
86
-
87
-
88
-
89
-
90
-
91
-
92
-
93
-
94
-
95
-
96
-
97
-
98
-
99
-
100
-
101
-
102
-
103
-
104
-
105
-
106
-
107
-
108
-
109
-
110
-
111
-
112
-
113
-
114
-
115
-
116
-
117
-
118
 |
 |
