IBM 79856au User Guide - Page 58
eserver/serverproven/compat/us
 |
UPC - 883436004374
View all IBM 79856au manuals
Add to My Manuals
Save this manual to your list of manuals |
Page 58 highlights
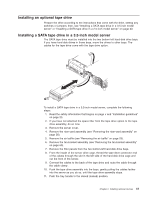
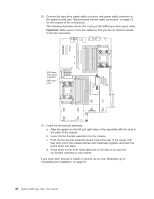
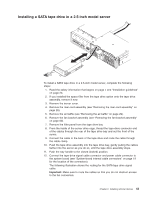
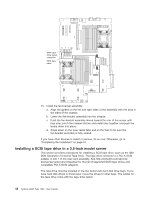
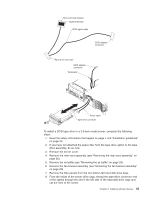
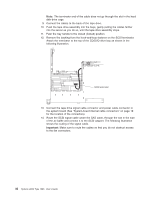
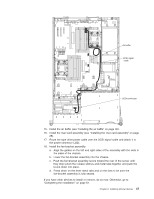
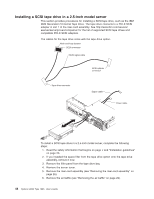
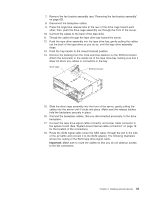
SATA tape drive signal connector SATA tape cable 13. Install the fan-bracket assembly: a. Align the guides on the left and right sides of the assembly with the slots in the sides of the chassis. b. Lower the fan-bracket assembly into the chassis. c. Push the fan-bracket assembly levers toward the rear of the server until they stop; pinch the release latches and metal tabs together and push the levers down into place. d. Press down on the lever metal tabs and on the fans to be sure the fan-bracket assembly is fully seated. If you have other devices to install or remove, do so now. Otherwise, go to "Completing the installation" on page 61. Installing a SCSI tape drive in a 3.5-inch model server This section provides procedures for installing a SCSI tape drive, such as the IBM DDS Generation 5 Internal Tape Drive. The tape drive connects to a PCI-X SCSI adapter in slot 1 of the riser-card assembly. See http://www.ibm.com/servers/ eserver/serverproven/compat/us/ for the list of supported SCSI tape drives and compatible PCI-X SCSI adapters. The tape drive must be installed in the two bottom-left hard disk drive bays. If you have hard disk drives in those bays, move the drives to other bays. The cables for the tape drive come with the tape drive option. 44 System x3655 Type 7985: User's Guide
-
 1
1 -
2
-
3
-
4
-
5
-
6
-
7
-
8
-
9
-
10
-
11
-
12
-
13
-
14
-
15
-
16
-
17
-
18
-
19
-
20
-
21
-
22
-
23
-
24
-
25
-
26
-
27
-
28
-
29
-
30
-
31
-
32
-
33
-
34
-
35
-
36
-
37
-
38
-
39
-
40
-
41
-
42
-
43
-
44
-
45
-
46
-
47
-
48
-
49
-
50
-
51
-
52
-
 53
53 -
 54
54 -
 55
55 -
 56
56 -
 57
57 -
 58
58 -
 59
59 -
 60
60 -
 61
61 -
 62
62 -
 63
63 -
64
-
65
-
66
-
67
-
68
-
69
-
70
-
71
-
72
-
73
-
74
-
75
-
76
-
77
-
78
-
79
-
80
-
81
-
82
-
83
-
84
-
85
-
86
-
87
-
88
-
89
-
90
-
91
-
92
-
93
-
94
-
95
-
96
-
97
-
98
-
99
-
100
-
101
-
102
-
103
-
104
-
105
-
106
-
107
-
108
-
109
-
110
-
111
-
112
-
113
-
114
-
115
-
116
-
117
-
118
 |
 |
