Insignia IS-TV040921 User Manual (English) - Page 12
Connecting To A Dolby Digital Decoder For Dvd, Installing The Batteries
 |
View all Insignia IS-TV040921 manuals
Add to My Manuals
Save this manual to your list of manuals |
Page 12 highlights
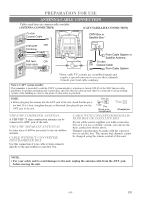
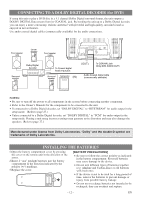
CONNECTING TO A DOLBY DIGITAL DECODER (for DVD) If using this unit to play a DVD disc in a 5.1 channel Dolby Digital surround format, the unit outputs a DOLBY DIGITAL Data stream from its COAXIAL jack. By hooking the unit up to a Dolby Digital decoder, you can enjoy a more convincing, realistic ambience with powerful and high-quality surround sound as enjoyed in movie theaters. Use audio coaxial digital cables (commercially available) for the audio connections. Front speaker (left) Center speaker Front speaker (right) COAXIAL ANT. Dolby Digital decoder Surround speaker (left) To Coaxial digital Audio input jack Surround speaker (right) Subwoofer (IN) (OUT) To COAXIAL jack (Only DVD AUDIO OUT) Audio Coaxial digital cable (commercially available) NOTES: • Be sure to turn off the power to all components in the system before connecting another component. • Refer to the Owner's Manuals for the components to be connected to the unit. • If connected to a Dolby Digital decoder, set "DOLBY DIGITAL" to "BITSTREAM" for audio output in the setup mode. (Refer to page 27.) • Unless connected to a Dolby Digital decoder, set "DOLBY DIGITAL" to "PCM" for audio output in the setup mode. Playing a unit using incorrect settings may generate noise distortion and may also damage the speakers. (Refer to page 27.) Manufactured under license from Dolby Laboratories. "Dolby" and the double-D symbol are trademarks of Dolby Laboratories. INSTALLING THE BATTERIES 1)Open the battery compartment cover by pressing the cover on the remote unit in the direction of the arrow. 2)Insert 2 "AA" penlight batteries into the battery compartment in the direction indicated by the polarity (+/-) markings. 3)Replace the cover. [BATTERY PRECAUTIONS] • Be sure to follow the correct polarity as indicated in the battery compartment. Reversed batteries may cause damage to the device. • Do not mix different types of batteries together (e.g. Alkaline and Carbon-Zinc) or old batteries with fresh ones. • If the device is not to be used for a long period of time, remove the batteries to prevent damage or injury from possible battery leakage. • Do not try to recharge batteries not intended to be recharged; they can overheat and rupture. - 12 - EN
-
 1
1 -
2
-
3
-
4
-
5
-
6
-
 7
7 -
 8
8 -
 9
9 -
 10
10 -
 11
11 -
 12
12 -
 13
13 -
 14
14 -
 15
15 -
 16
16 -
 17
17 -
18
-
19
-
20
-
21
-
22
-
23
-
24
-
25
-
26
-
27
-
28
-
29
-
30
-
31
-
32
-
33
-
34
-
35
-
36
-
37
-
38
-
39
-
40
-
41
-
42
-
43
-
44
-
45
-
46
-
47
-
48
-
49
-
50
-
51
-
52
-
53
-
54
-
55
-
56
-
57
-
58
-
59
-
60
-
61
-
62
-
63
-
64
-
65
-
66
-
67
-
68
-
69
-
70
-
71
-
72
-
73
-
74
-
75
-
76
-
77
-
78
-
79
-
80
-
81
-
82
-
83
-
84
-
85
-
86
-
87
-
88
-
89
-
90
-
91
-
92
-
93
-
94
-
95
-
96
-
97
-
98
-
99
-
100
-
101
-
102
-
103
-
104
 |
 |
