JVC DLA-HX1U Instruction Manual
JVC DLA-HX1U - D-ila Home Theater Projector Manual
 |
View all JVC DLA-HX1U manuals
Add to My Manuals
Save this manual to your list of manuals |
JVC DLA-HX1U manual content summary:
- JVC DLA-HX1U | Instruction Manual - Page 1
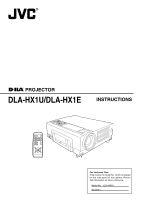
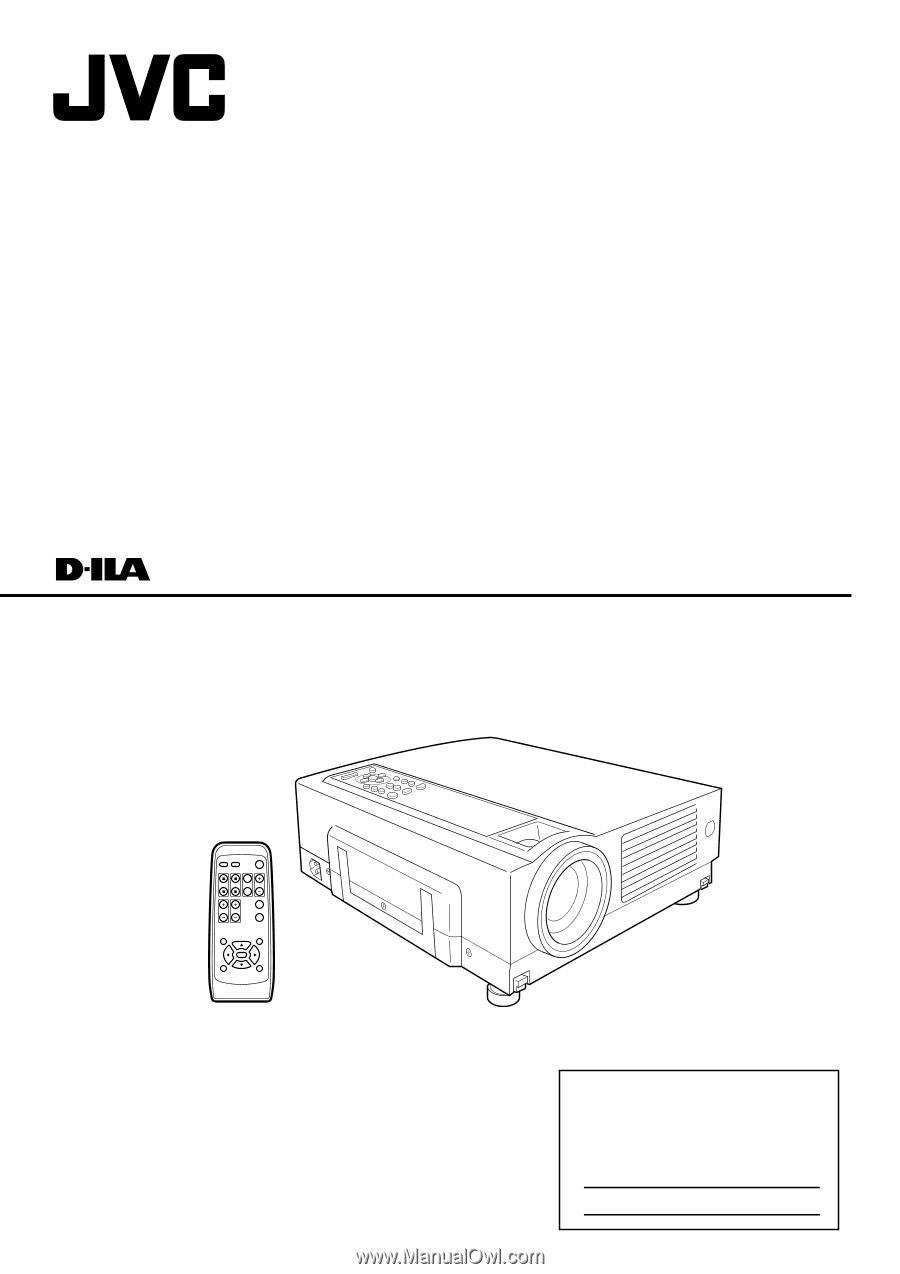
® ® PROJECTOR DLA-HX1U/DLA-HX1E INSTRUCTIONS PC VIDEO OPERATE W V-KEYSTONE H-KEYSTONE SCREEN DIGITAL ZOOM S FREEZE VOLUME FOCUS QUICK ALIGN. MENU EXIT ENTER PRESET HIDE For customer Use: Enter below the Serial No. which is located on the side panel of the cabinet. Retain this - JVC DLA-HX1U | Instruction Manual - Page 2
be burnt into the D-ILA device. Use special care when projecting video games or computer program images. There is no problem with ordinary video-cassette playback images. About the installation place Do not install the projector in a place that cannot support its weight securely. If the installation - JVC DLA-HX1U | Instruction Manual - Page 3
normally by following the operating instructions. Adjust only those controls that are covered by the Operation Manual, as an improper adjustment lamp may cause injuries. - The light-source lamp used in this projector is a high pressure mercury lamp. Be careful when disposing of the lightsource lamp - JVC DLA-HX1U | Instruction Manual - Page 4
with the letter L or colored red. When replacing the fuse, be sure to use only a correctly rated approved type, re-fit the fuse cover. IF IN DOUBT . If a new main plug has to be fitted, then follow the instruction given below: WARNING: THIS APPARATUS MUST BE EARTHED. IMPORTANT: The wires in - JVC DLA-HX1U | Instruction Manual - Page 5
into the D-ILA device. Use special care when projecting video games or computer program images. There is no problem with ordinary video cassette as this causes poor eyesight. Using the projector ● Remove the Lens Cap when using the projector Please use the projector after removing the lens cap. - JVC DLA-HX1U | Instruction Manual - Page 6
50 Troubleshooting 51 What to do when these messages are displayed .... 53 Warning Indication 55 Specifications 56 The following accessories are packed together with this projector. Please confirm all items. If any item is missing, please contact your dealer. Quick Guide ...x 1 Instructions (CD - JVC DLA-HX1U | Instruction Manual - Page 7
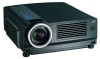
cord is connected to. (☞ page 24) 3 Carrying Handle Use this handle when carrying the projector. 4 Foot Lever (for front adjustable foot) Use when extending and retracting the front foot. (☞ page 15) 5 Lens The lens is a 1.3 x (zoom ratio) manual zoom lens. Before projection, remove the lens cap - JVC DLA-HX1U | Instruction Manual - Page 8
/ Bottom Surface q Connector Panel t Remote Sensor (Rear) r Exhaust Vent w Speaker 7 Air Inlet e Lamp Cover Bottom Surface y Front Adjustable Foot 7 Air Inlet u Filter i Rear Fixed Foot Blocked as it is not in use. Opening it forcibly will cause damage to the machine. q Connector Panel For - JVC DLA-HX1U | Instruction Manual - Page 9
The signal output for controlling roll-up screen that supports [SCREEN TRIGGER]. Outputs DC 12 V / max. 100 mA when power is on. (Tip to rear projection etc., the [REMOTE] terminal can be used to connect an external sensor to the projector. The external sensor is not generally sold. Please check - JVC DLA-HX1U | Instruction Manual - Page 10
OPERATE [STAND BY] blinking Projector is in cool down mode (when cooling lamp) STAND BY LAMP TEMP OPERATE [LAMP] blinking*1 Lamp life has expired (Lamp time over 2000 hours) STAND BY LAMP TEMP OPERATE [LAMP] light on*1 The time to replace the lamp is near (Lamp usage time over 1900 hours - JVC DLA-HX1U | Instruction Manual - Page 11
Blinking : Indicates the temperature inside the projector is abnormally high. 9 [LAMP] Indicator Light on : Indicates the lamp has been used for more than 1900 hours. Blinking : Indicates the lamp has been used for more than 2000 hours. Please change the lamp. (☞ page 10, 47, 55) p [VIDEO] button - JVC DLA-HX1U | Instruction Manual - Page 12
Controls and Features Remote Control Unit q [VIDEO] button w [PC] button e [H-KEYSTONE] button r [V-KEYSTONE] button t [VOLUME] button y [FOCUS] button (Not functional on this unit.) u [MENU] button i [PRESET] button PC VIDEO OPERATE W V-KEYSTONE H-KEYSTONE SCREEN DIGITAL ZOOM S FREEZE - JVC DLA-HX1U | Instruction Manual - Page 13
select an item, adjust the value etc. (☞ page 35) q [VIDEO] button Use this button to select a device such as a video connected to the [VIDEO IN] terminal ([VIDEO] or [Y/C] Input terminal) of the projector. (☞ page 25) w [PC] button Use this button to select a device connected to the [PC1], [PC2] or - JVC DLA-HX1U | Instruction Manual - Page 14
the minus · end of the battery first. Precautions for using batteries If batteries are used incorrectly, they may crack or leak. This could cause to contact with the skin, wipe it away with a cloth, otherwise skin problems may occur. 3. Close the back cover • Close the back cover by inserting - JVC DLA-HX1U | Instruction Manual - Page 15
soiling, removing grease/dirt totally from the optical parts is not possible. Precaution for Usage This projector uses a light-source lamp which reaches high temperatures when projecting. Please DO NOT use it in the following ways as doing so may result in fire or malfunction. • Projecting images - JVC DLA-HX1U | Instruction Manual - Page 16
downward from the vertical line. * If the KEYSTONE compensation is used simultaneously for upper/lower/left/right directions, the compensating range will decrease. Mounting the Projector When mounting of the projector is required, do it using the embedded three screw holes (M6 nuts) at the bottom - JVC DLA-HX1U | Instruction Manual - Page 17
projector uses 1.3x manual zoom lens for projection. • Although the focusable projection distance is about 1.6 m ~ 12 m, the projection distance recommendable for performance is about 2 m ~ 8 m. Install the projector are provided only as a guide (reference). Please use them during installation. The - JVC DLA-HX1U | Instruction Manual - Page 18
remote control via remote cable to the [REMOTE] terminal, the remote control can be used as a wired control unit. • When connected to the remote cable, the supplied remote control's transmitter and the projector's sensor do not function. • Please keep within the range of the remote cable length - JVC DLA-HX1U | Instruction Manual - Page 19
can be input into the projector The following signals can be input to the projector. Ⅵ Video signals (1) video signal output port by consulting the computer's manual. The video signal output port is generally called signals out of this range should not be used. (Out of range signals can be projected - JVC DLA-HX1U | Instruction Manual - Page 20
Some of the signals listed above may require adjustment depending on the video board used. • Composite sync (Cs) and G on Sync signals cannot sometimes be at times be displayed in the video 480p mode. (In this case, the projector enters the video menu when the [MENU] button is pressed.) • The motion - JVC DLA-HX1U | Instruction Manual - Page 21
to Various Devices Connecting to Devices Before connection, be sure to turn off both the projector and the device. Ⅵ Connecting to Video Devices • Thoroughly read the manual that comes with each video device. • Use the supplied AV connection cable. S-video (Y/C) cable, BNC cable and PC Audio cables - JVC DLA-HX1U | Instruction Manual - Page 22
manuals that come with the computer used. • Prepare cables for connecting the devices. Desktop type (DOS/V, etc.) • When the [PC2] input terminal is used, such as a computer sound source to the projector, connect to the [AUDIO IN] terminal using the separately available audio cable. • When - JVC DLA-HX1U | Instruction Manual - Page 23
RS-232C connection cable (sold separately) (Cross cable) Connection for controlling more than one projector By using the [CONTROL] terminal, more than one projector can be controlled simultaneously by one computer. Connect these projectors in series by connecting the [OUT] terminal of the first - JVC DLA-HX1U | Instruction Manual - Page 24
they may be damaged. ● Do not insert or pull out the plugs with a wet hand. Ⅵ When using the projector, remove the Lens Cap • Be sure to fit the lens cap on when the projector is not in use to keep out dirt. • Do not project with the lens cap attached. The lens cap may - JVC DLA-HX1U | Instruction Manual - Page 25
Basic Operations If projector set up is not yet complete, please read 'Adjustments and Settings Using Menus' on page 32 and appears. Light on OPERATE OPERATE STAND BY LAMP TEMP OPERATE Projector: Remote Control panel control unit Projector: Indicator Notes • Upon projection, the image - JVC DLA-HX1U | Instruction Manual - Page 26
PC Audio-Vol 12 Digital zoom x1.2 Vert.keystone 0 Horiz.Keystone 0 Projector: Remote Control panel control unit • Upon pressing the button, the input displayed on the screen. (☞ page 53) • When the [PC2] input terminal is used, "PC2(BNC)" must be se- lected from the "Options" item in the main - JVC DLA-HX1U | Instruction Manual - Page 27
for approximately 90 seconds as the temperature of the light source lamp cools (Cool Down Mode). OPERATE OPERATE Projector: Control panel Remote control unit Turn off Blink LAMP TEMP STAND BY OPERATE Projector: Indicator Note • The [OPERATE] button will not work for approximately 1 minute - JVC DLA-HX1U | Instruction Manual - Page 28
in while not changing the size of the projected image. After zooming, the position of the image displayed can be moved. • This cannot be done using the projector buttons. Please use the re- mote control unit. 1. Press [DIGITAL ZOOM] ª • The "Digital zoom" display appears on the screen and the - JVC DLA-HX1U | Instruction Manual - Page 29
image and sound return. Displaying a Still Picture The projected image can be paused temporarily. • This operation cannot be operated by the projector buttons. Please use the remote control unit. Press the [FREEZE] button • The image pauses after the [FREEZE] button is pressed for a few sec- onds - JVC DLA-HX1U | Instruction Manual - Page 30
of the Image Depending on the angle of projection onto the screen, the image may get distorted in a trapezoid form sometimes. When installing the projector or screen for the first time, or when reinstalling in other rooms, etc., Keystone adjustments need to be made to remove trapezoid distortions - JVC DLA-HX1U | Instruction Manual - Page 31
PC VIDEO OPERATE W V-KEYSTONE H-KEYSTONE SCREEN DIGITAL ZOOM S FREEZE VOLUME FOCUS QUICK ALIGN. MENU EXIT ENTER PRESET HIDE Basic Operations Using the Quick Alignment function The Quick Alignment function automatically adjusts (sets) the screen settings of the image input from the [PC1 - JVC DLA-HX1U | Instruction Manual - Page 32
on the screen are used to setup the projector and perform adjustments. The Menu Structure The menus of the projector have the following structure. . Set up Logo Options A Language Information Input Switcher Source VIDEO CH.0 NTSC Lamp time 1234 h t Main: "Information" menu Image adj. Set up R - JVC DLA-HX1U | Instruction Manual - Page 33
8 Main: "Logo" menu Adjustments and Settings Using Menus Submenu Image adj. Set up R GB H 63.98kHz Frequency V 60.02 Hz Lamp time 1234 h t Main: "Information" menu language of the menus is set to "English" when the projector is bought. The display language can be selected from among - JVC DLA-HX1U | Instruction Manual - Page 34
Using up R GB Logo Options A Language Information Input Switcher PC1 CH.0 Lamp time 1234 h t Main: "Information" menu Submenu Image adj. • The display language of the menus is set to "English" when the projector is bought. The display language can be selected from among 8 languages. (☞ - JVC DLA-HX1U | Instruction Manual - Page 35
Adjustments and Settings Using Menus LAMP TEMP STAND BY OPERATE PC VIDEO V-KEYSTONE H-KEYSTONE VOL. button The Menu Operation Buttons The menus are accessed and operated using the following buttons on the projector/remote control: Button Main unit Remote control unit Function MENU MENU - JVC DLA-HX1U | Instruction Manual - Page 36
Adjustments and Settings Using Menus LAMP PC TEMP VIDEO STAND BY OPERATE MENU 1 V-KEYSTONE H-KEYSTONE VOL. MENU EXIT ENTER 6 3, 5 5 2, 4 The Procedure for Menu Operation 1. Press the [MENU] button The main menu - JVC DLA-HX1U | Instruction Manual - Page 37
movies. Set value : "Auto", "OFF" {"Auto"} "Auto" : Normally, the projector is set to "Auto". "OFF" : This is set when not viewing movies. "HDTV ENTER] button to enter the "Resize" menu 7. "Clamp" This can be used if the screen of the PC/ workstation is unstable in that it dims and - JVC DLA-HX1U | Instruction Manual - Page 38
ENTER] button to delete. You can project a picture from the video player or PC and capture it to use as your logo. The captured picture can be displayed as a logo display when the projector starts up. [ Press the [ENTER] button to enter the "Capture menu" 9. 9 "Capture menu" Adjustment item (press - JVC DLA-HX1U | Instruction Manual - Page 39
and the background can be seen through it. Setting value: "OFF", "ON" {"OFF"} "PC2(BNC)" "DIST" Sets whether to use the BNC connector on the back of the projector as an "RGB" signal input terminal or as a "YPBPR" (color-difference) signal input terminal. Please reset it based on the connected - JVC DLA-HX1U | Instruction Manual - Page 40
. When video input is selected "Input" "Switcher" "Source" "Lamp time" Displays the image input [VIDEO], [Y/C], [PC2]) when projecting. Displays the selected switcher matching the specification of this projector. "0" : not being used. "1-10" : switcher number. For details, please check with your - JVC DLA-HX1U | Instruction Manual - Page 41
ratio" Set the "Aspect ratio" when image is input from the [VIDEO], [Y/C] or [PC2] terminals. 1. Project the image onto the screen LAMP PC TEMP VIDEO STAND BY OPERATE MENU 2 V-KEYSTONE H-KEYSTONE VOL. MENU EXIT ENTER 3, 4 3, 4 PC VIDEO OPERATE W V-KEYSTONE H-KEYSTONE SCREEN DIGITAL - JVC DLA-HX1U | Instruction Manual - Page 42
Setting "Aspect ratio" and "Resize" LAMP PC TEMP VIDEO STAND BY OPERATE MENU 6 V-KEYSTONE H-KEYSTONE VOL. MENU EXIT ENTER 5 5. Select "Zoom" with the cursor buttons (ᮤ / ᮣ) • Set "Aspect ratio" to "Zoom" for - JVC DLA-HX1U | Instruction Manual - Page 43
LAMP PC TEMP VIDEO STAND BY OPERATE MENU 2 V-KEYSTONE H-KEYSTONE VOL. MENU EXIT ENTER 3, 4 3, 4 PC VIDEO OPERATE W V-KEYSTONE H-KEYSTONE SCREEN DIGITAL ZOOM S FREEZE VOLUME FOCUS QUICK - JVC DLA-HX1U | Instruction Manual - Page 44
Setting "Aspect ratio" and "Resize" LAMP PC TEMP VIDEO STAND BY OPERATE MENU 6 V-KEYSTONE H-KEYSTONE VOL. MENU EXIT ENTER 5 5. Select "Zoom" with the cursor buttons (ᮤ / ᮣ) • Set "Resize" to "Zoom" for optimum - JVC DLA-HX1U | Instruction Manual - Page 45
Editing and Projecting Logo You can project your logo if you like when you start up the projector. This may come in useful during presentations, etc. 1. Project the images to be included in your logo MOTOR SHOW 2 4 V-KEYSTONE H-KEYSTONE VOL. MENU EXIT ENTER 3,5 2 4 PC VIDEO OPERATE W V- - JVC DLA-HX1U | Instruction Manual - Page 46
the framed image set in the procedures 8 to 11 from the projected image. • The captured picture will be taken into memory as a logo in the projector and will be shown during start-up. Image adj. Set up R GB Logo Options A Language Information Capture menu Menu pos. Horiz.move Vert.move Horiz - JVC DLA-HX1U | Instruction Manual - Page 47
Replacing the Lamp The light source lamp and its lamp time The light-source lamp has a service life. The life of lamps currently used for this projector is about 2000 hours. [Average lamp life: 2000 hours] When the light-source lamp approaches the end of its service life, deterioration progresses - JVC DLA-HX1U | Instruction Manual - Page 48
the handle, and tighten the screw. • Tighten the two screws with a ª screwdriver. 6. Attach the light-source lamp cover and tighten the screw. • Tighten the two screws with a ª screwdriver. Note • When closing the lamp cover, please insert the left side (with the two claws) in first and then ensure - JVC DLA-HX1U | Instruction Manual - Page 49
. After blinking stops, lamp time resets and the projector returns to the stand- lamp time only when you have replaced the lamp. Never reset it while the lamp is still in use, otherwise the approximate standard for gauging replacement time may be inaccurate, lamp performance may suffer and lamp - JVC DLA-HX1U | Instruction Manual - Page 50
. ❈ The air inlet filter on the right side cannot be removed. Please clean this filter regularly using, for example, a vacuum cleaner. 1. Pull out the power cord from the wall outlet • After the projector goes into the stand-by state with the [STAND BY] indicator on, pull out the power cord - JVC DLA-HX1U | Instruction Manual - Page 51
plug in again. 25, 27, 50 Has the lamp life expired? (Has the lamp time reached 2000 hours?) • After the projector goes into the stand-by state with the [STAND 19, 20 Is "Brightness" adjusted correctly? • Adjust "Brightness" using the menu. 37 Is volume level set at minimum? • Adjust volume - JVC DLA-HX1U | Instruction Manual - Page 52
unit and the remote sensor? Is the remote control held too far from the sen- • Use the remote control unit at a nearer point. sor? 37 38 19, 20 39 19, 20 ----- 14 14 18 18 • This projector uses a micro computer. External noise may cause it to malfunction. If this happens, unplug from the - JVC DLA-HX1U | Instruction Manual - Page 53
range. The frequency of the input video signal is out of range. [ Please ensure the frequency level of the input video signals is within the projector's specifications. 53 - JVC DLA-HX1U | Instruction Manual - Page 54
off, it cannot be turned on again if the accumulated lamp time has exceeded 2000 hours. When the accumulated lamp time reaches 2010 hours, the projector shuts down and cannot be turned on again. [ Replace the light-source lamp and reset the lamp time. (☞ page 47, 48, 49) Note • The message display - JVC DLA-HX1U | Instruction Manual - Page 55
following table. The projector will then automatically stops projection and run the cooling fan for about 90 seconds. No. [LAMP] 1 Blink 2 up. After that, check No.4 ~ No.7. No.4 : Ensure that the lamp is correctly set in place. Restart according to the basic operation procedures. No.5 - JVC DLA-HX1U | Instruction Manual - Page 56
DLA-HX1U/ DLA-HX1E D-ILA projector Ⅵ Emission method D-ILA®*1 (Reflective Active Matrix Principle) Ⅵ Display panel/ size D-ILA*2 / 0.64 (1400 pixels x 788 pixels) x 3 (Total number of pixels: Approx. 3,309,600) Ⅵ Projecting lens x 1.3 zoom lens (2:1 ~ 2.6:1) (Manual manufactured using extremely - JVC DLA-HX1U | Instruction Manual - Page 57
Dimensions (unit: mm) Ⅵ Top Ⅵ Bottom Specifications 181 20 300 360 298 38.2 8.2 7 Ⅵ Front 92.5 298 89 M6 (Depth 10 mm) 67.5 Center of lens 2 Attachment screw should be more than 6 mm but less than 10 mm in length. Ⅵ Side 109 115.9 65.4 25 ~ 56 15 267 36.2 292 57 - JVC DLA-HX1U | Instruction Manual - Page 58
Specifications Pin arrangement Ⅵ Y/C terminal 4 3 2 1 Pin number 1 2 3 4 Signal name GND (Y) GND (C) Y C Ⅵ RS-232C IN/OUT terminal 9876 54321 Pin number 1 2 3 4 5 Signal name N/C RD TD N/C GND Pin number 6 7 8 9 Signal name N/C N/C N/C N/C N/C Ⅵ PC 1 terminal 11 12 13 14 15 6 7 1 2 8 3 - JVC DLA-HX1U | Instruction Manual - Page 59
Stop bit Flow control 9600 bps/19200 bps 8 bits None 1 bit None 2. Command Format 2-1 Command data format When sending a control command to the projector, use the following data format. [ Header ID SP Command SP Parameter CR Header : Designates the head of data and the data type. : ! (21h - JVC DLA-HX1U | Instruction Manual - Page 60
Specifications 3) Special parameters Input switching parameters Character 0 1 3 4 5 Hex. 30 31 33 34 35 Meaning Y/C VIDEO PC1 PC2 PC3 Operation mode parameters Character 0000 0001 0002 0004 Hex. 30h 30h 30h 30h 30h 30h 30h 31h 30h 30h 30h 32h 30h 30h 30h 34h Meaning Stand-by mode Power-on - JVC DLA-HX1U | Instruction Manual - Page 61
Memo 61 - JVC DLA-HX1U | Instruction Manual - Page 62
® VICTOR COMPANY OF JAPAN, LIMITED © 2003 VICTOR COMPANY OF JAPAN, LIMITED Printed in Japan 1003-SW-VP DLA-HX1U/DLA-HX1E ® PROJECTOR
-
 1
1 -
 2
2 -
 3
3 -
 4
4 -
 5
5 -
 6
6 -
 7
7 -
8
-
9
-
10
-
11
-
12
-
13
-
14
-
15
-
16
-
17
-
18
-
19
-
20
-
21
-
22
-
23
-
24
-
25
-
26
-
27
-
28
-
29
-
30
-
31
-
32
-
33
-
34
-
35
-
36
-
37
-
38
-
39
-
40
-
41
-
42
-
43
-
44
-
45
-
46
-
47
-
48
-
49
-
50
-
51
-
52
-
53
-
54
-
55
-
56
-
57
-
58
-
59
-
60
-
61
-
62
 |
 |
QUICK ALIGN.
PC
VIDEO
VOLUME
PRESET
HIDE
ENTER
MENU
EXIT
FREEZE
OPERATE
V-KEYSTONE
H-KEYSTONE
SCREEN
DIGITAL
ZOOM
FOCUS
W
S
INSTRUCTIONS
DLA-HX1U/DLA-HX1E
®
®
PROJECTOR
DLA-HX1U
For customer Use:
Serial No.
Model No.
Enter below the Serial No. which is located
on the side panel of the cabinet. Retain
this information for future reference.