JVC DLA-HX1U Instruction Manual - Page 39
“Capture start”, 11 “Options” menu (“ Color profile” menu
 |
View all JVC DLA-HX1U manuals
Add to My Manuals
Save this manual to your list of manuals |
Page 39 highlights
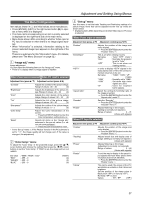
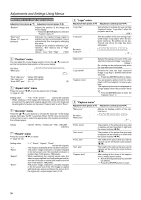
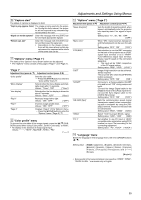
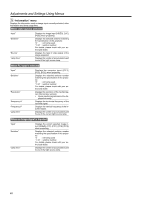
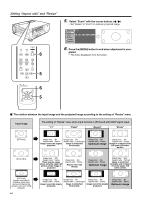
Adjustments and Settings Using Menus p "Capture start" The status of capture is displayed in bold. "Capt. in prog. (approx. 2min)" The image is being read into the projector. During this time interval, the projector will not respond to any command signal inputted by the user. "Signal can not be captured" Clear the message with the [EXIT] button and input appropriate signals. "Reduce capt. size" Clear the message with the [EXIT] button and decrease the signal size. • Depending on the image content, there will be cases where certain signals cannot be captured while others of the same size can be. q "Options" menu ("Page 1") The items of the "Options" menu shown below can be adjusted. • The "Options" menu consists of two pages ("Page 1" and "Page 2"). "Page 1" Adjustment item (press ᮡ / ᮢ) Adjustment content (press ᮤ / ᮣ) "Color profile" "Menu display" "Line display" "Flip H" "Flip V" "Page 2" Sets the color table. [ Press the [ENTER] button to enter the "Color profile" menu w. Sets whether the menu display automati- cally clears after 15 seconds. Values : "15sec", "ON" {"15sec"} Sets whether the line display is shown for about 5 seconds. Values : "5sec", "OFF" {"5sec"} Reverses image left to right. Values : "ON", "OFF" {"OFF"} Inverses image upside down. Values : "ON", "OFF" {"OFF"} Displays "Page 2" of the "Options" menu. [ Press the [ENTER] button to enter the "Options" menu ("Page 2") e. w "Color profile" menu To choose the color table of the image signals, press the CURSOR buttons. When using "Color profile", set the "Color temp." to "6500". • No display in the absence of image signal input. Values HDTV", "MacRGB", "NTSC", "PAL" {"------"} e "Options" menu ("Page 2") Adjustment item (press ᮡ / ᮢ) Adjustment content (press ᮤ / ᮣ) "Sleep time[min]" Sets the length of sleep time which, when lapsed, automatically puts the projector into stand-by state if no signal is inputted. Setting value: "15", "30", "60", "OFF" {"OFF"} "Menu color" When "ON", menu becomes transparent and the background can be seen through it. Setting value: "OFF", "ON" {"OFF"} "PC2(BNC)" "DIST" Sets whether to use the BNC connector on the back of the projector as an "RGB" signal input terminal or as a "YPBPR" (color-difference) signal input terminal. Please reset it based on the connected apparatus. • The input will be "RGB" irrespective of the PC signal setting. Setting value: "RGB", "YPbPr" {"YPbPr"} Image of high resolution can be achieved. Set as required. This is turned "ON" when the [OPERATE] button is pressed. Setting value: "OFF", "ON" {"ON"} "SCART" Connects to a Europe-adapted SCART plug and turns it "ON" during component input. Connect the Image Signal cable to the [RGB] terminal of the [PC2] input termi- nal and the Sync Signal cable to the [VIDEO IN] terminal. Setting value: "OFF", "ON" {"OFF"} "RS-232C [bps]" Sets the communication speed (signal transmission speed) when communicating with a computer by using the [RS232C] terminal. Please set the baud rate for transmission. Setting value: "9600", "19200" {19200} "SXGA" Select "1400" to project SXGA+ signal. Setting value: "1280", "1400" {1280} "PC 3" Set whether to use PC input or HDCP compatible video signal when using [PC3] terminal as input. Set according to the connecting equipment. Setting value : "PC", "HDCP" {"HDCP"} r "Language" menu Select the language in this language menu with the CURSOR buttons Setting value : [ ] (Japanese), [English], [Deutsch] (German), [Español] (Spanish), [Italiano] (Italian), [Français] (French), [Português] (Portuguese) and [ ] (Korean). {[English]} • Some words in the menu and proper nouns such as "VIDEO", "NTSC", "QUICK ALIGN..." are shown only in English. 39
-
 1
1 -
2
-
3
-
4
-
5
-
6
-
7
-
8
-
9
-
10
-
11
-
12
-
13
-
14
-
15
-
16
-
17
-
18
-
19
-
20
-
21
-
22
-
23
-
24
-
25
-
26
-
27
-
28
-
29
-
30
-
31
-
32
-
33
-
 34
34 -
 35
35 -
 36
36 -
 37
37 -
 38
38 -
 39
39 -
 40
40 -
 41
41 -
 42
42 -
 43
43 -
 44
44 -
45
-
46
-
47
-
48
-
49
-
50
-
51
-
52
-
53
-
54
-
55
-
56
-
57
-
58
-
59
-
60
-
61
-
62
 |
 |
