JVC DLA-HX1U Instruction Manual - Page 46
Select Horiz. size with the cursor buttons
 |
View all JVC DLA-HX1U manuals
Add to My Manuals
Save this manual to your list of manuals |
Page 46 highlights
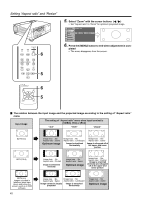
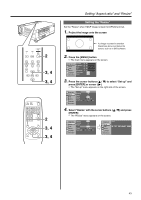
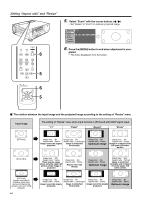
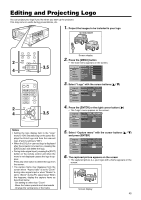
Editing and projecting logo V-KEYSTONE H-KEYSTONE VOL. MENU EXIT ENTER 7~12 12 7. Set the menu position as required • Select "Menu pos." with the cursor buttons Move the menu display position with the cursor buttons (ᮤ / ᮣ) while viewing the projected image. Image adj. Set up R GB Logo Options A Language Information Capture menu Menu pos. Horiz.move Vert.move Horiz.size Vert.size Capture start ( - ) 12 12 ( + ) ENTER 8. Select "Horiz. move" with the cursor buttons (ᮡ / ᮢ) • Move the logo left or right with the cursor buttons while viewing it on the screen. Image adj. Set up R GB Logo Options A Language Information Capture menu Menu pos. Horiz.move Vert.move Horiz.size Vert.size Capture start ( - ) 12 12 ( + ) ENTER PC VIDEO OPERATE W V-KEYSTONE H-KEYSTONE SCREEN DIGITAL ZOOM S FREEZE VOLUME FOCUS QUICK ALIGN. MENU EXIT ENTER PRESET HIDE 7~12 12 "Capt. in prog. (approx. 2min)" The image is being read into the projector. During this time interval, the projector will not respond to any command signal inputted by the user. Capt.in prog.(approx. 2min) Signal can not be captured Reduce capt.size "Signal can not be captured" Clear the message with the [EXIT] button and input appropriate signals. "Reduce capt. size" Clear the message with the [EXIT] button and decrease the signal size. • Depending on the image content, there will be cases where certain signals cannot be captured while others of the same size can be. 9. Select "Vert. move" with the cursor buttons (ᮡ / ᮢ) • Move the logo up or down with the cursor buttons while viewing it on the screen. Image adj. Set up R GB Logo Options A Language Information Capture menu Menu pos. Horiz.move Vert.move Horiz.size Vert.size Capture start ( - ) 12 12 ( + ) ENTER 10. Select "Horiz. size" with the cursor buttons (ᮡ / ᮢ) • Set the width with the cursor buttons while viewing the projected image. Image adj. Set up R GB Logo Options A Language Information Capture menu Menu pos. Horiz.move Vert.move Horiz.size Vert.size Capture start ( - ) 12 12 ( + ) ENTER 11. Select "Vert. size" with the cursor buttons (ᮡ / ᮢ) • Set the height with the cursor buttons while viewing the projected image. Image adj. Set up R GB Logo Options A Language Information Capture menu Menu pos. Horiz.move Vert.move Horiz.size Vert.size Capture start ( - ) 12 12 ( + ) ENTER 12. Select "Capture start" with the cursor buttons (ᮡ / ᮢ) and press [ENTER] • Begin to capture the framed image set in the procedures 8 to 11 from the projected image. • The captured picture will be taken into memory as a logo in the projector and will be shown during start-up. Image adj. Set up R GB Logo Options A Language Information Capture menu Menu pos. Horiz.move Vert.move Horiz.size Vert.size Capture start ( - ) 12 12 ( + ) ENTER 46
-
 1
1 -
2
-
3
-
4
-
5
-
6
-
7
-
8
-
9
-
10
-
11
-
12
-
13
-
14
-
15
-
16
-
17
-
18
-
19
-
20
-
21
-
22
-
23
-
24
-
25
-
26
-
27
-
28
-
29
-
30
-
31
-
32
-
33
-
34
-
35
-
36
-
37
-
38
-
39
-
40
-
 41
41 -
 42
42 -
 43
43 -
 44
44 -
 45
45 -
 46
46 -
 47
47 -
 48
48 -
 49
49 -
 50
50 -
 51
51 -
52
-
53
-
54
-
55
-
56
-
57
-
58
-
59
-
60
-
61
-
62
 |
 |