JVC DLA-HX1U Instruction Manual - Page 25
Basic Operations, Basic Operation Procedures, 1. Power On, 2. Selecting the image to be projected
 |
View all JVC DLA-HX1U manuals
Add to My Manuals
Save this manual to your list of manuals |
Page 25 highlights
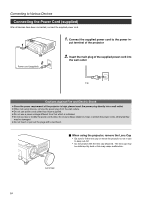
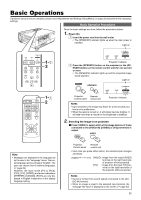
Basic Operations If projector set up is not yet complete, please read 'Adjustments and Settings Using Menus' on page 32 and perform the necessary settings. Basic Operation Procedures Once the basic settings are done, follow the procedures below: 1. Power On 1 Insert the power cord into the wall outlet • The [STAND BY] indicator lights up when the main power is inputted. Light on LAMP TEMP STAND BY OPERATE PC VIDEO V-KEYSTONE H-KEYSTONE VOL. MENU EXIT 1-2 2 ENTER PC VIDEO OPERATE W V-KEYSTONE H-KEYSTONE SCREEN DIGITAL ZOOM S FREEZE VOLUME FOCUS QUICK ALIGN. 1-2 2 MENU EXIT ENTER PRESET HIDE LAMP TEMP STAND BY OPERATE Projector: Indicator 2 Press the [OPERATE] button on the projector (or the [OP- ERATE] button on the remote control unit) for one second or more • The [OPERATE] indicator lights up and the projected image slowly appears. Light on OPERATE OPERATE STAND BY LAMP TEMP OPERATE Projector: Remote Control panel control unit Projector: Indicator Notes • Upon projection, the image may flicker for a few seconds, but this is not a malfunction. • When the lamp is turned on, it will slowly become brighter. It will take more than a minute for the brightness to stabilize. 2. Selecting the image to be projected Ⅵ Press [VIDEO] to select which of the image devices of those connected to the [VIDEO IN] ([VIDEO] or [Y/C]) terminals is output VIDEO VIDEO Note • Messages are displayed in the language set by the user in the "Language" menu. The preset language upon purchase is "English". The user can choose from 8 national languages. (☞ page 39) However, the input mode ([PC1], [PC2], [PC3], [Y/C], [VIDEO]) and button indications ([FREEZE], [D.ZOOM], [EXIT]) are only displayed in English irrespective of the display language setting. Projector: Control panel Remote control unit • Each time you press either button, the selected input changes as follows. [VIDEO] [Y/C] [VIDEO] : Image from the input [VIDEO] terminal on the right hand side of projector will be projected. [Y/C] : Image from the input [Y/C] terminal on the right hand side of the projector will be projected. Notes • Sound is formed from sound signals connected to the [AUDIO IN] terminal. • When no image is input to the selected input terminal, the message "No Input" is displayed on the screen. (☞ page 53) 25
-
 1
1 -
2
-
3
-
4
-
5
-
6
-
7
-
8
-
9
-
10
-
11
-
12
-
13
-
14
-
15
-
16
-
17
-
18
-
19
-
 20
20 -
 21
21 -
 22
22 -
 23
23 -
 24
24 -
 25
25 -
 26
26 -
 27
27 -
 28
28 -
 29
29 -
 30
30 -
31
-
32
-
33
-
34
-
35
-
36
-
37
-
38
-
39
-
40
-
41
-
42
-
43
-
44
-
45
-
46
-
47
-
48
-
49
-
50
-
51
-
52
-
53
-
54
-
55
-
56
-
57
-
58
-
59
-
60
-
61
-
62
 |
 |
