JVC DLA-HX1U Instruction Manual - Page 21
Connecting to Devices
 |
View all JVC DLA-HX1U manuals
Add to My Manuals
Save this manual to your list of manuals |
Page 21 highlights
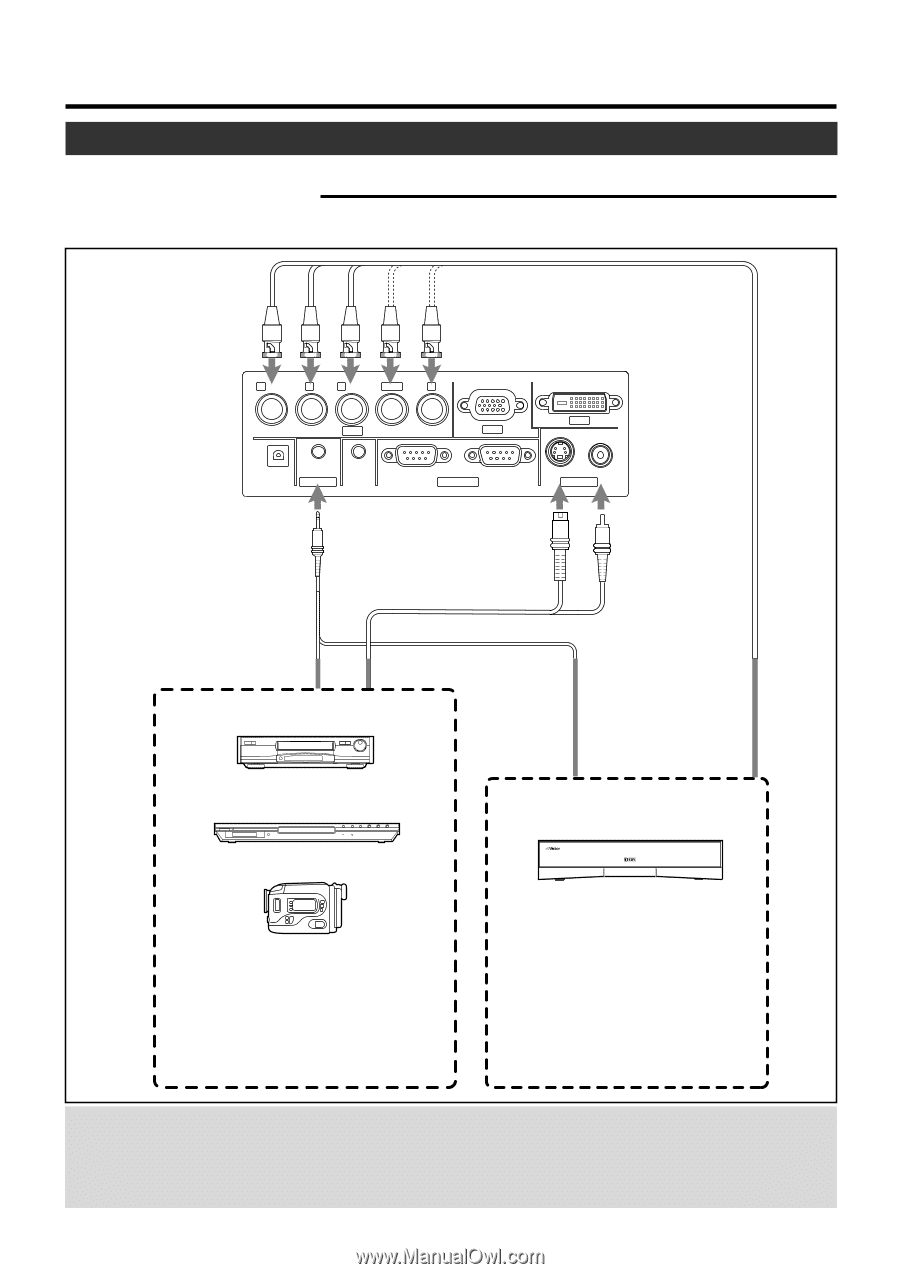
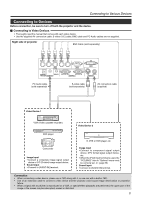
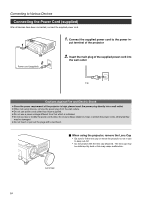
Connecting to Various Devices Connecting to Devices Before connection, be sure to turn off both the projector and the device. Ⅵ Connecting to Video Devices • Thoroughly read the manual that comes with each video device. • Use the supplied AV connection cable. S-video (Y/C) cable, BNC cable and PC Audio cables are not supplied. Right side of projector BNC Cable (sold separately) R PR/CR GY B PB/CB H/CS V PC2 PC1 DVI PC3 SCREEN REMOTE TRIGGER AUDIO IN RS-232C OUT RS-232C IN CONTROL Y/C VIDEO VIDEO IN PC Audio cable (sold separately) S-video cable (sold separately) AV connection cable (supplied) Video Device 1 VCR (Video cassette recorder) Video Device 2 DVD player Camcorder Image input • Connect a composite image signal output device or Y/C (S-video) image output device. Sound input • Connect to [AUDIO IN] terminal. D-VHS or DVD player etc. Image input • Connect to component signal output device, DTV format signal output device, etc. • When the [PC2] input terminal is used, the "PC2(BNC)" item in "Options" menu must be correctly set. (☞ page 39) Sound input • Connect to [AUDIO IN] terminal. Connection • When connecting a video device, please use a TBC along with it, or use one with a built-in TBC. • Use of an extension cable to connect a video device and the projector could cause image deterioration or projection failure. • When a signal with much jitter is reproduced on a VCR, or special-effect playbacks are performed, the upper part of the image or the screen may be interrupted, erased or distorted. 21
-
 1
1 -
2
-
3
-
4
-
5
-
6
-
7
-
8
-
9
-
10
-
11
-
12
-
13
-
14
-
15
-
 16
16 -
 17
17 -
 18
18 -
 19
19 -
 20
20 -
 21
21 -
 22
22 -
 23
23 -
 24
24 -
 25
25 -
 26
26 -
27
-
28
-
29
-
30
-
31
-
32
-
33
-
34
-
35
-
36
-
37
-
38
-
39
-
40
-
41
-
42
-
43
-
44
-
45
-
46
-
47
-
48
-
49
-
50
-
51
-
52
-
53
-
54
-
55
-
56
-
57
-
58
-
59
-
60
-
61
-
62
 |
 |