JVC DLA-HX1U Instruction Manual - Page 36
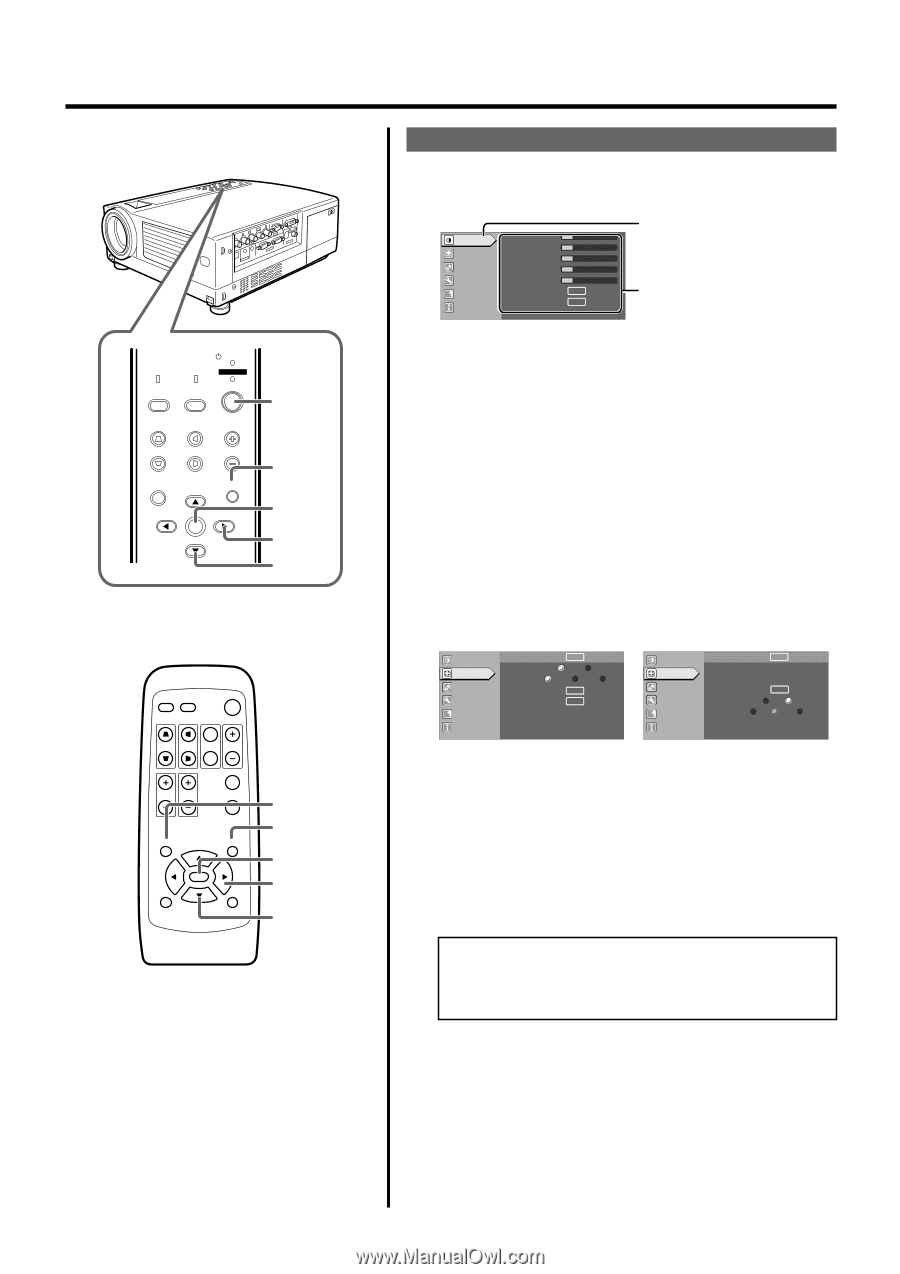
The Procedure for Menu Operation, Alternatively, press [ENTER].
 |
View all JVC DLA-HX1U manuals
Add to My Manuals
Save this manual to your list of manuals |
Page 36 highlights
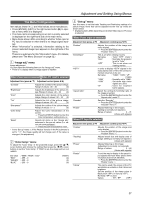
Adjustments and Settings Using Menus LAMP PC TEMP VIDEO STAND BY OPERATE MENU 1 V-KEYSTONE H-KEYSTONE VOL. MENU EXIT ENTER 6 3, 5 5 2, 4 The Procedure for Menu Operation 1. Press the [MENU] button The main menu is displayed on the screen. Image adj. Set up Logo Options A Language Information Contrast 12 Brightness 12 Color 12 Tint 12 Sharpness 1 Color temp. Reset ENTER ENTER The icon of the selected menu item will be highlighted. The menu item currently selected is displayed. E.g. Main menu when video input is selected: "Image adj." 2. Press the cursor buttons to select a main menu item • The content of the selected item is displayed on the right side of the screen. • When "Information" is chosen, the image input or PC input information (whichever is currently selected) is displayed on the right of the menu. • When "Language" is selected, you can set the language. ➔ Proceed to Procedure 6. 3. Press [ENTER] or cursor ( ᮣ ) to confirm the menu item • The menu indicated differs according to whether Video input or PC input is selected, or when there is no image signal inputted. For details, please see 'The Menu Configuration' on the next page. PC VIDEO OPERATE W V-KEYSTONE H-KEYSTONE SCREEN DIGITAL ZOOM S FREEZE VOLUME FOCUS QUICK ALIGN. MENU EXIT ENTER PRESET HIDE 1 6 3, 5 5 2, 4 36 Image adj. Set up R GB Logo Options A Language Information Position Deinterlace HDTV Aspect ratio Decoder Phase ENTER Auto OFF 1080i 1035i sF ENTER ENTER 12 E.g. "Set up" menu when video input is selected Image adj. Set up R GB Logo Options A Language Information Position Tracking Phase Resize Clamp Sync level ENTER 123 12 ENTER ST BP Low Std High E.g. "Set up" menu when PC input is selected 4. Press the cursor buttons to select an adjustment item • Adjustment item names displayed in pale cannot be selected. 5. Press the cursor buttons to change the setting value Alternatively, press [ENTER]. • When the item in the image adjustment menu against which [ENTER] is indicated is selected, either it will shift to the set up screen or the item command will be executed. 6. To exit after the adjustment, press the [EXIT] button • Each time you press the button, the menu returns to the previous one. 7. Repeat procedures 2 to 6 to set other items After all adjustments are done, Press the [MENU] button. The menu will disappear from the screen.
-
 1
1 -
2
-
3
-
4
-
5
-
6
-
7
-
8
-
9
-
10
-
11
-
12
-
13
-
14
-
15
-
16
-
17
-
18
-
19
-
20
-
21
-
22
-
23
-
24
-
25
-
26
-
27
-
28
-
29
-
30
-
 31
31 -
 32
32 -
 33
33 -
 34
34 -
 35
35 -
 36
36 -
 37
37 -
 38
38 -
 39
39 -
 40
40 -
 41
41 -
42
-
43
-
44
-
45
-
46
-
47
-
48
-
49
-
50
-
51
-
52
-
53
-
54
-
55
-
56
-
57
-
58
-
59
-
60
-
61
-
62
 |
 |