JVC DLA-HX1U Instruction Manual - Page 41
Setting “Aspect ratio” and “Resize”, Setting the “Aspect ratio
 |
View all JVC DLA-HX1U manuals
Add to My Manuals
Save this manual to your list of manuals |
Page 41 highlights
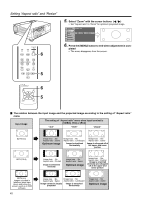
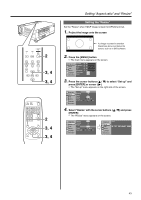
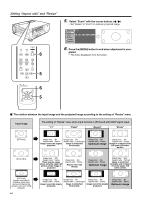
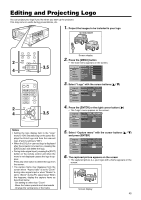
Setting "Aspect ratio" and "Resize" By setting the "Aspect ratio" and "Resize" of the projected input image, optimum image can be projected onto the screen. Setting the "Aspect ratio" Set the "Aspect ratio" when image is input from the [VIDEO], [Y/C] or [PC2] terminals. 1. Project the image onto the screen LAMP PC TEMP VIDEO STAND BY OPERATE MENU 2 V-KEYSTONE H-KEYSTONE VOL. MENU EXIT ENTER 3, 4 3, 4 PC VIDEO OPERATE W V-KEYSTONE H-KEYSTONE SCREEN DIGITAL ZOOM S FREEZE VOLUME FOCUS QUICK ALIGN. 2 MENU EXIT ENTER PRESET HIDE 3, 4 3, 4 4:3 image recorded in letterbox (black bars above and below the screen) such as in DVD software. 2. Press the [MENU] button • The main menu appears on the screen. Image adj. Set up Logo Options A Language Information Contrast 12 Brightness 12 Color 12 Tint 12 Sharpness 1 Color temp. Reset ENTER ENTER 3. Press the cursor buttons to select "Set up" and press [ENTER] or cursor ( ᮣ ) • The "Set up" menu appears on the right side of the screen. Image adj. Set up R GB Logo Options A Language Information Position Deinterlace HDTV Aspect ratio Decoder Phase ENTER Auto OFF 1080i 1035i sF ENTER ENTER 12 4. Select "Aspect ratio" with the cursor buttons and press [ENTER] • The "Aspect ratio" menu appears on the screen. Image adj. Set up R GB Logo Options A Language Information Position Deinterlace HDTV Aspect ratio Decoder Phase ENTER Auto OFF 1080i 1035i sF ENTER ENTER 12 Image adj. Set up R GB Logo Options A Language Information Aspect ratio 4:3 16:9 Zoom 41
-
 1
1 -
2
-
3
-
4
-
5
-
6
-
7
-
8
-
9
-
10
-
11
-
12
-
13
-
14
-
15
-
16
-
17
-
18
-
19
-
20
-
21
-
22
-
23
-
24
-
25
-
26
-
27
-
28
-
29
-
30
-
31
-
32
-
33
-
34
-
35
-
 36
36 -
 37
37 -
 38
38 -
 39
39 -
 40
40 -
 41
41 -
 42
42 -
 43
43 -
 44
44 -
 45
45 -
 46
46 -
47
-
48
-
49
-
50
-
51
-
52
-
53
-
54
-
55
-
56
-
57
-
58
-
59
-
60
-
61
-
62
 |
 |
