JVC GY-DV300U 42 pg. users guide on the KA-DV300 Network Pack (PDF, 916KB)
JVC GY-DV300U - 1/3" 3-ccd Dv Camcorder Manual
 |
View all JVC GY-DV300U manuals
Add to My Manuals
Save this manual to your list of manuals |
JVC GY-DV300U manual content summary:
- JVC GY-DV300U | 42 pg. users guide on the KA-DV300 Network Pack (PDF, 916KB) - Page 1
NETWORK PACK KA-DV300 User's Guide LWT0028-000A - JVC GY-DV300U | 42 pg. users guide on the KA-DV300 Network Pack (PDF, 916KB) - Page 2
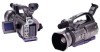
Pack KA-DV300 to DV Camcorder GY-DV300, network related menus are added to the GY-DV300 menu screen. This User's Guide explains settings for the network related menus, operation for recording streaming data to a CF (Compact Flash) memory card and operation for sending streaming data using a LAN - JVC GY-DV300U | 42 pg. users guide on the KA-DV300 Network Pack (PDF, 916KB) - Page 3
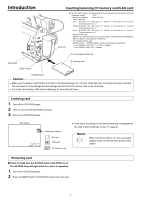
Communications, Inc)*1 • Wireless LAN-card TEW-PC16 (firmware version 0.8.3 or later) (Name of manufacturer: TRENDware use the wireless LAN card continuously for more than 48 hours. Inserting card 1. Turn off the GY-DV300 power. 2. Insert a card into the KA-DV300 card slot. 3. Turn on the GY-DV300 - JVC GY-DV300U | 42 pg. users guide on the KA-DV300 Network Pack (PDF, 916KB) - Page 4
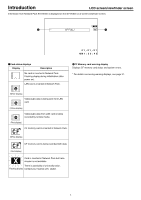
Introduction LCD screen/viewfinder screen Information from Network Pack KA-DV300 is displayed on the GY-DV300 LCD screen/viewfinder screen. w CF FULL! e q qCard status displays Display . There is possibility of unit malfunction. Flashing display Contact your nearest JVC dealer. 4 - JVC GY-DV300U | 42 pg. users guide on the KA-DV300 Network Pack (PDF, 916KB) - Page 5
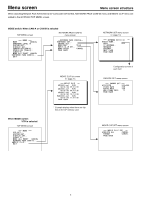
Menu screen Menu screen structure When attaching Network Pack KA-Dv300 to DV Camcorder GY-DV300, NETWORK PACK CONFIG menu and MOVIE CLIP menu are added to the GY-DV300 TOP MENU screen. MODE switch: When CAM-A or CAM-B is selected TOP MENU screen NETWORK PACK CONFIG menu screen MENU MO D E - JVC GY-DV300U | 42 pg. users guide on the KA-DV300 Network Pack (PDF, 916KB) - Page 6
a remote media from a LAN card. TRIG: Pressing the REC START/STOP button of GY-DV300 starts operation. Use this setting when simultaneously recording to a DV tape. SPLIT: Pressing the SELECT dial starts operation. Use this setting when recording or transferring with CF memory card or LAN card only - JVC GY-DV300U | 42 pg. users guide on the KA-DV300 Network Pack (PDF, 916KB) - Page 7
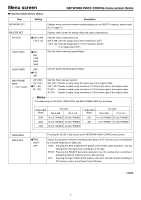
Menu screen NETWORK PACK CONFIG menu screen items Item MOVIE CLIP SET Setting Description Displays the menu screen for CF memory card related settings such as formatting or deleting all recorded event files. DELETE ALL FORMAT PAGE BACK MENU RESET PAGE BACK CANCEL EXECUTE CANCEL EXECUTE CANCEL - JVC GY-DV300U | 42 pg. users guide on the KA-DV300 Network Pack (PDF, 916KB) - Page 8
inserted. Settings will be stored in the KA-DV300 memory even when turning the power off BAR AW MENU FWD SELECT dial REV ● The NETWORK PACK CONFIG ● Set to "VTR" for VTR playback, clip file playback or DV signal recording. 3. Press the MENU button for about 1 seconds. The - JVC GY-DV300U | 42 pg. users guide on the KA-DV300 Network Pack (PDF, 916KB) - Page 9
XECUTE PAGE BACK MENU R E S E T . . MENU button POWER OFF ON MODE CAM-B CAM-A VTR GAIN SHUTTER BAR AW MENU FWD SELECT dial REV 1. Press the MENU button to display the TOP MENU screen. 2. Turn the SELECT dial to select NETWORK PACK CONFIG and press the SE- - JVC GY-DV300U | 42 pg. users guide on the KA-DV300 Network Pack (PDF, 916KB) - Page 10
using a LAN card, network related settings for KA-DV300 are made using NETWORK SET of the NETWORK PACK CONFIG menu. Settings will be stored in the KA-DV300 -B CAM-A VTR GAIN SHUTTER BAR MENU AW FWD SELECT dial REV \ Settings are made by viewing the LCD screen or - JVC GY-DV300U | 42 pg. users guide on the KA-DV300 Network Pack (PDF, 916KB) - Page 11
. (Max. 8 alphanumerical characters) Used when controlling GY-DV300 via LAN card. ( page 29) [Factory setting: jvc] Displays the password input setting screen. (Max. 8 alphanumerical characters) Used when controlling GY-DV300 via LAN card. ( page 29) [Factory setting: ka-dv300] (Password is hidden - JVC GY-DV300U | 42 pg. users guide on the KA-DV300 Network Pack (PDF, 916KB) - Page 12
345 67 89_. - B S U S ER NA ME 5/8 j vc_1 Example: Changing USER NAME from jvc to jvc-1234 \ Select USER NAME in the NETWORK SET [2/2] menu screen and press the ● The setting changes to "jvc_" and the following digit of the setting area flashes. 2. Turn the SELECT dial - JVC GY-DV300U | 42 pg. users guide on the KA-DV300 Network Pack (PDF, 916KB) - Page 13
01 or later Detailed IP settings (LAN) 1. For 1:1 communication between PC and GY-DV300/KA-DV300 10 BASE-T cross cable Set a unique number to avoid doubling * For the PC settings when using a LAN card, refer to the instruction manual included with the LAN card. DHCP OFF IP ADDRESS 192. 168. 100 - JVC GY-DV300U | 42 pg. users guide on the KA-DV300 Network Pack (PDF, 916KB) - Page 14
000 Set the same network group PC wireless LAN driver settings NetworkType 802. 11 Ad Hoc Mode ESS ID abcdef Channel 2 Encryption Mode Open System * For the PC settings when using a LAN card, refer to the instruction manual included with the LAN card. Cautionary items concerning Wireless - JVC GY-DV300U | 42 pg. users guide on the KA-DV300 Network Pack (PDF, 916KB) - Page 15
192. 168. 100. 100 255. 255. 255. 000 PC wireless LAN driver settings NetworkType Infrastructure ESS ID abcdef Channel 2 Encryption Mode Open System * For the PC settings when using a LAN card, refer to the instruction manual included with the LAN card. DHCP WLAN AD HOC MODE WLAN ESS ID - JVC GY-DV300U | 42 pg. users guide on the KA-DV300 Network Pack (PDF, 916KB) - Page 16
BACK MENU button POWER OFF ON MODE CAM-B CAM-A VTR GAIN SHUTTER BAR AW MENU FWD SELECT dial REV 1. Press the MENU button to display the TOP MENU screen. 2. Use the SELECT dial to select NETWORK PACK CONFIG menu screen ¥ MOVIE CLIP SET menu screen. 3. Set FORMAT in - JVC GY-DV300U | 42 pg. users guide on the KA-DV300 Network Pack (PDF, 916KB) - Page 17
6) e When completed with settings, press the MENU button to return to the normal screen. 6. Press the REC START/STOP button on GY-DV300 to start recording on the DV cassette tape as well as video/audio streaming data on the CF memory card. ● During CF memory card recording, C F display will light - JVC GY-DV300U | 42 pg. users guide on the KA-DV300 Network Pack (PDF, 916KB) - Page 18
-B CAM-A VTR button GAIN SHUTTER BAR MENU AW FWD SELECT dial REV ● "NO CF FORMAT!" will appear if the inserted CF memory 38) ● Recording will not be made on the DV cassette tape even if a tape is inserted. ● When using the SELECT dial for GAIN or SHUTTER operation, no - JVC GY-DV300U | 42 pg. users guide on the KA-DV300 Network Pack (PDF, 916KB) - Page 19
return to the normal screen. 6. Press the BAR (t/w) button of GY-DV300 to start DV cassette tape playback. 7. Press the REC START/STOP button or SELECT dial at the scene to start record- ing on the CF memory card. (The recording method of using REC START/STOP button or SELECT dial is set in - JVC GY-DV300U | 42 pg. users guide on the KA-DV300 Network Pack (PDF, 916KB) - Page 20
panel> 1. Insert an already recorded CF memory card. 2. Turn on the GY-DV300 power. Check to see that the C F display appears on the LCD screen/viewfinder screen. 3. Press the MENU button to display the TOP MENU screen. 4. Use the SELECT dial to select NETWORK PACK CONFIG menu screen ¥ MOVIE CLIP - JVC GY-DV300U | 42 pg. users guide on the KA-DV300 Network Pack (PDF, 916KB) - Page 21
) of the selected clip 1. Insert an already recorded CF memory card. 2. Turn on the GY-DV300 power. Check to see that the C F display appears on the LCD screen/viewfinder screen. selected clip appears. Note ASF files recorded using another device may not play back properly on this unit. → OVER 21 - JVC GY-DV300U | 42 pg. users guide on the KA-DV300 Network Pack (PDF, 916KB) - Page 22
ON MODE CAM-B CAM-A VTR GAIN SHUTTER BAR MENU FWD (g) AW button FWD SELECT dial REV REV (h) button 7. Play back the clip. Turn the SELECT dial, move the cursor to REVIEW and press the SELECT dial. ● The movie clip is played back after the still image is displayed for - JVC GY-DV300U | 42 pg. users guide on the KA-DV300 Network Pack (PDF, 916KB) - Page 23
card Clips recorded on a CF memory card can be protected using the MOVIE CLIP screen. POWER switch MODE switch POWER OFF ON will flash during initialization.) 3. Set the MODE switch to "VTR". 4. Make sure GY-DV300 is not in operation. 5. Display the MOVIE CLIP screen. q Press the MENU button - JVC GY-DV300U | 42 pg. users guide on the KA-DV300 Network Pack (PDF, 916KB) - Page 24
flash during initialization.) 3. Set the MODE switch to "VTR". 4. Make sure GY-DV300 is not in operation. 5. Display the MOVIE CLIP screen. q Press the OK?" confirmation message appears. (Confirmation screen) 8. To delete, select YES using the SELECT dial and press the SELECT dial. ● "DELETE . ." - JVC GY-DV300U | 42 pg. users guide on the KA-DV300 Network Pack (PDF, 916KB) - Page 25
LEVEL ND FILTER ON OFF IRIS FOCUS AUTO MANU PUSH AUTO PROFESSINAL DV CAMCORDER GY-DV300 OPEN CF memory card CF Card reader Clips recorded on a CF Operation 1. Load data already recorded on a CF memory card to your PC using a CF card reader, etc. 2. Launch Explorer, etc., and open the - JVC GY-DV300U | 42 pg. users guide on the KA-DV300 Network Pack (PDF, 916KB) - Page 26
LAN card Sending video using LAN card while recording on a DV cassette tape T W REC START/STOP button POWER DV camcorder • Trigger mode function" of network distribution software "Streamproducer" User's Guide. 7. To stop transmission or recording, press the REC START/STOP button. ● GY-DV300 - JVC GY-DV300U | 42 pg. users guide on the KA-DV300 Network Pack (PDF, 916KB) - Page 27
using a LAN card (no DV cassette tape recording POWER switch MODE switch POWER OFF ON MENU button MODE CAM-B CAM-A VTR GAIN SHUTTER BAR MENU AW FWD SELECT dial REV - JVC GY-DV300U | 42 pg. users guide on the KA-DV300 Network Pack (PDF, 916KB) - Page 28
DV cassette tape using a LAN card POWER switch MODE switch POWER OFF ON MENU button MODE CAM-B CAM-A VTR GAIN SHUTTER BAR AW MENU FWD SELECT Tdial REV - JVC GY-DV300U | 42 pg. users guide on the KA-DV300 Network Pack (PDF, 916KB) - Page 29
PROFESSINAL DV CAMCORDER GY-DV300 OPEN PC 10 BASE-T cross cable Set the LAN card driver by following the instructions on manual provided by the card manufacturer. KA-DV300 Socket Com: EA2900-117 (USA) EA2903-162 (Europe) EA2906-194 (Asia) (CF memory card adapter (PCMCIA TYPE I/II specifications - JVC GY-DV300U | 42 pg. users guide on the KA-DV300 Network Pack (PDF, 916KB) - Page 30
Streamcorder screen appears. Camera adjustments of GY-DV300 can be made in the CAMERA CONTROL screen. Screen selection Clicking will display the selected screen. JVC NETWORK PACK KA-DV300 setting stored in the GY-DV300 memory will be used. IRIS GAIN SHUTTER ZOOM AUTO MANUAL Lolux ALC STEP 0dB - JVC GY-DV300U | 42 pg. users guide on the KA-DV300 Network Pack (PDF, 916KB) - Page 31
Clicking NETWORK SETUP on the left of the Streamcorder screen displays the NETWORK SETUP screen for performing network related settings. Screen selection JVC NETWORK PACK KA-DV300 NETWORK PACK SETUP NETWORK SETUP PORT SETUP ENCODE PARAMETERS CAMERA CONTROL STREAM CAPTURE VTR CONTROL NETWORK SETUP - JVC GY-DV300U | 42 pg. users guide on the KA-DV300 Network Pack (PDF, 916KB) - Page 32
screen Clicking PORT SETUP on the left of the Streamcorder screen displays the PORT SETUP screen for performing port settings. Screen selection JVC NETWORK PACK KA-DV300 NETWORK PACK SETUP NETWORK SETUP PORT SETUP ENCODE PARAMETERS CAMERA CONTROL STREAM CAPTURE VTR CONTROL PORT SETUP RTP RTSP - JVC GY-DV300U | 42 pg. users guide on the KA-DV300 Network Pack (PDF, 916KB) - Page 33
ENCODE PARAMETERS on the left of the Streamcorder screen displays the ENCODE PARAMETERS screen for performing video/audio compression settings. Screen selection JVC NETWORK PACK KA-DV300 NETWORK PACK SETUP NETWORK SETUP PORT SETUP ENCODE PARAMETERS CAMERA CONTROL STREAM CAPTURE VTR CONTROL ENCODE - JVC GY-DV300U | 42 pg. users guide on the KA-DV300 Network Pack (PDF, 916KB) - Page 34
and return to the previous screen. VTR control icons Click each button to perform operation. \ To control the VTR in the Streamcorder screen, the following menu items of GY-DV300 must be set in advance. SYSTEM SET [2/2] menu screen SY STEM REC MOD E SP LONG PAUS E T I ME 3M I N N ET R EMOT - JVC GY-DV300U | 42 pg. users guide on the KA-DV300 Network Pack (PDF, 916KB) - Page 35
NETWORK PACK SETUP STREAMCAPTURE screen (Playing back video/audio using a PC and saving to file) Clicking STREAMCAPTURE on the left of the Streamcorder screen displays the Streamcapture screen shown below. Video and audio sent from KA-DV300 via LAN can be played back on your PC in the Streamcapture - JVC GY-DV300U | 42 pg. users guide on the KA-DV300 Network Pack (PDF, 916KB) - Page 36
field when changing the save destination folder. My Document¥Streamcorder (¥IPAddress) When changing the destination folder, press the OK CANCEL Client side RTSP port setting/RTP port setting Follow the instructions given by the network administrator for these settings. Default settings: RTSP - JVC GY-DV300U | 42 pg. users guide on the KA-DV300 Network Pack (PDF, 916KB) - Page 37
Troubleshooting When there is a system error, network error, unit malfunction, etc., KA-DV300 displays the error on the GY-DV300 again. If the card still cannot be format- 16 ted, contact your nearest JVC-authorized service agent. NO CF FORMAT! (Flashing) CF memory card is unformatted, or - JVC GY-DV300U | 42 pg. users guide on the KA-DV300 Network Pack (PDF, 916KB) - Page 38
Others Troubleshooting Screen display Cause Remedy NO CF CARD! (Flashing for 3 sec.) . SET MAX FRAME RATE 15F - 4F! (Flashing for 3 sec.) Attempted to set PIX SIZE to 352 X 288 Use MAX FRAME RATE 15F ~ 4F. with MAX FRAME RATE set to 30F. SET PIX SIZE 176 x 144! (Flashing - JVC GY-DV300U | 42 pg. users guide on the KA-DV300 Network Pack (PDF, 916KB) - Page 39
/connection By using the PING command standard to Windows, it is possible to check whether the connection is correct and that communication can be made from the PC to KA-DV300. 1. Launch the command prompt. ● For Windows 2000 From the Start button, select [Programs] → [Accessories] → [Command - JVC GY-DV300U | 42 pg. users guide on the KA-DV300 Network Pack (PDF, 916KB) - Page 40
Dynamic Host Control Protocol) Service that automatically assigns IP used to relay when a computer communicates with another computer outside the network. The gateway IP address is referred to as the gateway address. ● RTP (Realtime Transport Protocol) Protocol to transmit in realtime digitalized - JVC GY-DV300U | 42 pg. users guide on the KA-DV300 Network Pack (PDF, 916KB) - Page 41
-scale networks, "Class B IP addresses" are used for medium-scale networks and "Class C IP addresses" are used for small-scale networks. Within a network, all IP addresses must be of the same class. Each IP address is structured by a series of 4 digit numbers separated by a period. The first number - JVC GY-DV300U | 42 pg. users guide on the KA-DV300 Network Pack (PDF, 916KB) - Page 42
VICTOR COMPANY OF JAPAN, LIMITED ® is a registered trademark owned by VICTOR COMPANY OF JAPAN, LTD. ® is a registered trademark in Japan, the U.S.A., the U.K. and many other countries. © 2002 VICTOR COMPANY OF JAPAN, LIMITED LWT0028-000A KA-DV300 NETWORK PACK
-
 1
1 -
 2
2 -
 3
3 -
 4
4 -
 5
5 -
 6
6 -
 7
7 -
8
-
9
-
10
-
11
-
12
-
13
-
14
-
15
-
16
-
17
-
18
-
19
-
20
-
21
-
22
-
23
-
24
-
25
-
26
-
27
-
28
-
29
-
30
-
31
-
32
-
33
-
34
-
35
-
36
-
37
-
38
-
39
-
40
-
41
-
42
 |
 |
KA-DV300
LWT0028-000A
NETWORK PACK
User
’
s Guide