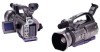
JVC GY-DV300U 42 pg. users guide on the KA-DV300 Network Pack (PDF, 916KB) - Page 3
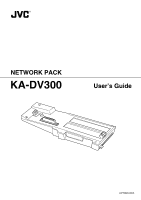
Introduction, Inserting/removing CF memory card/LAN card - firmware
 |
View all JVC GY-DV300U manuals
Add to My Manuals
Save this manual to your list of manuals |
Page 3 highlights
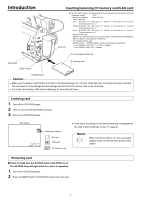
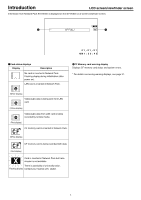
Introduction Inserting/removing CF memory card/LAN card Card slot ● The KA-DV300 accepts the following cards for which operation has been confirmed: Operating voltage 3.3 V Current consumption Max. 300 mA • Wired LAN-card US: E A 2 9 0 0 - 1 1 7 ( R ev i s i o n C ) ( N a m e o f m a nu fa c t u r e r : S o cke t Communications, Inc)*1 Europe:E A 2 9 0 3 - 1 6 2 ( R ev i s i o n C ) ( N a m e o f m a nu fa c t u r e r : S o cke t Communications, Inc)*1 Asia: E A 2 9 0 6 - 1 9 4 ( R ev i s i o n C ) ( N a m e o f m a nu fa c t u r e r : S o cke t Communications, Inc)*1 • Wireless LAN-card TEW-PC16 (firmware version 0.8.3 or later) (Name of manufacturer: TRENDware) WFC11 (Name of manufacturer: LINKSYS)*2 • CF (Compact Flash) card SDCFB-16-801 ~ SDCFB-256-801 (Name of manufacturer: SunDisk)*1 *1: Use PCMCIA card TYPE 1 or TYPE 2 adapter *2: Use PCMCIA card TYPE 2 adapter CF Card adapter/LAN card KA-DV300 EJECT button CF memory card ACCESS lamp Caution ● Make sure the power of GY-DV300 is off when inserting/removing a CF memory card/LAN card. Inserting/removing a card with the unit power on may damage the data storage section of the CF memory card or the card itself. ● Do not use the wireless LAN card continuously for more than 48 hours. Inserting card 1. Turn off the GY-DV300 power. 2. Insert a card into the KA-DV300 card slot. 3. Turn on the GY-DV300 power. LCD screen CF Card status display : No card e : LAN card C F : CF memory card ● Card status according to the inserted card type is displayed on the LCD screen/viewfinder screen. ( page 4) Memo When turning the power on, the card status display shown on left will flash during initialization. Removing card \ Check to make sure the ACCESS lamp of KA-DV300 is off. The ACCESS lamp will light when the card is in operation. 1. Turn off the GY-DV300 power. 2. Press the EJECT button of KA-DV300 and remove the card. 3
-
 1
1 -
 2
2 -
 3
3 -
 4
4 -
 5
5 -
 6
6 -
 7
7 -
 8
8 -
 9
9 -
10
-
11
-
12
-
13
-
14
-
15
-
16
-
17
-
18
-
19
-
20
-
21
-
22
-
23
-
24
-
25
-
26
-
27
-
28
-
29
-
30
-
31
-
32
-
33
-
34
-
35
-
36
-
37
-
38
-
39
-
40
-
41
-
42
 |
 |
