JVC GY-DV300U 42 pg. users guide on the KA-DV300 Network Pack (PDF, 916KB) - Page 10
Network settings, Setting the NETWORK SET menu screen
 |
View all JVC GY-DV300U manuals
Add to My Manuals
Save this manual to your list of manuals |
Page 10 highlights
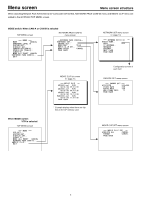
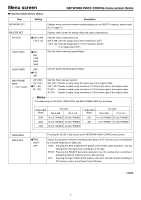
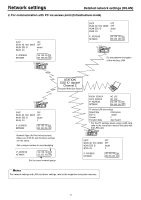
Network settings Setting the NETWORK SET menu screen When using a LAN card, network related settings for KA-DV300 are made using NETWORK SET of the NETWORK PACK CONFIG menu. Settings will be stored in the KA-DV300 memory even when turning the power off. TOP MENU screen MENU MO D E MANU AL E AR H ONE L E V E L 1 0 S YS T EM S E T . . D I S PLAY SE T . . CAME RA S E T [ CAM - A ] . . OPER AT I ON [ CAM- A ] . . C LOC K / TC . . MENU A L L R ESE T CANCE L N E TWORK P A CK CONF I G . . EX I T NETWORK PACK CONFIG menu screen N E TWORK P A CK C ON F I G NE T WOR K S E T . . ENCODE SE T . . MPEG R EC TR I G MOV I E CL I P S E T . . MENU R E S E T CANCE L PAGE BACK NETWORK SET [1/2] menu screen NE TWORK S E T [ 1 / 2 ] HO S T NAME . . DHCP OF F I P ADDRE S S . . NE T MAS K . . GAT EWAY . . NE X T P AG E PAGE BACK NETWORK SET [2/2] menu screen NE TWORK S E T [ 2 / 2 ] RTP. . RT S P . . HT T P . . WLAN AD HOC MODE OF F WLAN ESS - I D . . WLAN CH 2CH USER NAME . . PA S S WOR D . . PAGE BACK POWER switch MODE switch POWER OFF ON MENU button MODE CAM-B CAM-A VTR GAIN SHUTTER BAR MENU AW FWD SELECT dial REV \ Settings are made by viewing the LCD screen or viewfinder screen. If OUTPUT CHAR of the DISPLAY [2/2] menu screen is set to MIX, the menu screen also appears on the monitor screen connected to the VIDEO OUT or Y/C connector. Display the NETWORK SET menu screen 1. Turn on the GY-DV300 power. 2. Press the MENU button to display the TOP MENU screen. 3. Turn the SELECT dial, move the cursor (t) to NETWORK PACK CONFIG and press the SELECT dial. ● The NETWORK PACK CONFIG menu screen appears. 4. Turn the SELECT dial, move the cursor (t) to NETWORK SET and press the SELECT dial. ● The NETWORK SET [1/2] menu screen will appear. The NETWORK SET menu screen is structured by 2 pages. \ Select NEXT PAGE and press the SELECT dial to display the NETWORK SET [2/ 2] menu screen. Select PAGE BACK in the NETWORK SET [2/2] menu screen and press the SELECT dial to return to the NETWORK SET [1/2] menu screen. 5. Set DHCP to ON or OFF in the NETWORK SET [1/2] menu screen. Items other than DHCP are set in the individual setting screen. ( page 12) 6. To return to the normal screen after completing setting, perform one of the follow- ing operations. ● Press the MENU button ● Select PAGE BACK to return to the TOP MENU screen. Select EXIT in the TOP MENU screen and press the SELECT dial. 10
-
 1
1 -
2
-
3
-
4
-
 5
5 -
 6
6 -
 7
7 -
 8
8 -
 9
9 -
 10
10 -
 11
11 -
 12
12 -
 13
13 -
 14
14 -
 15
15 -
16
-
17
-
18
-
19
-
20
-
21
-
22
-
23
-
24
-
25
-
26
-
27
-
28
-
29
-
30
-
31
-
32
-
33
-
34
-
35
-
36
-
37
-
38
-
39
-
40
-
41
-
42
 |
 |
