Konica Minolta bizhub 283 bizhub 423/363/283/223 Box Operations User Guide - Page 42
Comm. List - ip address
 |
View all Konica Minolta bizhub 283 manuals
Add to My Manuals
Save this manual to your list of manuals |
Page 42 highlights
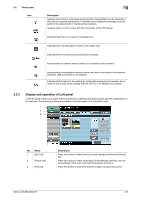
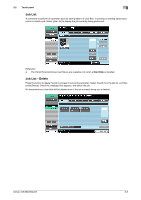
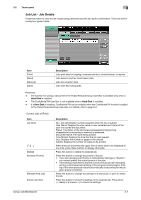
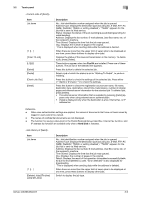
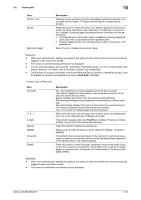
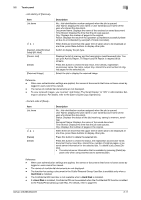
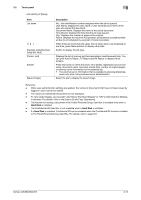
3.2 Touch panel 3 Item [Comm. List] [Detail] [Scanned Image] Description Displays the list of scanner and fax transmission (sent/received) jobs. You can print Activity Report, TX Report and RX Report in respective list screens. Press this button to check the result, error details, registration source/user name, file name, destination type, destination, stored time, communication, number of original pages and external server information for the selected job. • The external server information that is available by pressing [Detail] ap- pears only when using external server authentication. • [Type] is displayed only when the destination is a fax, Internet fax, or IP address fax. Select the job to display the scanned image. Reference - When user authentication settings are applied, the names of documents that have not been saved by logged in users cannot be viewed. - The names of confidential documents are not displayed. - To view scanned images, you must set "Job History Thumbnail Display" to "ON" in Administrator Set- tings in advance. For details, refer to the [User's Guide Copy Operations]. - The function for saving a document in the Public/Personal/Group User Box, Internet fax function, and IP address fax function are available only when a Hard Disk is installed. Item List items [ ][ ] [L1][L2] [Delete] [Redial] [Forward] [Detail] Description No.: Job identification number assigned when the job is queued. User Name: Displays the user name or user name/account name of the user who stored the document. Status: Displays the status of the job (receiving/dialing (Polling RX)/queued/printing/printing stopped/print error/saving to memory/deleting). Document Name: Displays the name of the received or saved document. Time Stored: Displays the time that the job was queued. Org.: The number of original pages that were received. When there are more than the upper limit of seven jobs to be displayed at one time, press these buttons to display other jobs. These buttons appear when two Fax Kit are installed. Press one of these buttons. The job list of the selected line appears. Press this button to delete the selected job. Select a job of which the status is set to "Waiting To Redial", to perform redialing. Forwards the fax received and stored in the memory (in-memory proxy reception). Specify the recipients either by selecting destinations registered in the address book or by entering directly. Press this button to check the state, registration source/user name, document name, output tray, stored time, transmission time, number of original pages, or external server information for the selected job. To delete a job, press [Delete]. Reference - When user authentication settings are applied, the names of documents that have not been saved by logged in users cannot be viewed. - The names of confidential documents are not displayed. bizhub 423/363/283/223 3-10
-
 1
1 -
2
-
3
-
4
-
5
-
6
-
7
-
8
-
9
-
10
-
11
-
12
-
13
-
14
-
15
-
16
-
17
-
18
-
19
-
20
-
21
-
22
-
23
-
24
-
25
-
26
-
27
-
28
-
29
-
30
-
31
-
32
-
33
-
34
-
35
-
36
-
 37
37 -
 38
38 -
 39
39 -
 40
40 -
 41
41 -
 42
42 -
 43
43 -
 44
44 -
 45
45 -
 46
46 -
 47
47 -
48
-
49
-
50
-
51
-
52
-
53
-
54
-
55
-
56
-
57
-
58
-
59
-
60
-
61
-
62
-
63
-
64
-
65
-
66
-
67
-
68
-
69
-
70
-
71
-
72
-
73
-
74
-
75
-
76
-
77
-
78
-
79
-
80
-
81
-
82
-
83
-
84
-
85
-
86
-
87
-
88
-
89
-
90
-
91
-
92
-
93
-
94
-
95
-
96
-
97
-
98
-
99
-
100
-
101
-
102
-
103
-
104
-
105
-
106
-
107
-
108
-
109
-
110
-
111
-
112
-
113
-
114
-
115
-
116
-
117
-
118
-
119
-
120
-
121
-
122
-
123
-
124
-
125
-
126
-
127
-
128
-
129
-
130
-
131
-
132
-
133
-
134
-
135
-
136
-
137
-
138
-
139
-
140
-
141
-
142
-
143
-
144
-
145
-
146
-
147
-
148
-
149
-
150
-
151
-
152
-
153
-
154
-
155
-
156
-
157
-
158
-
159
-
160
-
161
-
162
-
163
-
164
-
165
-
166
-
167
-
168
-
169
-
170
-
171
-
172
-
173
-
174
-
175
-
176
-
177
-
178
-
179
-
180
-
181
-
182
-
183
-
184
-
185
-
186
-
187
-
188
-
189
-
190
-
191
-
192
-
193
-
194
-
195
-
196
-
197
-
198
-
199
-
200
-
201
-
202
-
203
-
204
-
205
-
206
-
207
-
208
-
209
-
210
-
211
-
212
-
213
-
214
-
215
-
216
-
217
-
218
-
219
-
220
-
221
-
222
-
223
-
224
-
225
-
226
-
227
-
228
-
229
-
230
-
231
-
232
-
233
-
234
-
235
-
236
-
237
-
238
-
239
-
240
-
241
-
242
-
243
-
244
-
245
-
246
-
247
-
248
-
249
-
250
-
251
-
252
-
253
-
254
-
255
-
256
-
257
-
258
-
259
-
260
-
261
-
262
-
263
-
264
-
265
-
266
-
267
-
268
-
269
-
270
-
271
-
272
-
273
-
274
-
275
-
276
-
277
-
278
-
279
-
280
-
281
-
282
-
283
-
284
-
285
-
286
-
287
-
288
-
289
-
290
-
291
-
292
-
293
-
294
-
295
-
296
-
297
-
298
-
299
-
300
-
301
-
302
 |
 |