Lenovo ThinkCentre M50e Hardware Maintenance Manual - Page 109
master/slave
 |
View all Lenovo ThinkCentre M50e manuals
Add to My Manuals
Save this manual to your list of manuals |
Page 109 highlights
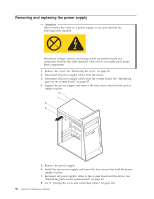
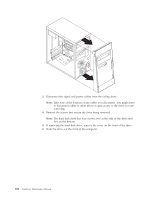
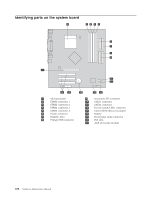
Note: This illustration shows the hard disk drive being removed. All drives are removed in the same manner. However, it is only necessary to remove the front bezel when removing the hard disk drive or diskette drive. 7. Make sure the drive that you are installing is set correctly as either a master or a slave device. Jumper the new drive the same as the drive being replaced. Note: If you are installing a serial ATA drive, no master/slave jumpering is necessary. Refer to the documentation that comes with your drive for master/slave jumper information. 8. Install the new drive into the bay. Align the screw holes and install the screws to secure the drive. Chapter 8. Replacing FRUs (Types 8126, 8174, 8175, and 8176) 103
-
 1
1 -
2
-
3
-
4
-
5
-
6
-
7
-
8
-
9
-
10
-
11
-
12
-
13
-
14
-
15
-
16
-
17
-
18
-
19
-
20
-
21
-
22
-
23
-
24
-
25
-
26
-
27
-
28
-
29
-
30
-
31
-
32
-
33
-
34
-
35
-
36
-
37
-
38
-
39
-
40
-
41
-
42
-
43
-
44
-
45
-
46
-
47
-
48
-
49
-
50
-
51
-
52
-
53
-
54
-
55
-
56
-
57
-
58
-
59
-
60
-
61
-
62
-
63
-
64
-
65
-
66
-
67
-
68
-
69
-
70
-
71
-
72
-
73
-
74
-
75
-
76
-
77
-
78
-
79
-
80
-
81
-
82
-
83
-
84
-
85
-
86
-
87
-
88
-
89
-
90
-
91
-
92
-
93
-
94
-
95
-
96
-
97
-
98
-
99
-
100
-
101
-
102
-
103
-
 104
104 -
 105
105 -
 106
106 -
 107
107 -
 108
108 -
 109
109 -
 110
110 -
 111
111 -
 112
112 -
 113
113 -
 114
114 -
115
-
116
-
117
-
118
-
119
-
120
-
121
-
122
-
123
-
124
-
125
-
126
-
127
-
128
-
129
-
130
-
131
-
132
-
133
-
134
-
135
-
136
-
137
-
138
-
139
-
140
-
141
-
142
-
143
-
144
-
145
-
146
-
147
-
148
-
149
-
150
-
151
-
152
-
153
-
154
-
155
-
156
-
157
-
158
-
159
-
160
-
161
-
162
-
163
-
164
-
165
-
166
-
167
-
168
-
169
-
170
-
171
-
172
-
173
-
174
-
175
-
176
-
177
-
178
-
179
-
180
-
181
-
182
-
183
-
184
-
185
-
186
-
187
-
188
-
189
-
190
-
191
-
192
-
193
-
194
-
195
-
196
-
197
-
198
-
199
-
200
-
201
-
202
-
203
-
204
-
205
-
206
-
207
-
208
-
209
-
210
-
211
-
212
-
213
-
214
-
215
-
216
-
217
-
218
-
219
-
220
-
221
-
222
-
223
-
224
-
225
-
226
-
227
-
228
 |
 |

Note:
This
illustration
shows
the
hard
disk
drive
being
removed.
All
drives
are
removed
in
the
same
manner.
However,
it
is
only
necessary
to
remove
the
front
bezel
when
removing
the
hard
disk
drive
or
diskette
drive.
7.
Make
sure
the
drive
that
you
are
installing
is
set
correctly
as
either
a
master
or
a
slave
device.
Jumper
the
new
drive
the
same
as
the
drive
being
replaced.
Note:
If
you
are
installing
a
serial
ATA
drive,
no
master/slave
jumpering
is
necessary.
Refer
to
the
documentation
that
comes
with
your
drive
for
master/slave
jumper
information.
8.
Install
the
new
drive
into
the
bay.
Align
the
screw
holes
and
install
the
screws
to
secure
the
drive.
Chapter
8.
Replacing
FRUs
(Types
8126,
8174,
8175,
and
8176)
103