Lenovo ThinkCentre M50e Hardware Maintenance Manual - Page 121
documentation
 |
View all Lenovo ThinkCentre M50e manuals
Add to My Manuals
Save this manual to your list of manuals |
Page 121 highlights
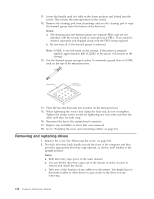
3. Disconnect the signal cable and power supply cable from the drive being replaced. 4. Remove any screws that secure the drive. Not all drives have screws. 5. Make sure the drive that you are installing is set correctly as either a master or a slave device. Jumper the new drive the same as the drive being replaced. Note: If you are installing a serial ATA drive, no master/slave jumpering is necessary. Refer to the documentation that comes with your drive for master/slave jumper information. 6. Install the drive into the bay as shown. Chapter 9. Replacing FRUs (Types 8149, 8177, and 8178) 115
-
 1
1 -
2
-
3
-
4
-
5
-
6
-
7
-
8
-
9
-
10
-
11
-
12
-
13
-
14
-
15
-
16
-
17
-
18
-
19
-
20
-
21
-
22
-
23
-
24
-
25
-
26
-
27
-
28
-
29
-
30
-
31
-
32
-
33
-
34
-
35
-
36
-
37
-
38
-
39
-
40
-
41
-
42
-
43
-
44
-
45
-
46
-
47
-
48
-
49
-
50
-
51
-
52
-
53
-
54
-
55
-
56
-
57
-
58
-
59
-
60
-
61
-
62
-
63
-
64
-
65
-
66
-
67
-
68
-
69
-
70
-
71
-
72
-
73
-
74
-
75
-
76
-
77
-
78
-
79
-
80
-
81
-
82
-
83
-
84
-
85
-
86
-
87
-
88
-
89
-
90
-
91
-
92
-
93
-
94
-
95
-
96
-
97
-
98
-
99
-
100
-
101
-
102
-
103
-
104
-
105
-
106
-
107
-
108
-
109
-
110
-
111
-
112
-
113
-
114
-
115
-
 116
116 -
 117
117 -
 118
118 -
 119
119 -
 120
120 -
 121
121 -
 122
122 -
 123
123 -
 124
124 -
 125
125 -
 126
126 -
127
-
128
-
129
-
130
-
131
-
132
-
133
-
134
-
135
-
136
-
137
-
138
-
139
-
140
-
141
-
142
-
143
-
144
-
145
-
146
-
147
-
148
-
149
-
150
-
151
-
152
-
153
-
154
-
155
-
156
-
157
-
158
-
159
-
160
-
161
-
162
-
163
-
164
-
165
-
166
-
167
-
168
-
169
-
170
-
171
-
172
-
173
-
174
-
175
-
176
-
177
-
178
-
179
-
180
-
181
-
182
-
183
-
184
-
185
-
186
-
187
-
188
-
189
-
190
-
191
-
192
-
193
-
194
-
195
-
196
-
197
-
198
-
199
-
200
-
201
-
202
-
203
-
204
-
205
-
206
-
207
-
208
-
209
-
210
-
211
-
212
-
213
-
214
-
215
-
216
-
217
-
218
-
219
-
220
-
221
-
222
-
223
-
224
-
225
-
226
-
227
-
228
 |
 |

3.
Disconnect
the
signal
cable
and
power
supply
cable
from
the
drive
being
replaced.
4.
Remove
any
screws
that
secure
the
drive.
Not
all
drives
have
screws.
5.
Make
sure
the
drive
that
you
are
installing
is
set
correctly
as
either
a
master
or
a
slave
device.
Jumper
the
new
drive
the
same
as
the
drive
being
replaced.
Note:
If
you
are
installing
a
serial
ATA
drive,
no
master/slave
jumpering
is
necessary.
Refer
to
the
documentation
that
comes
with
your
drive
for
master/slave
jumper
information.
6.
Install
the
drive
into
the
bay
as
shown.
Chapter
9.
Replacing
FRUs
(Types
8149,
8177,
and
8178)
115