Lenovo ThinkPad 130 ThinkPad i Series 1200/1300, TP 130 - User's Reference - Page 68
Startup Configuration, Enter, Fast Boot, How to Calculate Total Memory Size, Removing a DIMM
 |
View all Lenovo ThinkPad 130 manuals
Add to My Manuals
Save this manual to your list of manuals |
Page 68 highlights
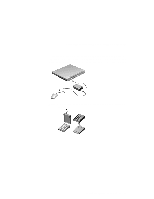
Increasing memory a. While the ThinkPad logo is being displayed, wait for the BIOS Utility prompt before pressing F1. b. Select Startup Configuration and press Enter. c. Disable Fast Boot. d. Save the changes and exit the BIOS Utility. e. Verify the memory value (shown near the top left corner of the screen) when the computer restarts. Note: After you have verified the memory value, shutdown and restart the computer. Enter the BIOS Utility to enable Fast Boot. 9. You have finished installing the DIMM. Reconnect all cables. Notes: 1. If the total memory size is not the same as the value you calculated, power off the computer and see pages 54 and 52 to reinstall the DIMM. 2. If you changed the memory installed in the computer, Sleep Manager automatically updates the hibernation file (see "Sleep Manager" on page 31). How to Calculate Total Memory Size Calculate your total memory size in kilobytes (KB) by adding the DIMM memory size to the base memory size (32384 KB for a computer with 32 MB base memory). Note: 384 KB is reserved by the system. For example, if you installed a 32MB DIMM to a computer with 32 MB base memory, you should have about 64 MB. Your computer displays the memory size in kilobytes. For example, 640 KB (system memory) + 64512 (extended memory) = 65152 KB. Removing a DIMM If you need to remove a DIMM, follow these steps: 54 ThinkPad i Series 1200/1300 User's Reference
-
 1
1 -
2
-
3
-
4
-
5
-
6
-
7
-
8
-
9
-
10
-
11
-
12
-
13
-
14
-
15
-
16
-
17
-
18
-
19
-
20
-
21
-
22
-
23
-
24
-
25
-
26
-
27
-
28
-
29
-
30
-
31
-
32
-
33
-
34
-
35
-
36
-
37
-
38
-
39
-
40
-
41
-
42
-
43
-
44
-
45
-
46
-
47
-
48
-
49
-
50
-
51
-
52
-
53
-
54
-
55
-
56
-
57
-
58
-
59
-
60
-
61
-
62
-
 63
63 -
 64
64 -
 65
65 -
 66
66 -
 67
67 -
 68
68 -
 69
69 -
 70
70 -
 71
71 -
 72
72 -
 73
73 -
74
-
75
-
76
-
77
-
78
-
79
-
80
-
81
-
82
-
83
-
84
-
85
-
86
-
87
-
88
-
89
-
90
-
91
-
92
-
93
-
94
-
95
-
96
-
97
-
98
-
99
-
100
-
101
-
102
-
103
-
104
-
105
-
106
-
107
-
108
-
109
-
110
-
111
-
112
-
113
-
114
-
115
-
116
-
117
-
118
-
119
-
120
-
121
-
122
-
123
-
124
-
125
-
126
-
127
-
128
-
129
-
130
-
131
-
132
-
133
-
134
-
135
-
136
-
137
-
138
-
139
-
140
-
141
-
142
-
143
-
144
-
145
-
146
-
147
-
148
-
149
-
150
-
151
-
152
-
153
-
154
-
155
-
156
-
157
-
158
-
159
-
160
-
161
-
162
 |
 |
