Lexmark 20K1100 User's Reference - Page 78
Cleaning the printhead lens, Select, Replaced, Saved, Ready
 |
UPC - 734646641005
View all Lexmark 20K1100 manuals
Add to My Manuals
Save this manual to your list of manuals |
Page 78 highlights
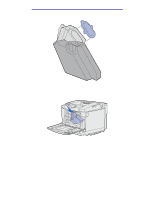
Maintenance 4 Press and release Menu until you see one of the following items based on the one you replaced. Make sure the one you want to select is on the second line of the operator panel. Yellow Toner Magenta Toner Cyan Toner Black Toner Photodev Cart Fuser 5 Press Select. 6 Press and release Menu until you see Replaced, and then press Select. The Saved message appears. Press and release Return until the printer returns to the Ready state. Cleaning the printhead lens Clean the printhead lens when you see print quality problems as mentioned in Solving print quality problems in the Troubleshooting chapter. 1 Turn the printer off. 2 Pull the front door release latch forward and gently lower the front door. See the illustration in step 1 on page 65 if you need help. 3 Remove all of the toner cartridges one at a time. See the illustration in step 2 on page 65 if you need help. 4 Open the top door. See the illustration in step 1 on page 74 if you need help. 5 Remove the photodeveloper cartridge. Complete step 2 on page 74 through step 3 on page 75 to remove the photodeveloper cartridge. Cleaning the printhead lens 78
-
 1
1 -
2
-
3
-
4
-
5
-
6
-
7
-
8
-
9
-
10
-
11
-
12
-
13
-
14
-
15
-
16
-
17
-
18
-
19
-
20
-
21
-
22
-
23
-
24
-
25
-
26
-
27
-
28
-
29
-
30
-
31
-
32
-
33
-
34
-
35
-
36
-
37
-
38
-
39
-
40
-
41
-
42
-
43
-
44
-
45
-
46
-
47
-
48
-
49
-
50
-
51
-
52
-
53
-
54
-
55
-
56
-
57
-
58
-
59
-
60
-
61
-
62
-
63
-
64
-
65
-
66
-
67
-
68
-
69
-
70
-
71
-
72
-
 73
73 -
 74
74 -
 75
75 -
 76
76 -
 77
77 -
 78
78 -
 79
79 -
 80
80 -
 81
81 -
 82
82 -
 83
83 -
84
-
85
-
86
-
87
-
88
-
89
-
90
-
91
-
92
-
93
-
94
-
95
-
96
-
97
-
98
-
99
-
100
-
101
-
102
-
103
-
104
-
105
-
106
-
107
-
108
-
109
-
110
-
111
-
112
-
113
-
114
-
115
-
116
-
117
-
118
-
119
-
120
-
121
-
122
-
123
-
124
-
125
-
126
-
127
-
128
-
129
-
130
-
131
-
132
-
133
-
134
-
135
-
136
-
137
-
138
-
139
-
140
-
141
-
142
-
143
-
144
-
145
-
146
-
147
-
148
-
149
-
150
-
151
-
152
-
153
-
154
-
155
-
156
-
157
-
158
-
159
-
160
-
161
-
162
-
163
-
164
-
165
-
166
-
167
-
168
-
169
-
170
-
171
-
172
-
173
-
174
-
175
-
176
-
177
-
178
-
179
-
180
-
181
-
182
-
183
-
184
-
185
-
186
-
187
-
188
-
189
-
190
-
191
-
192
-
193
-
194
-
195
-
196
-
197
-
198
 |
 |
