Lexmark BDX5495HSN3 User Guide - Page 23
Using the control panel buttons and menus, Using the control panel
 |
UPC - 836367004401
View all Lexmark BDX5495HSN3 manuals
Add to My Manuals
Save this manual to your list of manuals |
Page 23 highlights
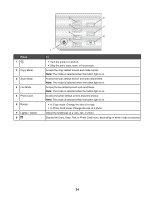
1 2 Use the 1 Scanner unit 2 Print cartridge carrier 3 USB port 4 EXT port 34 5 6 To Access the print cartridges. Install, replace, or remove a print cartridge. Connect the printer to a computer using a USB cable. Connect additional devices, such as a data/fax modem, telephone, or answering machine to the printer. Note: Remove the plug to access the port. EXT 5 LINE port LINE Connect the printer to an active telephone line to send and receive faxes. The printer must be connected to this telephone line to receive incoming fax calls. Note: Do not connect additional devices to the LINE port, and do not connect a DSL (digital subscriber line), ISDN (integrated services digital network), or cable modem to the printer. 6 Power supply with port Connect the printer to a power source. Using the control panel buttons and menus Using the control panel The display shows: • Printer status • Messages • Menus 23
-
 1
1 -
2
-
3
-
4
-
5
-
6
-
7
-
8
-
9
-
10
-
11
-
12
-
13
-
14
-
15
-
16
-
17
-
 18
18 -
 19
19 -
 20
20 -
 21
21 -
 22
22 -
 23
23 -
 24
24 -
 25
25 -
 26
26 -
 27
27 -
 28
28 -
29
-
30
-
31
-
32
-
33
-
34
-
35
-
36
-
37
-
38
-
39
-
40
-
41
-
42
-
43
-
44
-
45
-
46
-
47
-
48
-
49
-
50
-
51
-
52
-
53
-
54
-
55
-
56
-
57
-
58
-
59
-
60
-
61
-
62
-
63
-
64
-
65
-
66
-
67
-
68
-
69
-
70
-
71
-
72
-
73
-
74
-
75
-
76
-
77
-
78
-
79
-
80
-
81
-
82
-
83
-
84
-
85
-
86
-
87
-
88
-
89
-
90
-
91
-
92
-
93
-
94
-
95
-
96
-
97
-
98
-
99
-
100
-
101
-
102
-
103
-
104
-
105
-
106
-
107
-
108
-
109
-
110
-
111
-
112
-
113
-
114
-
115
-
116
-
117
-
118
-
119
-
120
-
121
-
122
-
123
-
124
-
125
-
126
-
127
 |
 |
