Lexmark BDX5495HSN3 User Guide - Page 74
Printing fax activity reports, Setting up Speed Dial numbers, Ringing and Answering, Fax Forward
 |
UPC - 836367004401
View all Lexmark BDX5495HSN3 manuals
Add to My Manuals
Save this manual to your list of manuals |
Page 74 highlights
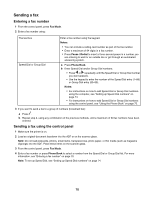
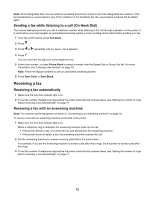
5 Press or repeatedly until Ringing and Answering appears. 6 Press . 7 Press or repeatedly until Fax Forward appears. 8 Press . 9 Press or repeatedly until the setting you want appears. 10 Press . 11 Enter the number to which you want to forward the fax. 12 Press to save the setting. Note: If you select Forward or Print & Forward, Forward will appear in the lower left corner of the fax default menu. To view the selected setting, press repeatedly. Printing fax activity reports 1 From the control panel, press Fax Mode. 2 Press . 3 Press or repeatedly until Fax Setup appears. 4 Press . 5 Press or repeatedly until Reports appears. 6 Press . 7 Press or repeatedly until the type of report you want to print appears. 8 Press . 9 Press or repeatedly until the setting you want appears. 10 Press to print the report. Setting up Speed Dial numbers 1 From the desktop, double-click the Imaging Studio icon. 2 Click Fax. 3 Click Manage fax history or All-In-One fax settings. 4 Click Adjust speed dial list and other fax settings. 5 Click the Speed Dial tab. 6 To add a fax number to your Speed Dial list: a Click the next empty line in the list. b Enter a fax number. c Place the cursor in the Contact Name field. 74
-
 1
1 -
2
-
3
-
4
-
5
-
6
-
7
-
8
-
9
-
10
-
11
-
12
-
13
-
14
-
15
-
16
-
17
-
18
-
19
-
20
-
21
-
22
-
23
-
24
-
25
-
26
-
27
-
28
-
29
-
30
-
31
-
32
-
33
-
34
-
35
-
36
-
37
-
38
-
39
-
40
-
41
-
42
-
43
-
44
-
45
-
46
-
47
-
48
-
49
-
50
-
51
-
52
-
53
-
54
-
55
-
56
-
57
-
58
-
59
-
60
-
61
-
62
-
63
-
64
-
65
-
66
-
67
-
68
-
 69
69 -
 70
70 -
 71
71 -
 72
72 -
 73
73 -
 74
74 -
 75
75 -
 76
76 -
 77
77 -
 78
78 -
 79
79 -
80
-
81
-
82
-
83
-
84
-
85
-
86
-
87
-
88
-
89
-
90
-
91
-
92
-
93
-
94
-
95
-
96
-
97
-
98
-
99
-
100
-
101
-
102
-
103
-
104
-
105
-
106
-
107
-
108
-
109
-
110
-
111
-
112
-
113
-
114
-
115
-
116
-
117
-
118
-
119
-
120
-
121
-
122
-
123
-
124
-
125
-
126
-
127
 |
 |
