Lexmark BDX5495HSN3 User Guide - Page 95
does not print, Start, Settings, Printers and Faxes, Control Panel, Printers - printer drivers
 |
UPC - 836367004401
View all Lexmark BDX5495HSN3 manuals
Add to My Manuals
Save this manual to your list of manuals |
Page 95 highlights
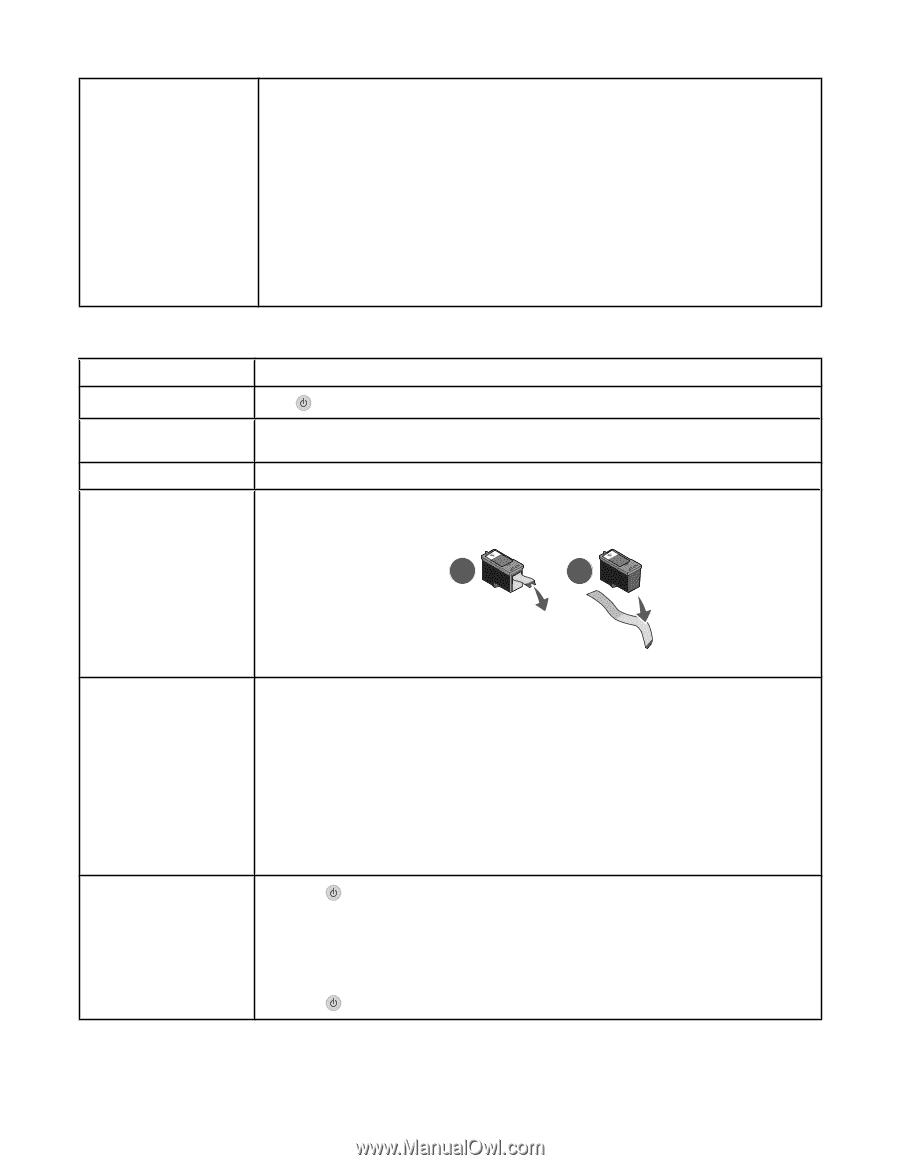
Software may not be installed correctly 1 Uninstall the printer software, and then reinstall it. For more information, see "Removing and reinstalling the software" on page 117. 2 If the software still does not install correctly, visit our Web site at www.lexmark.com to check for the latest software. a In all countries or regions except the United States, select your country or region. b Click the links for drivers or downloads. c Select your printer family. d Select your printer model. e Select your operating system. f Select the file you want to download, and then follow the directions on the computer screen. Page does not print Check messages If an error message is displayed, see "Error messages" on page 110. Check power If the light is not on, see "Power button is not lit" on page 94. Paper may not be loaded Remove and then load paper. correctly Check ink Check the ink levels, and install new print cartridges if necessary. Cartridges may have tape 1 Remove the print cartridges. on them 2 Make sure the sticker and tape have been removed. 1 2 3 Reinsert the cartridges. Make sure the printer is set as the default printer and is not on hold or paused. 1 Click: • In Windows XP Pro: Start Œ Settings Œ Printers and Faxes. • In Windows XP Home: Start Œ Control Panel Œ Printers and Faxes. • In Windows 2000: Start Œ Settings Œ Printers. • In Windows 98/Me: Start Œ Settings Œ Printers. 2 Double-click the name of your printer. 3 Click Printer. • Make sure no check mark appears next to Pause Printing. • Make sure a check mark does appear next to Set As Default. May need to reconnect power supply 1 Press to turn the printer off. 2 Disconnect the power cord from the wall outlet. 3 Gently remove the power supply from the printer. 4 Reconnect the power supply to the printer. 5 Plug the power cord into the wall outlet. 6 Press to turn the printer on. 95
-
 1
1 -
2
-
3
-
4
-
5
-
6
-
7
-
8
-
9
-
10
-
11
-
12
-
13
-
14
-
15
-
16
-
17
-
18
-
19
-
20
-
21
-
22
-
23
-
24
-
25
-
26
-
27
-
28
-
29
-
30
-
31
-
32
-
33
-
34
-
35
-
36
-
37
-
38
-
39
-
40
-
41
-
42
-
43
-
44
-
45
-
46
-
47
-
48
-
49
-
50
-
51
-
52
-
53
-
54
-
55
-
56
-
57
-
58
-
59
-
60
-
61
-
62
-
63
-
64
-
65
-
66
-
67
-
68
-
69
-
70
-
71
-
72
-
73
-
74
-
75
-
76
-
77
-
78
-
79
-
80
-
81
-
82
-
83
-
84
-
85
-
86
-
87
-
88
-
89
-
 90
90 -
 91
91 -
 92
92 -
 93
93 -
 94
94 -
 95
95 -
 96
96 -
 97
97 -
 98
98 -
 99
99 -
 100
100 -
101
-
102
-
103
-
104
-
105
-
106
-
107
-
108
-
109
-
110
-
111
-
112
-
113
-
114
-
115
-
116
-
117
-
118
-
119
-
120
-
121
-
122
-
123
-
124
-
125
-
126
-
127
 |
 |