Lexmark BDX5495HSN3 User Guide - Page 72
Sending a fax while listening to a call (On Hook Dial), Receiving a fax, Receiving a fax automatically
 |
UPC - 836367004401
View all Lexmark BDX5495HSN3 manuals
Add to My Manuals
Save this manual to your list of manuals |
Page 72 highlights
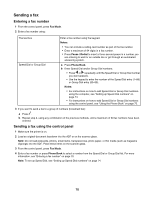
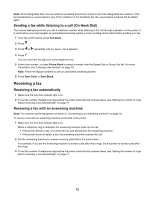
Note: At the designated time, the fax numbers are dialed and the fax is sent to all of the designated fax numbers. If the fax transmission is unsuccessful to any of the numbers on the broadcast list, the unsuccessful numbers will be dialed again. Sending a fax while listening to a call (On Hook Dial) The manual dialing feature lets you dial a telephone number while listening to the call through a speaker on the printer. It is useful when you must navigate an automated answering system or enter a calling card number before sending your fax. 1 From the control panel, press Fax Mode. 2 Press . 3 Press or repeatedly until On Hook Dial appears. 4 Press . You can now hear the dial tone of the telephone line. 5 Enter a fax number, or press Phone Book to select a number from the Speed Dial or Group Dial list. For more information, see "Entering a fax number" on page 70. Note: Press the keypad numbers to use an automated answering system. 6 Press Start Color or Start Black. Receiving a fax Receiving a fax automatically 1 Make sure the Fax Auto Answer light is on. 2 To set the number of telephone rings before the printer automatically receives faxes, see "Setting the number of rings before receiving a fax automatically" on page 77. Receiving a fax with an answering machine Note: You must set up the equipment as shown in "Connecting to an answering machine" on page 18. To receive a fax with an answering machine connected to the printer: 1 Make sure the Fax Auto Answer light is on. When a telephone ring is detected, the answering machine picks up the call. • If the printer detects a fax, it receives the fax and disconnects the answering machine. • If the printer does not detect a fax, the answering machine receives the call. 2 Set the answering machine to answer incoming calls before the printer does. For example, if you set the answering machine to answer calls after three rings, set the printer to answer calls after five rings. 3 To set the number of telephone rings before the printer automatically receives faxes, see "Setting the number of rings before receiving a fax automatically" on page 77. 72
-
 1
1 -
2
-
3
-
4
-
5
-
6
-
7
-
8
-
9
-
10
-
11
-
12
-
13
-
14
-
15
-
16
-
17
-
18
-
19
-
20
-
21
-
22
-
23
-
24
-
25
-
26
-
27
-
28
-
29
-
30
-
31
-
32
-
33
-
34
-
35
-
36
-
37
-
38
-
39
-
40
-
41
-
42
-
43
-
44
-
45
-
46
-
47
-
48
-
49
-
50
-
51
-
52
-
53
-
54
-
55
-
56
-
57
-
58
-
59
-
60
-
61
-
62
-
63
-
64
-
65
-
66
-
 67
67 -
 68
68 -
 69
69 -
 70
70 -
 71
71 -
 72
72 -
 73
73 -
 74
74 -
 75
75 -
 76
76 -
 77
77 -
78
-
79
-
80
-
81
-
82
-
83
-
84
-
85
-
86
-
87
-
88
-
89
-
90
-
91
-
92
-
93
-
94
-
95
-
96
-
97
-
98
-
99
-
100
-
101
-
102
-
103
-
104
-
105
-
106
-
107
-
108
-
109
-
110
-
111
-
112
-
113
-
114
-
115
-
116
-
117
-
118
-
119
-
120
-
121
-
122
-
123
-
124
-
125
-
126
-
127
 |
 |
