Lexmark Prospect Pro205 User's Guide - Page 18
Changing temporary settings into new default settings - won t print color
 |
View all Lexmark Prospect Pro205 manuals
Add to My Manuals
Save this manual to your list of manuals |
Page 18 highlights
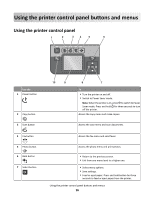
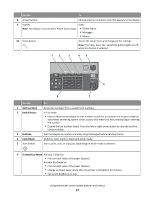
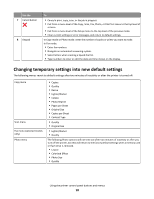
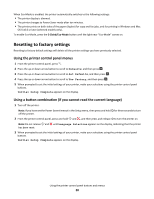
Use the 7 Cancel button 8 Keypad To • Cancel a print, copy, scan, or fax job in progress. • Exit from a menu level of the Copy, Scan, Fax, Photo, or File Print menu to the top level of a menu. • Exit from a menu level of the Setup menu to the top level of the previous mode. • Clear current settings or error messages, and return to default settings. In Copy mode or Photo mode: enter the number of copies or prints you want to make. In Fax mode: • Enter fax numbers. • Navigate an automated answering system. • Select letters when creating a Speed Dial list. • Type numbers to enter or edit the date and time shown on the display. Changing temporary settings into new default settings The following menus revert to default settings after two minutes of inactivity or after the printer is turned off: Copy menu Scan menu Fax menu (selected models only) Photo menu • Copies • Quality • Resize • Lighter/Darker • Collate • Photo Reprint • Pages per Sheet • Original Size • Copies per Sheet • Content Type • Quality • Original Size • Lighter/Darker • Quality The following Photo options will not time out after two minutes of inactivity or after you turn off the printer, but they will return to the factory default settings when a memory card or flash drive is removed. • Layout • Colorized Effect • Photo Size • Quality Using the printer control panel buttons and menus 18
-
 1
1 -
2
-
3
-
4
-
5
-
6
-
7
-
8
-
9
-
10
-
11
-
12
-
 13
13 -
 14
14 -
 15
15 -
 16
16 -
 17
17 -
 18
18 -
 19
19 -
 20
20 -
 21
21 -
 22
22 -
 23
23 -
24
-
25
-
26
-
27
-
28
-
29
-
30
-
31
-
32
-
33
-
34
-
35
-
36
-
37
-
38
-
39
-
40
-
41
-
42
-
43
-
44
-
45
-
46
-
47
-
48
-
49
-
50
-
51
-
52
-
53
-
54
-
55
-
56
-
57
-
58
-
59
-
60
-
61
-
62
-
63
-
64
-
65
-
66
-
67
-
68
-
69
-
70
-
71
-
72
-
73
-
74
-
75
-
76
-
77
-
78
-
79
-
80
-
81
-
82
-
83
-
84
-
85
-
86
-
87
-
88
-
89
-
90
-
91
-
92
-
93
-
94
-
95
-
96
-
97
-
98
-
99
-
100
-
101
-
102
-
103
-
104
-
105
-
106
-
107
-
108
-
109
-
110
-
111
-
112
-
113
-
114
-
115
-
116
-
117
-
118
-
119
-
120
-
121
-
122
-
123
-
124
-
125
-
126
-
127
-
128
-
129
-
130
-
131
-
132
-
133
-
134
-
135
-
136
-
137
-
138
-
139
-
140
-
141
-
142
-
143
-
144
-
145
-
146
-
147
-
148
-
149
-
150
-
151
-
152
-
153
-
154
-
155
-
156
-
157
-
158
-
159
-
160
-
161
-
162
-
163
-
164
-
165
-
166
-
167
-
168
-
169
-
170
-
171
-
172
-
173
-
174
-
175
-
176
-
177
-
178
-
179
-
180
-
181
-
182
 |
 |
